How to enable imagick on your wordpress site – How to enable ImageMagick on your WordPress site is a crucial step for optimizing image performance and functionality. ImageMagick is a powerful tool for image manipulation, and integrating it into your WordPress setup can significantly enhance your website’s image handling capabilities. This guide walks you through the process, from installation to configuration, troubleshooting, and even performance optimization.
This guide will cover everything from installing ImageMagick on your server, regardless of whether you’re using Linux, Windows, or another environment, to configuring it within your WordPress setup. We’ll also touch on essential aspects like security considerations and advanced usage examples.
Introduction to ImageMagick on WordPress: How To Enable Imagick On Your WordPress Site
ImageMagick is a powerful open-source software suite that allows for manipulation and conversion of various image formats. Its role in WordPress often goes unnoticed, but it plays a crucial part in optimizing images for web use and enhancing functionality. From resizing images for different devices to converting between image types, ImageMagick is a versatile tool that significantly improves a WordPress site’s performance and visual appeal.ImageMagick’s integration with WordPress provides several key advantages.
Optimized images load faster, leading to improved user experience and search engine rankings. Complex image manipulations, such as creating thumbnails or applying filters, become simpler and more efficient. This allows for greater flexibility in designing themes and plugins, resulting in more visually engaging and dynamic websites.
Benefits of Using ImageMagick in WordPress
The use of ImageMagick in WordPress offers numerous advantages. Efficient image optimization leads to faster loading times, improving user experience and search engine rankings. This, in turn, results in increased engagement and potentially higher conversion rates.
- Improved Website Performance: Optimized images reduce page load times, a crucial factor in user experience. Faster loading speeds lead to lower bounce rates and higher user engagement. Search engines also prioritize faster websites, positively impacting rankings.
- Enhanced Image Manipulation Capabilities: ImageMagick simplifies complex image manipulations, such as creating thumbnails, resizing images for different devices (desktops, tablets, mobile phones), and applying various filters. This empowers users to customize their websites effectively.
- Cost-Effectiveness: ImageMagick is free and open-source software, unlike some paid image editing solutions. This makes it a cost-effective choice for WordPress users.
- Versatility and Flexibility: ImageMagick supports numerous image formats and offers a wide range of commands for image manipulation. This versatility is invaluable for creating custom functionalities in themes and plugins.
Common Scenarios Where ImageMagick is Helpful
ImageMagick proves invaluable in various WordPress contexts. Its functionality transcends basic image manipulation, enabling more advanced features.
- Responsive Design: Creating different image sizes for various devices (desktop, tablet, mobile) is simplified with ImageMagick. This ensures optimal display and user experience across different screen sizes.
- Custom Thumbnail Generation: Generating custom thumbnails for posts, products, or galleries is a crucial aspect of website design. ImageMagick facilitates the creation of varied thumbnail sizes with ease.
- Image Conversion: Converting images between different formats (JPEG, PNG, GIF) is a common requirement in web development. ImageMagick efficiently handles these conversions.
- Image Optimization: ImageMagick allows for image compression without significant loss of quality, crucial for optimizing image sizes and reducing page load times.
Brief History of ImageMagick and Its Integration with WordPress
ImageMagick has a long history, originating in the early 1990s. Its initial development focused on providing a comprehensive set of tools for image manipulation. Its integration with WordPress is a testament to its adaptability and enduring popularity. Over time, it has become an essential tool for WordPress developers, designers, and users.
- Early Development: ImageMagick’s origins lie in the 1990s, with its development focused on providing a versatile set of image manipulation tools.
- Continued Evolution: The software has consistently evolved, adding new features and functionalities to address emerging needs.
- WordPress Integration: The tool’s adaptability allows for seamless integration into WordPress workflows, allowing users to easily manage and optimize images.
Prerequisites for Installation
Getting ImageMagick up and running on your WordPress site requires careful attention to server-side requirements. This section Artikels the essential prerequisites, ensuring compatibility and a smooth installation process. Ignoring these details can lead to errors and prevent ImageMagick from functioning correctly.Successfully installing ImageMagick involves understanding the necessary server-side configurations and software versions. This crucial step ensures your WordPress environment is correctly set up to leverage ImageMagick’s capabilities.
A thorough understanding of these prerequisites is paramount for a successful installation.
Server-Side Requirements
ImageMagick relies on a compatible web server environment. Your server needs to support the necessary PHP extensions for ImageMagick to interact with WordPress. This includes a robust configuration that allows for smooth communication between the different components.
- Operating System: A stable operating system is essential. Common operating systems like Linux (various distributions), macOS, and Windows Server are compatible with ImageMagick. Specific versions of the OS might have different compatibility requirements, and this can impact the software installation.
- Web Server: The web server (e.g., Apache, Nginx) must be correctly configured to handle the requests related to ImageMagick. Appropriate server settings are crucial for ImageMagick to function correctly.
- PHP Version: A compatible PHP version is essential. Consult the ImageMagick documentation for the latest recommended PHP version. The correct version is critical for compatibility, avoiding unexpected issues during installation and operation.
Software Versions
Precise software versions play a significant role in the installation process. Mismatched versions can lead to compatibility problems, hindering the use of ImageMagick.
- ImageMagick: The specific ImageMagick version should be compatible with the PHP version and server environment. Check the ImageMagick website for the latest stable release and ensure compatibility with your server’s setup.
- PHP Extensions: Ensure the necessary PHP extensions (like GD, or the ImageMagick extension itself) are installed and enabled. The correct PHP extension installation is critical for successful integration of ImageMagick into your WordPress environment.
Essential Configurations and Dependencies
Proper configuration is essential for a smooth ImageMagick installation.
- PHP Extensions: Enable the required PHP extensions in your PHP configuration file (e.g., php.ini). This allows ImageMagick to function within your WordPress environment. Proper configuration of the extensions ensures the smooth operation of ImageMagick within the PHP environment.
- Server Permissions: Ensure that the server user running the web server has the necessary permissions to access and modify the files ImageMagick needs. Appropriate permissions are critical for ImageMagick to interact with files and folders without encountering errors.
- ImageMagick Installation Directory: Ensure the ImageMagick installation directory is accessible and correctly configured. The location of the ImageMagick installation directory impacts its functionality and accessibility.
PHP Extensions and Their Roles
PHP extensions are integral to ImageMagick’s functionality within a WordPress environment.
- GD Library: The GD library is often used in conjunction with ImageMagick for image manipulation. It provides core image manipulation functionalities, and its compatibility with ImageMagick is important for proper image handling.
- ImageMagick Extension: The ImageMagick extension provides direct interaction with the ImageMagick library. It is the primary extension used for ImageMagick functions. This extension facilitates seamless image processing within the WordPress context.
Checklist for a Smooth Installation
A checklist helps ensure a smooth and error-free installation process.
- Verify server-side compatibility (OS, web server, PHP).
- Install the appropriate ImageMagick version.
- Enable the ImageMagick PHP extension in php.ini.
- Configure server permissions for the ImageMagick installation directory.
- Test the ImageMagick functionality with sample code to confirm successful installation.
Installing ImageMagick on Your Server
Installing ImageMagick on your server is a crucial step in enabling its functionalities for WordPress. This process ensures that WordPress can utilize ImageMagick’s powerful image manipulation capabilities, enhancing image optimization, resizing, and other tasks. Proper installation is vital for a smooth and efficient WordPress experience.
Installing on Linux (Debian/Ubuntu)
The `apt-get` package manager simplifies ImageMagick installation on Debian and Ubuntu systems. A simple command executes the process.
- Open your terminal or command prompt.
- Execute the command `apt-get install imagemagick` to download and install the necessary packages.
- After successful installation, verify ImageMagick’s installation with the command `magick -version`. This command will display the ImageMagick version number, confirming successful installation.
Installing on Linux (CentOS/RHEL)
CentOS and RHEL systems utilize `yum` for package management. This method is similar to the Debian/Ubuntu approach.
- Open your terminal or command prompt.
- Execute the command `yum install ImageMagick` to download and install the ImageMagick package.
- Confirm installation by running `magick -version` in your terminal.
Installing on Windows
Windows systems typically require a different approach for ImageMagick installation. Manual downloads and installations are generally preferred over package managers.
- Download the appropriate ImageMagick Windows installer package from the official ImageMagick website. Choose the appropriate version matching your Windows architecture.
- Run the installer and follow the on-screen instructions to complete the installation process. This usually involves selecting installation directories and components.
- Verify the installation by opening a command prompt or PowerShell window. Type `magick -version` and press Enter. If ImageMagick is installed correctly, the version information will be displayed.
Compiling ImageMagick from Source Code
Compiling ImageMagick from source code offers more control over the installation process, allowing users to select specific libraries or configure settings. However, this process often requires a greater level of technical expertise.
- Download the ImageMagick source code archive from the official ImageMagick website.
- Extract the archive to a suitable directory.
- Compile the source code using a compiler (like GCC) and the necessary libraries. Detailed instructions on compilation steps can be found in the ImageMagick documentation.
- After successful compilation, verify the installation by running the `magick` command to check the version.
Installation Summary Table
This table summarizes the installation procedures across various server environments.
| Server Type | Installation Command | Verification Command |
|---|---|---|
| Linux (Debian/Ubuntu) | apt-get install imagemagick |
magick -version |
| Linux (CentOS/RHEL) | yum install ImageMagick |
magick -version |
| Windows | Download and run the installer | Open a command prompt or PowerShell, type `magick -version` |
Configuring ImageMagick in WordPress
Configuring ImageMagick for use within WordPress involves several crucial steps beyond the initial installation. Proper configuration ensures ImageMagick functions seamlessly with your plugins and themes, handling image manipulation tasks efficiently. This section details the essential steps for smooth integration.
Configuring ImageMagick for WordPress Plugins and Themes
ImageMagick integration with WordPress plugins and themes requires specific configuration. Plugins that rely on ImageMagick functions need to be aware of the ImageMagick installation path and environment variables. Themes that utilize image manipulation often use functions that interact with the ImageMagick library. Proper configuration avoids errors and ensures that plugins and themes can access the ImageMagick library without issues.
Setting Environment Variables for ImageMagick
Environment variables provide a way to tell applications, such as PHP, where to find ImageMagick libraries and configuration files. This is crucial for ImageMagick to function correctly within the WordPress environment. Setting these variables allows ImageMagick to be accessed and used by WordPress.
- System-level configuration is the most common method. This involves setting environment variables in your operating system’s configuration. The exact procedure varies depending on the operating system, but it typically involves adding lines to configuration files, such as the `.bashrc` or `.bash_profile` files on Linux/macOS or equivalent system files on other platforms. This ensures that ImageMagick is available system-wide.
- PHP-specific configuration: Setting environment variables directly within your PHP configuration can be useful for controlling access to ImageMagick within specific WordPress environments. If you’re using a dedicated server or hosting platform, you might need to adjust the PHP configuration files to specify the location of the ImageMagick libraries.
File Permissions for ImageMagick Operations
Appropriate file permissions are essential for ImageMagick operations. WordPress and ImageMagick require access to files and directories involved in image manipulation. Incorrect permissions can lead to errors or failures when processing images. It’s important to grant appropriate read and write permissions to ImageMagick’s temporary files and directories.
- Verify that the user running the web server (often `www-data` or `apache`) has read and write access to the directories where ImageMagick temporary files are stored.
- Verify that the user running the web server has read and write access to the directories containing the image files being processed by ImageMagick.
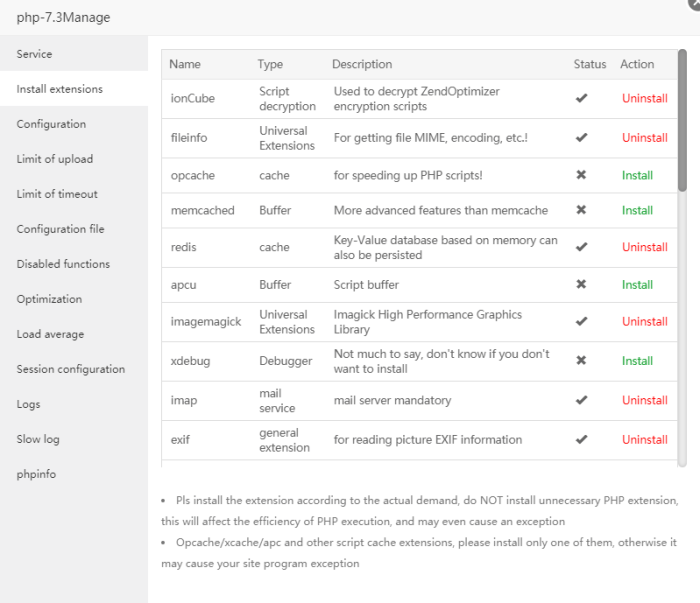
Configuring PHP Extensions
The PHP extension for ImageMagick needs to be enabled and configured correctly. This involves ensuring that the necessary PHP extension is loaded and that the correct path to the ImageMagick libraries is specified.
- Enable the ImageMagick extension in your PHP configuration file (e.g., php.ini). Look for the `extension=imagick.so` line and ensure it’s uncommented. If the extension is missing, install it via your system’s package manager or appropriate hosting provider tools.
- Ensure the PHP extension can find the ImageMagick libraries. The correct path to the ImageMagick library files must be specified within the PHP configuration. Verify that the path matches the actual location of the ImageMagick installation on your server.
Setting the Correct Paths for ImageMagick
Setting the correct paths for ImageMagick is crucial for the PHP extension to locate the necessary libraries. Inaccurate paths will result in errors and prevent ImageMagick from working correctly.
- The path to the ImageMagick installation directory should be correctly configured within your system environment variables and PHP configuration files.
- Verify the paths to ImageMagick libraries and configuration files within your PHP configuration to ensure that they point to the correct locations.
Troubleshooting Common Issues
ImageMagick, while powerful, can sometimes present challenges during installation and configuration on a WordPress site. This section details common pitfalls and provides practical solutions to get your site running smoothly with ImageMagick. Understanding these troubleshooting steps is crucial for a seamless workflow.Troubleshooting ImageMagick issues often involves a systematic approach. Begin by carefully reviewing the error messages and examining potential compatibility problems.
Identifying the source of the problem is often the first step towards a resolution.
ImageMagick Installation Errors
Common installation errors include permission issues, missing dependencies, and incorrect configuration files. These errors frequently manifest as cryptic error messages within your server logs. Analyzing these messages is essential for pinpointing the root cause.
- Permission Errors: ImageMagick needs specific permissions to write to and read from directories during installation. Insufficient permissions can halt the installation process. Verify that the user account running the installation process has the necessary write access to the designated directories.
- Missing Dependencies: ImageMagick often relies on other software packages. If a required dependency is missing, the installation will fail. Review the ImageMagick installation instructions to identify and install any missing packages.
- Incorrect Configuration Files: Errors in the configuration files, like incorrect paths or syntax issues, can lead to installation failures. Carefully review the configuration files for accuracy and correctness. Ensure that the paths are correct and that the syntax adheres to the ImageMagick documentation.
PHP Extension Compatibility
PHP extensions often play a crucial role in ImageMagick’s functionality. Compatibility problems can arise if the PHP extension isn’t correctly installed or if there are conflicting versions.
- Version Mismatches: Incompatible versions of PHP and ImageMagick can lead to errors. Ensure that the PHP version you are using is compatible with the ImageMagick library.
- Extension Activation: The ImageMagick PHP extension needs to be activated in your PHP configuration. Verify that the extension is enabled in your PHP configuration file and that the path to the ImageMagick library is correctly specified.
- Conflicting Extensions: Sometimes other PHP extensions might interfere with ImageMagick. Investigate if any conflicting extensions are present and potentially disable or update them.
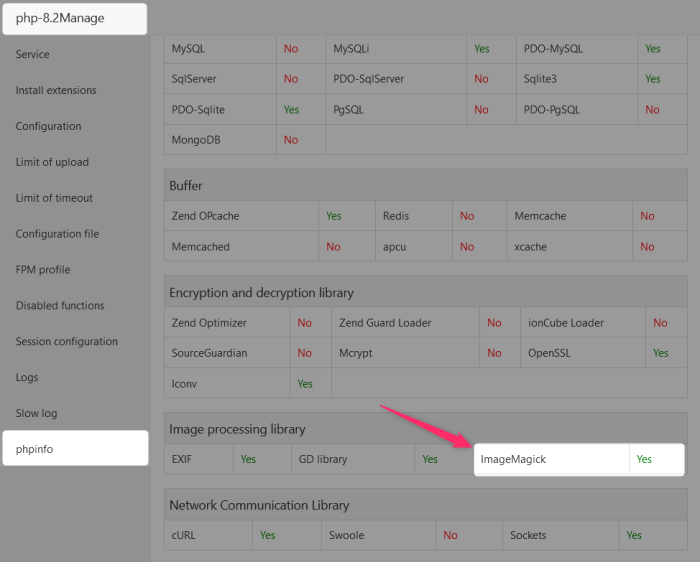
Verifying ImageMagick Functionality
Verifying ImageMagick’s functionality within WordPress is vital to ensure everything is operating correctly.
Figuring out how to enable Imagick on your WordPress site can be tricky, but it’s a crucial step for various website enhancements. While you’re focusing on technical aspects like this, it’s also important to consider smart marketing objectives for private schools, such as smart marketing objectives for private schools to attract more students. Ultimately, enabling Imagick will help your WordPress site run smoother and better support your website’s visual content, so keep an eye out for more tips on this in future posts.
- PHP Script Tests: Run simple PHP scripts designed to test ImageMagick functions. This will help you identify whether the ImageMagick PHP extension is working as expected.
- WordPress Plugins: Check if WordPress plugins designed to interact with ImageMagick are running correctly. Issues with plugins can indicate a problem with the core ImageMagick integration.
Resolving File Permissions
Correct file permissions are crucial for ImageMagick to access and modify files.
Figuring out how to enable Imagick on your WordPress site can sometimes feel like navigating a maze. But once you get the hang of it, you’ll be able to handle more complex images for your site. This process is crucial, especially if you’re planning on selling car parts online with WordPress, as high-quality images are key. Check out this guide on how to sell car parts online with WordPress for some inspiration on showcasing your inventory.
Ultimately, enabling Imagick correctly will boost your WordPress site’s visual appeal and overall performance.

- Identifying Incorrect Permissions: Use your server’s file management tools to examine the permissions of relevant directories and files, ensuring the correct permissions are set for the web server user.
- Setting Correct Permissions: Adjust the file permissions for directories and files to grant the necessary read and write access to the web server user. The correct permissions depend on your server setup.
- Example: Use `chmod 755` to give read and write access to the user and read access to others.
Optimizing ImageMagick Performance
ImageMagick, while powerful, can sometimes struggle with large image files or complex manipulations, impacting WordPress site performance. Optimizing its performance within your WordPress setup is crucial for a smooth user experience. This section details techniques to boost ImageMagick’s efficiency, ensuring your site remains responsive and efficient.
Handling Large Image Files
Large image files can significantly slow down ImageMagick processing. Employing strategies to reduce the size of these files before processing is a critical step. Optimizing image compression, using formats like WebP (for modern browsers), and resizing images to appropriate dimensions before upload are key techniques. This prevents ImageMagick from having to manipulate excessively large data sets, leading to quicker processing times.
Consider using image optimization plugins for WordPress to automate this process.
Efficient Image Manipulation Code Snippets
Employing efficient code snippets for image manipulation within ImageMagick commands directly can significantly impact performance. Avoid unnecessary operations, prioritize using optimized libraries, and choose appropriate parameters. Using dedicated ImageMagick functions for specific tasks, rather than a general approach, can lead to substantial performance gains.
Example: Instead of using a series of resize and crop operations, use a single command combining both tasks. This reduces processing overhead.
Caching Mechanisms
Caching ImageMagick-processed images is an essential optimization strategy. Store the output of ImageMagick manipulations in a cache. This technique prevents repeated processing of the same images, significantly improving response time. Implement a caching mechanism to store generated thumbnails, resized images, and other processed outputs. Utilizing WordPress’s built-in caching plugins can streamline this process.
Choosing the Correct ImageMagick Libraries
Selecting the appropriate ImageMagick libraries for your server environment directly impacts performance. Consider factors such as the specific version of ImageMagick, the server’s operating system, and the version of PHP you’re running. Using a compatible and optimized library ensures seamless interaction and efficient execution. Ensure that the chosen library aligns with your server’s architecture and software stack for optimal results.
Verify that the chosen library is well-maintained and regularly updated to address any potential vulnerabilities.
Security Considerations
ImageMagick, while a powerful tool, presents potential security vulnerabilities if not properly configured and managed. Careless installations or improper access controls can expose your WordPress site to various threats, from simple script injection to more sophisticated attacks. Understanding these risks and implementing robust security measures is crucial for safeguarding your website and user data.Protecting your ImageMagick installation is paramount, especially in a WordPress environment where many users rely on its functionality.
Failing to address security concerns can lead to compromised site integrity, data breaches, and reputational damage. This section Artikels essential security considerations and best practices to mitigate these risks.
Figuring out how to enable Imagick on your WordPress site can be a bit tricky, but it’s definitely doable. Once you’ve mastered that, you might be interested in streamlining user journeys. Have you considered exploring the best user onboarding platforms, like Appcues, Stonly, or Userpilot? A comprehensive comparison like discover the best user onboarding platforms appcues vs stonly vs userpilot a detailed comparison can help you decide which platform is right for your needs.
Ultimately, understanding how to enable Imagick will make your WordPress site run smoothly.
Potential Security Risks
ImageMagick, due to its complex scripting capabilities, can be vulnerable to malicious code injection. An attacker might exploit vulnerabilities to execute arbitrary code on your server, potentially gaining unauthorized access or even deploying malware. Improper handling of user-supplied input, especially in image processing requests, can create security loopholes. For instance, if an attacker uploads a specially crafted image file, ImageMagick might inadvertently execute harmful code within that file.
Best Practices for Securing ImageMagick Installations
Ensuring the security of your ImageMagick installation involves several critical steps. These include limiting access to the ImageMagick binaries and processes. Restricting access to only necessary users and roles is crucial. Using strong, unique passwords for all accounts associated with your server is also essential. Employing regular security audits and updates to ImageMagick’s software is also critical to address any identified vulnerabilities.
Restricting Access to ImageMagick’s Functionality
Limiting the functionality ImageMagick has access to is vital. One approach is to restrict which directories ImageMagick can read and write to. This is accomplished through careful configuration of the ImageMagick installation and your server’s file system permissions. You should also configure your web server to prevent direct access to ImageMagick binaries. This approach prevents attackers from directly interacting with ImageMagick without proper authentication.
Using Apache or Nginx, you can configure directives to restrict access based on IP addresses or user roles.
Secure Coding Practices
Employing secure coding practices within your WordPress plugins and themes that use ImageMagick is critical. Always sanitize and validate any user-supplied data before passing it to ImageMagick for processing. This includes input from forms, URLs, or uploaded files. Using parameterized queries or prepared statements when interacting with ImageMagick can help prevent SQL injection vulnerabilities.
Recommendations for Protecting Against Malicious Attacks
To bolster your ImageMagick security posture, consider these recommendations:
- Regularly update ImageMagick: Keeping ImageMagick updated is crucial as security patches are often released to address newly discovered vulnerabilities. The latest versions often include critical security fixes.
- Employ strong passwords: Use strong, unique passwords for all accounts related to your ImageMagick installation and server access.
- Restrict file access: Limit the directories and files ImageMagick can read and write to.
- Disable unnecessary features: Disable any features or modules of ImageMagick that are not required for your specific needs.
- Implement input validation: Validate all user-supplied data before processing it to prevent malicious input from being executed by ImageMagick.
Restricting Access Using File System Permissions
Controlling file system permissions is a crucial aspect of ImageMagick security. By meticulously setting appropriate permissions, you can significantly limit the scope of potential attacks. Only grant necessary access to directories and files used by ImageMagick, limiting the impact of any security breach. A thorough understanding of your server’s file system and appropriate permissions for different user accounts is crucial.
Utilizing Web Server Configuration
Employing web server configuration (e.g., Apache or Nginx) can provide an additional layer of security. Configuring directives to restrict access based on IP addresses or user roles further enhances protection against unauthorized access. This approach prevents direct interaction with ImageMagick without proper authentication.
Advanced Usage and Examples
ImageMagick’s power extends far beyond basic image resizing and cropping. In WordPress, leveraging its advanced functionalities allows for intricate image manipulations, custom transformations, and the integration of watermarks and logos, ultimately enhancing your site’s visual appeal and user experience. This section explores practical examples and demonstrates how to implement these techniques within your WordPress workflow.
Custom Image Manipulations
Custom image manipulations within WordPress often involve complex transformations that require precise control over various parameters. ImageMagick provides the flexibility to tailor these transformations to your specific needs. For instance, you might want to apply a sepia tone to images in a particular category or rotate images by a specific angle. These tasks can be automated through functions, plugins, or custom code, significantly streamlining your workflow.
Complex Image Transformations, How to enable imagick on your wordpress site
ImageMagick excels in handling complex image transformations. You can combine multiple operations like resizing, cropping, color adjustments, and applying filters to achieve sophisticated effects. For example, a plugin could automatically convert uploaded images to a specific format, resize them to multiple dimensions, and apply a custom filter to enhance visual quality. This automation frees up your time and resources.
Creating Watermarks and Logos
Integrating watermarks and logos into images is a common practice to protect your content and maintain brand consistency. ImageMagick offers robust tools to accomplish this. You can create custom watermarks with text, logos, or graphics and apply them to images automatically. For example, you could set up a plugin that adds a watermark to every uploaded image, preventing unauthorized use.
This is particularly useful for protecting original images or branding.
Table: ImageMagick Usage in WordPress Contexts
| Context | Description | ImageMagick Usage |
|---|---|---|
| Featured Images | Optimizing featured images for display and | Resize and compress featured images for different display sizes on the site, improving page load times and |
| Thumbnails | Generating different sizes of thumbnails for various display purposes | Generate multiple sizes of thumbnails for posts, pages, and other content areas. This ensures optimal display across various screen resolutions and devices. |
| Custom Post Types | Dynamic image handling for custom post types | Automatically resize images for custom post types, ensuring consistent image sizes and formats. This allows for flexible and standardized image handling across the site. |
End of Discussion

In conclusion, enabling ImageMagick on your WordPress site opens a world of possibilities for image manipulation and optimization. By following this guide, you’ll be well-equipped to handle images effectively, boosting your website’s performance and user experience. Remember to address potential security concerns and always optimize for efficiency. This comprehensive guide empowers you to confidently integrate ImageMagick into your WordPress workflow.