How to add an audio music player widget in WordPress? This guide dives deep into the world of integrating captivating audio into your WordPress site. From selecting the perfect plugin to mastering advanced customization, we’ll equip you with the knowledge to create a seamless and engaging audio experience for your visitors. We’ll cover everything from simple installation to advanced features, ensuring your audio player is not just functional but also aesthetically pleasing and accessible.
We’ll explore the various options available for audio players, comparing popular plugins and highlighting key features to consider. Learning the ins and outs of embedding audio files, setting up playback controls, and styling the player for a cohesive design will be a key component. We’ll also discuss essential considerations for responsive design, security, and accessibility, providing you with a comprehensive approach to integrating audio into your WordPress site.
Introduction to Audio Music Players in WordPress
Adding audio to your WordPress site is a great way to enhance user experience and engage your audience. Audio players provide a convenient and organized way to present music, podcasts, or other audio content, improving the overall presentation of your site. This is particularly useful for blogs, websites with podcasts, and other platforms that rely heavily on audio content.
A well-integrated audio player seamlessly blends into the design, offering a positive user experience.WordPress audio players are designed to handle audio files efficiently, providing controls for playback, pausing, and volume adjustments. They often integrate with common file formats and allow for easy customization. The key is to choose a player that complements your site’s aesthetic and functionality, while ensuring a smooth user experience.
Different Types of Audio Players
Various audio player plugins and widgets are available for WordPress, each with its own features and capabilities. Some are simple, offering basic playback controls, while others are more advanced, allowing for playlist management, metadata display, and more sophisticated controls. Free options are widely available, though premium plugins may offer extra features and support.
Dedicated Audio Player Widgets vs. Embedding Code
Using a dedicated WordPress audio player widget offers several advantages over embedding audio player code. Widgets are typically more user-friendly and easier to integrate. They are often designed to be compatible with WordPress’s theme and functionality, ensuring a better user experience. Furthermore, widgets usually provide a more seamless experience with WordPress’s other features, avoiding potential conflicts with theme designs or other plugins.
Integrating Audio Files
There are several ways to integrate audio files into a WordPress site. The most common method involves uploading the audio file to your WordPress media library. Once uploaded, the file can be embedded into posts or pages using the media library features. Some plugins might offer more advanced options for managing audio files, including organizing them into playlists or albums.
Alternatively, some players might allow for direct links to audio files hosted elsewhere, such as on a separate server.
Accessibility Considerations
Accessibility is a crucial factor when choosing an audio player. A good audio player should provide options for adjusting volume, providing transcripts, and alternative text descriptions for audio files. This is essential for users with disabilities, ensuring inclusivity and accessibility. Properly implementing these features helps create a more comprehensive and inclusive user experience. Consideration of users with hearing impairments is paramount, and the availability of transcripts and captions significantly improves accessibility.
Choosing a WordPress Audio Player Plugin
Selecting the right audio player plugin for your WordPress site is crucial for a seamless user experience. A well-integrated player enhances engagement, improves accessibility, and ultimately boosts your website’s overall effectiveness. The abundance of options available can feel overwhelming, so careful consideration of key features and user feedback is essential.Different plugins cater to diverse needs, from simple, straightforward players to sophisticated solutions with advanced customization.
Understanding the options and their nuances will guide you towards the ideal plugin for your website.
Popular WordPress Audio Player Plugins
Various plugins offer audio player functionality for WordPress. Some of the more popular choices include:
- Easy Audio Player: Known for its straightforward design and ease of use, this plugin is ideal for those seeking a simple, effective solution.
- Audio Player Pro: This plugin provides a wide range of customization options and advanced features.
- WP Audio Player: A popular choice due to its versatility and extensive support community.
- Simple Audio Player: This plugin offers a clean, minimalist interface that is perfect for websites with a focus on simplicity.
- Audio Player by CodeCanyon: Often providing high-quality audio players with a wide range of functionalities.
Comparison of Audio Player Plugins
A comparison of popular audio player plugins highlights key differences in their functionalities. This helps in choosing the plugin that best suits your needs and aesthetic.
| Plugin | Features | Ease of Use | Customization |
|---|---|---|---|
| Easy Audio Player | Basic playback controls, simple styling options. | Very easy | Limited |
| Audio Player Pro | Advanced controls, multiple skins, and playlist options. | Moderate | Extensive |
| WP Audio Player | Versatile playback controls, integration with various media types. | Easy | Moderate |
| Simple Audio Player | Clean interface, basic playback controls, ideal for simplicity. | Very easy | Limited |
| Audio Player by CodeCanyon | Wide range of functionalities, potentially premium features. | Variable | Extensive |
Factors to Consider When Selecting a Plugin
Several factors influence the selection of an audio player plugin. Consider the following:
- User Experience: A user-friendly interface and intuitive controls enhance user engagement.
- Customization Options: The ability to tailor the player’s appearance and functionality to your website’s design and needs is essential.
- Integration with Existing Themes: Compatibility with your chosen WordPress theme prevents conflicts and ensures a smooth visual experience.
- Support and Documentation: A strong support community and clear documentation are beneficial for troubleshooting and gaining further insight.
- Pricing: Understand the licensing and pricing models to determine the long-term cost-effectiveness of a particular plugin.
Importance of User Reviews and Ratings
User reviews and ratings provide valuable insights into a plugin’s performance, functionality, and user experience. Thorough review analysis helps assess the plugin’s reliability and suitability for your website.
Customization Options
Plugins offer varying degrees of customization. Some allow basic adjustments, while others provide extensive control over player aesthetics and functionalities. This flexibility is crucial for aligning the player with your website’s overall design.
Installing and Configuring the Chosen Plugin: How To Add An Audio Music Player Widget In WordPress
Getting your chosen audio player plugin up and running in WordPress is straightforward. This section provides a detailed walkthrough, guiding you through the installation and configuration process. Following these steps ensures a smooth integration and optimal functionality.This process assumes you’ve already selected a suitable plugin from the previously discussed options. The specific steps might vary slightly depending on the chosen plugin, but the general principles remain consistent.
Installation Steps
A well-structured installation process is crucial for a seamless plugin integration. The following table Artikels the typical steps involved in installing a WordPress audio player plugin.
| Step | Action |
|---|---|
| 1 | Navigate to the Plugins section in your WordPress dashboard. |
| 2 | Click on the “Add New” button. |
| 3 | Use the search bar to find your chosen audio player plugin. |
| 4 | Click on “Install Now” next to the plugin’s listing. |
| 5 | Confirm the installation by clicking “Activate.” |
Plugin Configuration
Once installed, you’ll need to configure the plugin to meet your specific needs. This section details common configuration options.
- General Settings: These settings typically involve basic parameters such as the default playback controls, theme integration, and player appearance options.
- Audio File Management: This section usually lets you define where audio files are stored and how they’re organized. You may have options to automatically detect files in specific folders or manually upload them. The plugin will likely provide a visual representation of your audio files for easy selection and management.
- Player Appearance: The player’s visual aspects, such as color schemes, button styles, and overall design, are often customizable. These options are typically presented as visual controls and menus within the plugin’s configuration panel. This allows you to match the player’s aesthetic with your website’s theme.
Uploading and Selecting Audio Files
The process of uploading and selecting audio files for playback is typically straightforward. The chosen plugin will usually have a dedicated section within the configuration panel to manage your audio files. This section will often present an interface that resembles a file explorer, allowing you to locate and select the audio files you wish to include.
Customizing Player Appearance
A wide range of options for the player’s appearance are usually available. These customizations might include:
- Color Scheme: Select from a range of colors or create custom color combinations to match your website’s color palette.
- Design Templates: Some plugins provide pre-designed templates that you can use as a starting point for your player’s design.
- Custom CSS: For advanced customization, you can use custom CSS to further tailor the audio player’s look and feel. This allows you to control aspects like font styles, button sizes, and layout arrangements.
Integrating the Audio Player into WordPress Pages and Posts

Now that you’ve chosen and installed your audio player plugin, it’s time to seamlessly integrate it into your WordPress posts and pages. This crucial step allows your readers to easily listen to the audio content you’ve created. Proper integration is key to a positive user experience, ensuring your audio content is easily accessible and enjoyable.
Different methods exist for embedding audio players within your WordPress content. These methods vary depending on the plugin you’ve chosen, but the underlying principle remains the same: to make the audio easily accessible to your readers. Shortcodes are a common and effective way to achieve this. We’ll explore these methods in detail, demonstrating how to tailor the audio player’s appearance and position within your posts and pages.
Methods for Embedding Audio Players
Several methods allow for embedding the audio player within WordPress posts and pages. The best approach depends on the specific functionality offered by your chosen plugin.
Adding an audio music player widget to your WordPress site is surprisingly straightforward. First, you’ll need to choose a suitable plugin. Then, understanding how to craft engaging content is crucial for keeping your audience interested. For a deeper dive into creating quality content, check out this helpful guide on creating quality content what it is and how to do it.
Once you’ve got that sorted, you can easily configure the widget to play your favorite tracks, further enhancing your site’s audio experience.
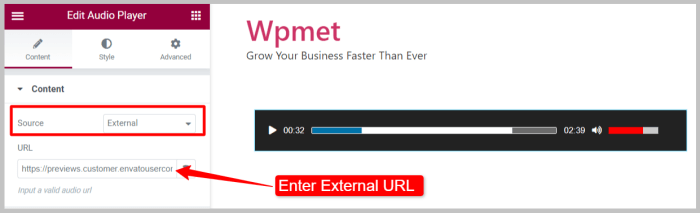
- Using the Plugin’s Shortcode: Most audio player plugins provide a shortcode for embedding the player. This shortcode is typically generated within the plugin’s interface when you upload or select your audio file. Copy this shortcode and paste it directly into the WordPress editor where you want the audio player to appear. This is the simplest and most straightforward method.
The shortcode is usually specific to the plugin, containing information such as the audio file path and playback options.
- Using the Plugin’s Widget: Some plugins might allow you to create a widget for your audio player. Widgets are self-contained modules that can be placed in designated areas of your WordPress theme. This method provides more control over the placement of the audio player but might require a bit more technical knowledge. Placing the widget in the appropriate sidebar or other designated area is essential for visibility.
- Customizing the HTML Embed Code: Advanced users may choose to embed the audio player using custom HTML. This approach is best suited for users familiar with HTML and CSS. This option offers maximum flexibility for customizing the player’s appearance and behavior. However, this method may not be as user-friendly for beginners.
Examples of Embedding Audio Players in Different Content Types
The method for embedding audio players remains consistent across different content types like posts and pages. The shortcode or embed code, generated by the plugin, is the common denominator.
- Blog Posts: Integrate the audio player into blog posts to provide an engaging listening experience for your readers. The player should be positioned strategically within the post content, perhaps after the introduction or within a relevant section. Placement considerations include maintaining readability and flow.
- Product Pages: For online stores, integrate audio players into product pages to provide detailed product information, background information, or instructions in an auditory format. The audio player can be positioned to complement the product images and descriptions.
- About Us Pages: On “About Us” pages, incorporate audio players to share company history or the team’s perspectives in an engaging way. This adds another dimension to the information presented.
Customizing Audio Player Position and Size
Most audio player plugins offer options for customizing the position and size of the audio player within your WordPress posts and pages. These options usually involve adjustments within the plugin’s settings or configuration panel.
Using Shortcodes for Embedding
Shortcodes are a crucial tool for embedding audio players. They allow for dynamic insertion of audio player elements into your WordPress content without needing to manually write HTML. This method streamlines the process and enhances usability.
Example:
[audioplayer file="your_audio_file.mp3"]
This example assumes a shortcode for the “audioplayer” plugin. The specific shortcode format will vary depending on your chosen plugin.
Adding an audio music player widget to your WordPress site is a straightforward process, often involving plugins. Thinking beyond just your website, though, consider future content distribution leveraging multi channel strategies like podcasts and social media. This broader approach, as discussed in future content distribution leveraging multi channel strategies , can significantly boost your reach. Ultimately, integrating a quality audio player widget is key for engaging your audience, whether it’s on your main site or expanded platforms.
Responsive Design Considerations
| Screen Size | Audio Player Appearance |
|---|---|
| Desktop (≥992px) | Full-width player, potentially with larger controls |
| Tablet (768-991px) | Adaptive width to fit the screen, potentially with slightly smaller controls |
| Mobile (≤767px) | Adaptive width to fit the screen, smaller controls for easy touch interaction |
Responsive design is crucial for ensuring a consistent user experience across various screen sizes. The audio player should adapt seamlessly to different resolutions and devices. The table demonstrates the expected appearance of the player on different screen sizes.
Advanced Customization Options
Once you’ve chosen and installed your audio player plugin, you’ll likely want to tailor its appearance and functionality to match your website’s design and user experience. This section dives into advanced customization options, from controlling player controls to adding playlist support and styling the player with CSS.Advanced customization empowers you to create a seamless audio experience. You can fine-tune the player’s visual elements and add functionalities like playlist management, significantly enhancing user interaction and visual appeal.
Customizing Player Controls
The core controls of an audio player (play/pause, volume, progress bar) are usually customizable. Different plugins offer various levels of control. For instance, some allow you to change the appearance of the play/pause buttons, adjust the size and color of the volume slider, or modify the progress bar’s style. These changes enhance the visual integration of the player with your website’s design.
Adding Playlist Support
Playlist support is a crucial feature for users who want to listen to a series of tracks sequentially. Most modern audio player plugins support playlists. This allows users to navigate through multiple tracks without needing to manually select each one. Adding playlist support enhances user engagement and convenience. The playlist could be a simple list or a more advanced feature with controls to shuffle or repeat tracks.
Styling the Audio Player with CSS
CSS allows you to fully integrate the audio player into your existing theme’s design. By targeting the specific HTML elements generated by the plugin, you can change colors, fonts, and layout to align with your site’s aesthetic. This is crucial for maintaining a consistent design across all elements of your website. Use CSS selectors carefully to target specific elements of the player, ensuring your changes affect only the desired areas and don’t conflict with other parts of your theme.
Comparison of Advanced Customization Features
| Plugin | Playlist Support | Customizable Controls | CSS Styling | Other Features |
|---|---|---|---|---|
| Plugin A | Yes (Simple list) | Yes (Play/pause, volume) | Limited | No other significant features |
| Plugin B | Yes (Advanced options: shuffle, repeat) | Yes (Extensive control over visuals) | Extensive | Download option, track information display |
| Plugin C | Yes (Customizable playlist layout) | Yes (Control over individual buttons and slider) | Moderate | Integration with social media platforms |
This table provides a simplified comparison. The features and options available might vary depending on the specific plugin version. Thoroughly review the documentation of the plugin you choose to understand the full scope of customization. Be aware that while CSS styling is possible, the effectiveness of the customization depends on the plugin’s structure and documentation.
Troubleshooting Common Issues
Adding an audio player to your WordPress site can sometimes lead to unexpected problems. Understanding common issues and their solutions can save you valuable time and frustration. This section will equip you with the knowledge to diagnose and fix common playback errors, formatting issues, and plugin compatibility problems.Troubleshooting audio players involves a methodical approach. Start by identifying the specific error you’re encountering.
Is it a playback issue, a formatting problem, or a compatibility problem with your chosen plugin or theme? Careful observation and documentation of the problem will greatly improve the efficiency of your troubleshooting process.
Playback Errors
Identifying playback errors, such as the audio not playing at all or stopping unexpectedly, is crucial. The first step is to check the audio file itself. Ensure the file is properly encoded and the correct format is used. Common formats include MP3, WAV, and OGG. Verify that the file is not corrupted or damaged.
If the file is correctly formatted, next inspect the plugin settings. Make sure the file path is correctly configured within the plugin. Double-check the plugin’s settings for any specific parameters that could affect playback. If the audio is still not playing, consider reviewing your browser’s settings and ensuring that sound is enabled. If the error persists, a server-side issue might be the cause.
Ensure your server’s audio processing capabilities are sufficient to handle the file.
Incorrect Formatting Issues, How to add an audio music player widget in wordpress
Incorrect formatting can lead to various problems, such as the audio playing at the wrong speed or with distorted sound. This can stem from issues with the audio file itself, or problems with the audio player plugin. Ensure the audio file is the correct format and that the file paths are accurately reflected in the plugin’s configuration. Also, ensure that the file names are not overly long or contain special characters that might cause issues.
In case of incorrect formatting, the plugin might not be able to handle the audio file type.
Plugin Compatibility Issues
Plugin compatibility problems are another common cause of audio player issues. Different themes and plugins might have conflicting functionalities. The problem could stem from incompatibility between your theme and the audio player plugin. To resolve this, check the plugin’s documentation for compatibility information with your theme. Sometimes, updates to your theme or plugins might cause the audio player to malfunction.
Consider updating the plugin to the latest version or reverting to a previous version if necessary. Another approach is to try a different audio player plugin. Some plugins might work better with your theme than others.
Debugging Audio Player Problems
Debugging audio player problems involves a systematic approach. First, review the error messages displayed by the browser or the plugin. These messages can offer clues about the underlying issue. Next, check the plugin’s logs for any error messages or warnings. These logs often contain valuable information about the plugin’s behavior.
Enable debugging mode in the plugin settings to see more detailed information. Isolate the problem by disabling other plugins temporarily. This helps to identify if any other plugins are interfering with the audio player. Check for any browser extensions that might be impacting the audio playback.

Common Issues and Solutions
| Issue | Solution |
|---|---|
| Audio file not playing | Check file format, file path, and file permissions. Ensure the audio file is not corrupted. |
| Audio plays at the wrong speed or with distortion | Verify the audio file format and ensure it is compatible with the plugin. Check file paths and the plugin’s settings. |
| Plugin not compatible with theme | Review the plugin’s documentation for compatibility with your theme. Update both the theme and the plugin to the latest versions. |
| Playback errors or interruptions | Check the audio file for errors, verify file paths, and ensure the server has sufficient resources. Check browser settings for sound and review plugin logs. |
Responsive Design Considerations
A crucial aspect of creating a user-friendly audio player is ensuring it adapts seamlessly to various screen sizes and devices. Responsive design allows the player to maintain its functionality and visual appeal across desktops, tablets, and mobile phones. This adaptability enhances the user experience, preventing frustration from a poorly scaled interface.Responsive design for audio players is not merely about shrinking the size of the controls; it’s about maintaining usability and accessibility on different devices.
A properly implemented responsive audio player ensures that all features, such as play/pause, volume controls, and scrubbing, remain easily accessible and functional regardless of the device’s dimensions.
Importance of Media Queries
Media queries are fundamental to achieving responsive design for audio players. They allow you to target different screen sizes and adjust the player’s layout and styling accordingly. By utilizing CSS media queries, you can tailor the appearance of your audio player to various screen resolutions, preventing visual clutter or the loss of functionality on smaller screens. This approach ensures the player’s optimal display on all devices.
Implementing Responsive Design in Audio Players
Ensuring your audio player is responsive involves several key strategies. First, use relative units (like percentages) for widths and heights instead of fixed pixel values. This enables the player to adjust its dimensions dynamically based on the screen size. Second, leverage CSS media queries to target different screen sizes. This allows you to apply specific styles for each device type.
Third, use flexible layouts like flexbox or grid to easily manage the player’s components and adapt them to different screen dimensions.
Example Responsive Audio Player Implementation
A simple example of a responsive audio player would use CSS media queries to adjust the size of the player controls. For smaller screens, the controls could be stacked vertically, while on larger screens, they might be displayed horizontally. This adaptability ensures the controls remain accessible and intuitive on all devices.
Using CSS Media Queries for Responsive Audio Player Design
Media queries allow you to define specific styles for different screen sizes. For instance, a media query targeting screens with a maximum width of 768px could adjust the player’s layout by stacking the controls vertically. This approach enables tailored design for each device category, preserving the user experience across various screen sizes.
Responsive Table Example
| Screen Size | Audio Player Adaptation |
|---|---|
| Desktop (1920px+) | Controls displayed horizontally, ample space for all controls. |
| Tablet (768px – 1919px) | Controls displayed horizontally, but potentially reduced spacing for better fit. |
| Mobile (0px – 767px) | Controls stacked vertically, ensuring all controls are accessible and easy to use on smaller screens. Volume slider and play/pause buttons may be adjusted to be larger for improved touch interaction. |
Security Considerations
Adding an audio player to your WordPress site can enhance user experience, but it also introduces potential security vulnerabilities if not handled properly. Careful consideration of security practices is crucial to protect your site and users from malicious activities. Robust security measures ensure the integrity of your audio content and the safety of your website.Protecting your audio files and the website itself from unauthorized access and malicious attacks is paramount.
This involves careful consideration of file storage, user permissions, and the overall security architecture of your WordPress site. Implementing strong security protocols is not just a best practice but a necessity in today’s digital landscape.
Protecting Audio Files from Unauthorized Access
Implementing robust access controls is vital to prevent unauthorized access to your audio files. This involves using appropriate file permissions and secure storage methods. Employing strong passwords and multi-factor authentication for your WordPress account is essential for securing your entire website, including audio files.
Adding an audio music player widget to your WordPress site is a straightforward process, but ongoing SEO optimization is crucial for long-term success. Think of it like maintaining a great playlist; you need to constantly update and refine it to keep listeners engaged. Just as you need to keep your music fresh, you also need to keep your site’s content and structure relevant to search engines, which is something you can do by reading about continuous SEO efforts like those discussed in this insightful article on continuous seo is seo ever finished.
Once you’ve optimized your site, you can focus on the practical aspects of adding your widget, ensuring a seamless listening experience for your visitors.
Avoiding Potential Security Vulnerabilities
Carefully select and configure your chosen audio player plugin. Look for plugins with a strong security track record and regularly update them to patch any vulnerabilities. Always scan your website for potential security threats to identify and address potential vulnerabilities. Consider implementing a web application firewall (WAF) to protect against malicious attacks.
Storing Audio Files Securely
Storing audio files securely involves more than just uploading them. Using a secure file storage solution is critical. Employing strong encryption methods during storage and transmission is paramount. Regularly backing up your audio files to a separate, secure location is essential to prevent data loss. Using a dedicated server with robust security measures, like intrusion detection systems, is highly recommended.
Security Best Practices
Implementing strong security measures is crucial to protect your audio files and website. A multi-layered approach is essential.
- Use strong passwords and enable two-factor authentication (2FA) for all accounts associated with your WordPress site and audio files. This adds an extra layer of security to prevent unauthorized access.
- Regularly update WordPress, plugins, and themes. Outdated software can contain known security vulnerabilities. Keeping everything updated is essential to patch known issues and maintain a secure environment.
- Employ strong file permissions. Restrict access to your audio files to only those who need it. Use appropriate directory permissions to limit the potential damage of a compromised file.
- Use a secure file storage solution. Avoid storing sensitive files directly on your web server’s public directory. Dedicated storage solutions like cloud storage or dedicated servers are more secure.
- Regularly monitor your website for suspicious activity. Utilize security plugins and tools to detect and respond to potential threats. This proactive approach helps to mitigate risks and safeguard your website from unauthorized access.
- Implement a robust firewall. A firewall can act as a first line of defense against malicious attacks and help to protect your website and audio files.
- Limit user access to essential files. Only grant necessary permissions to users. Avoid granting unnecessary privileges to protect your audio files and website from unauthorized access.
Accessibility Considerations
Building an audio player for your WordPress site isn’t just about great sound; it’s about making it usable for everyone. Accessibility is crucial for inclusivity, ensuring that people with disabilities can access and enjoy your content. This section dives into best practices for making your audio player truly accessible.Making your audio player accessible involves more than just adding a few features.
It’s about understanding the needs of diverse users and implementing solutions that meet those needs. This approach ensures that your site is usable for a wider audience, fostering a more inclusive online experience.
Best Practices for Audio Player Accessibility
Accessibility in audio players goes beyond simply playing the sound. It involves providing clear and actionable information for users with disabilities. These practices enhance the overall user experience for everyone.
- Providing Captions and Transcripts: Captions and transcripts are essential for users who are deaf or hard of hearing, or those who prefer to read along with the audio. They also benefit those in noisy environments or those who may be listening while multitasking. Providing both captions and transcripts is best practice. Captions are visual text synchronized with the audio, while transcripts provide a complete written record of the audio content.
- Using Clear and Concise Language: The language used within the audio player itself should be clear and straightforward. Avoid jargon or technical terms that might be confusing to some users. This also enhances understanding for users with cognitive disabilities.
- Ensuring Compatibility with Assistive Technologies: Audio players should be compatible with screen readers and other assistive technologies used by people with visual impairments. This ensures that the player and its controls are accessible via the assistive technology.
- Offering Adjustable Playback Controls: Allow users to adjust playback speed, volume, and other settings easily and intuitively. This accommodation is helpful for people with hearing impairments or those who need to customize the audio experience.
Importance of Captions and Transcripts
Captions and transcripts are more than just helpful additions; they are crucial for accessibility. They provide a crucial alternative to the auditory experience, making the content usable for a wider range of users.
- Enhanced Comprehension: Captions and transcripts aid in comprehension for users with hearing impairments, those with language barriers, or those who prefer to read the content. They offer a second layer of understanding that enhances the overall experience.
- Improved Learning Outcomes: For educational or training materials, captions and transcripts significantly improve learning outcomes by providing multiple ways to absorb the information.
- Accessibility for Diverse Audiences: Captions and transcripts make the content accessible to a wider audience, regardless of their auditory capabilities or language proficiency.
Making Audio Players Accessible to Users with Disabilities
A truly accessible audio player considers the diverse needs of its users, including those with disabilities. These accommodations ensure that everyone can engage with the content.
- Use of ARIA Attributes: Employ ARIA (Accessible Rich Internet Applications) attributes for screen readers and other assistive technologies to identify the elements of the audio player, making them understandable and navigable.
- Clear Error Messages: Provide clear and concise error messages if there are issues with playback or other functions, enabling users to understand the problem and potentially resolve it.
- Keyboard Navigation: Ensure that all functions of the audio player are accessible using only a keyboard. This is essential for users who cannot use a mouse or other pointing devices.
Alternative Text for Audio Players
Providing alternative text for audio players is essential for users who cannot hear the audio or who are using screen readers. This allows them to understand the content of the audio.
“Alternative text should accurately and concisely describe the audio content. Avoid using generic phrases like ‘audio file’ or ‘audio clip’; instead, describe the subject matter of the audio.”
Epilogue
In conclusion, adding an audio music player widget to your WordPress site is easier than you think. By carefully selecting a plugin, configuring its settings, and understanding how to embed it into your pages and posts, you can significantly enhance user engagement. Remember to prioritize accessibility and security to create a positive and trustworthy user experience. This guide has provided a robust foundation for implementing an engaging audio experience, allowing you to focus on creating high-quality content that truly resonates with your audience.