How to add read more tag in WordPress? This guide dives deep into mastering the “Read More” tag, exploring its crucial role in WordPress posts. We’ll navigate the visual and text editors, uncover various use cases, and meticulously examine how this tag impacts post display. We’ll cover customization, alternative methods, post type considerations, and even advanced configurations.
From basic implementation to advanced techniques, this comprehensive tutorial will empower you to effectively use the “Read More” tag, ensuring optimal readability and user engagement on your WordPress site. We’ll delve into the nuances of customizing its appearance, exploring alternative approaches for post snippets, and handling various post types. You’ll gain a complete understanding of this fundamental WordPress feature.
Introduction to the Read More Tag in WordPress
The “Read More” tag in WordPress is a crucial element for managing the display of your blog posts. It allows you to create a preview snippet of your content that entices readers to click and see more. This snippet, which is displayed on your blog’s front page, typically summarizes the core of the post. Knowing how to use it effectively is key to optimizing your post’s visibility and engagement.The tag itself isn’t a visual element; rather, it’s a signal to WordPress to truncate the post content.
The actual display of the preview is controlled by your theme’s design. This means the way your “Read More” excerpt looks will depend on the particular theme you’ve chosen.
Function of the Read More Tag
The “Read More” tag acts as a trigger. It instructs WordPress to show a portion of the post content on the homepage or archive pages, and display the rest of the content only when a reader clicks a “Read More” link. This helps manage the length of content presented in the main post area, keeping the site organized and visually appealing for visitors.
Visual Editor vs. Text Editor
Using the visual editor, you insert the “Read More” tag by clicking a button. This approach is straightforward and often preferred due to its ease of use. In contrast, the text editor requires you to type the tag manually. This is often less user-friendly, especially for those unfamiliar with HTML, but it provides more control for those who need to manipulate the code directly.
Typical Use Cases
The “Read More” tag is frequently used to:
- Control the amount of content displayed in post previews, improving the flow and readability of the homepage.
- Entice readers to click and discover the full post, boosting engagement.
- Manage post length, making sure the site’s layout remains organized and avoids overwhelming visitors with excessive content on the front page.
Impact on Post Display
The “Read More” tag significantly impacts how posts are displayed across the site. On the homepage, archive pages, or search results, only the excerpt before the tag will appear. The full content is revealed only after the reader clicks the “Read More” link. This encourages a more focused reading experience, improving website flow.
Example of Implementation
Imagine a blog post about the latest trends in sustainable fashion. Using the “Read More” tag, the initial preview might highlight the core idea and provide a brief overview. The full post, which would follow the tag, would include more detailed information, links to specific brands, and possibly a call to action.
Implementing the Read More Tag
The “Read More” tag in WordPress is a powerful tool for controlling the amount of content displayed on a post’s preview. It allows you to show only a snippet of the post and entice readers to click through for the full article. This section will guide you through the process of implementing this tag using both the visual and text editors, as well as how to customize the displayed text and set character limits.This process is crucial for optimizing your blog’s readability and encouraging engagement.
By strategically using the “Read More” tag, you can ensure your readers get a concise preview while maintaining a strong call to action to read the complete article.
Using the Visual Editor
The visual editor provides a user-friendly interface for inserting the “Read More” tag. Simply place your cursor at the point where you want the preview to end and the full content to begin. Then, in the toolbar, look for the “Read More” button. Clicking this button will automatically insert the tag and a default “Read More” text.
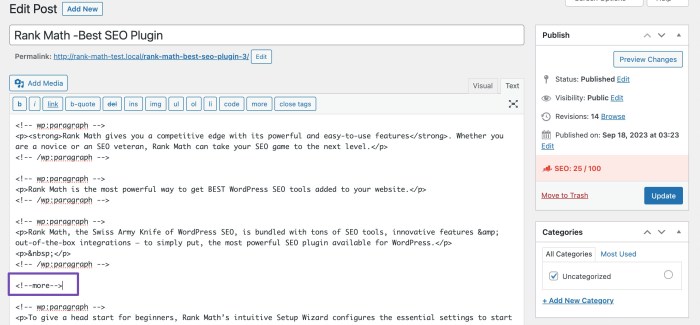
Inserting the Tag with the Text Editor
While less intuitive, the text editor allows for greater control over the implementation. To insert the “Read More” tag manually, use the following shortcode:[more]Place this shortcode precisely where you want the content to be truncated. This method gives you more control over the content that appears after the tag.
Customizing the “Read More” Text
The default “Read More” text is often sufficient. However, you can easily customize the text that appears after the “Read More” tag. Using the visual editor, you can edit the text within the “Read More” tag itself. In the text editor, modify the text within the shortcode.For example, instead of the default “Read More,” you could write “Continue Reading,” “Learn More,” or a custom phrase.
Setting a Specific Character Count
The “Read More” tag doesn’t inherently support a specific character count for the preview. Instead, you use a combination of the “more” tag and the “the_excerpt()” function within your theme’s functions.php file. This customizes the excerpt length, automatically creating the desired “Read More” point.This technique gives you precise control over how much content is displayed before the “Read More” tag, increasing the readability of your posts.
Customizing the Read More Tag Appearance
The WordPress “Read More” tag, while functional, often defaults to a simple text link. To enhance the user experience and brand consistency, you can customize its appearance. This involves choosing visual styles, tailoring the button’s look and feel, and ensuring a seamless integration with your website’s design. This section explores various techniques to achieve a visually appealing and consistent “Read More” experience.
Visual Representations of the “Read More” Tag
Different approaches can significantly alter the visual impact of the “Read More” tag. The following table compares several methods.
| Method | Appearance | Pros | Cons |
|---|---|---|---|
| Default Text Link | Plain text link, often “Read More” | Simple, requires no extra code. | Can be visually unappealing, blends in with other text. |
| Button Style | A button element, visually distinct from surrounding text. | Improved visual appeal, clear call to action. | Requires additional CSS or a plugin, potentially more complex. |
| Styled Link | A visually modified link with different colors, sizes, and fonts. | A compromise between simple text and a full button. | Requires CSS styling, could be difficult to achieve a perfect button appearance. |
| Custom Image | Link using a custom image. | Very visually distinctive, can fit the theme. | Requires image preparation and might not be appropriate for all themes. |
Various Styles for the “Read More” Tag
The table below showcases various styling options for the “Read More” tag. These styles focus on creating visually appealing and distinct calls to action.
| Style | Code Snippet | Preview | Description |
|---|---|---|---|
| Basic Button | Read More.read-more-button background-color: #4CAF50; color: white; padding: 10px 20px; text-decoration: none; border-radius: 5px; |
A simple, green button | This example uses a basic button style with a green background and white text. The .read-more-button class targets the link. |
| Artikeld Button | Read More.read-more-button border: 2px solid #4CAF50; color: #4CAF50; padding: 10px 20px; text-decoration: none; border-radius: 5px; |
A button with a light border | This style creates a button with an Artikel instead of a filled background. |
| Rounded Link | Read More.read-more-button color: #4CAF50; padding: 10px 20px; text-decoration: none; border-radius: 20px; |
A rounded text link | This option styles the link to have rounded corners, keeping it visually distinct but not as pronounced as a button. |
Customizing with CSS
CSS offers extensive control over the appearance of the “Read More” tag. You can modify various aspects like color, size, shape, and positioning. This gives you fine-grained control over the tag’s appearance to match your website’s branding and design.
Use CSS selectors to target specific elements, allowing for specific customization. Applying CSS classes to the “Read More” link allows for greater flexibility in applying styles.
Creating a Custom “Read More” Button
Building a custom “Read More” button involves combining HTML and CSS. The HTML defines the button element, while CSS controls its appearance. Using a custom class allows for consistent styling across multiple buttons or links.
For example, you could use a custom button with an image and text. The image would add visual interest, while the text clarifies the action. The CSS would control the button’s size, color, and spacing.
Alternative Methods for Post Snippets: How To Add Read More Tag In WordPress

The “Read More” tag, while a popular method for creating post snippets, isn’t the only option. WordPress offers other ways to present concise summaries of your posts, each with its own advantages and disadvantages. Understanding these alternatives allows you to tailor your content presentation to specific needs and preferences.The excerpt meta box is a straightforward way to craft post summaries without the need for a “Read More” tag.
By utilizing this feature, you can directly control the text that appears in the post listings, ensuring a clean and concise presentation of your content’s essence.
Excerpt Meta Box Usage
The excerpt meta box in WordPress allows you to define a custom snippet for each post. This snippet is displayed in the post listings and archives, offering readers a preview of the content before they click through to the full post. This method provides complete control over the summary presented, making it highly customizable.
Want to know how to add a “Read More” tag in WordPress? It’s a simple process, but understanding the impact on your SEO strategy is key. For example, learning about AI SEO and client success, as discussed in ai seo and client success 7 agency trends defining the year , can help optimize your content for better visibility.
This, in turn, directly influences how your readers interact with your posts and ultimately how the “Read More” tag functions in the overall user experience. So, get that “Read More” tag in place and leverage these powerful trends for greater success!
To use the excerpt meta box, simply navigate to the post edit screen. You’ll find a designated area labeled “Excerpt” where you can type a brief summary of the post. The excerpt should be compelling enough to encourage readers to click through for more, but concise enough to fit within the designated space in the listing.
For example, if you have a post titled “The Ultimate Guide to WordPress Customization,” your excerpt might read: “Learn how to transform your WordPress website into a professional-looking masterpiece. This comprehensive guide covers everything from theme customization to plugin integration.” This is a compelling snippet, highlighting the post’s value proposition while remaining concise.
Excerpt vs. Read More Tag
The excerpt and the “Read More” tag both serve the purpose of providing a preview of a post, but they differ in their approach and resulting presentation.
| Feature | Excerpt | Read More Tag |
|---|---|---|
| Content Display | Custom summary defined by the author. | Automatic snippet generated by the theme or plugin, often with a “Read More” link. |
| Readability | Highly customizable for optimal readability, allowing for precise control over the displayed summary. | Readability can vary depending on the implementation and the content. The “Read More” link may occasionally interrupt the flow. |
| Customization | Offers complete control over the preview text. | Customization options are often limited to theme settings or plugin configurations. |
| Allows for optimization of the summary for search engines. | impact is subject to how the “Read More” tag is implemented and whether it’s incorporated into the meta description. |
In essence, the excerpt offers greater control over the reader’s first impression of your post, potentially improving engagement and search engine visibility. The “Read More” tag provides a standard, albeit less customized, preview.
Comparison of Pros and Cons
- Excerpt: A significant advantage is the complete control over the snippet. This translates to precise wording, highlighting key elements, and tailoring the preview to different audiences. A drawback is that the author needs to create the summary themselves.
- Read More Tag: A benefit is that it automatically creates a snippet. This saves time, but it might not always provide the most compelling or relevant preview for each post. A downside is that there’s less direct control over the preview’s content.
Choosing between the excerpt and the “Read More” tag depends heavily on the desired level of control and the specific needs of your website’s content presentation.
Handling Different Post Types
The “Read More” tag, while a straightforward way to control post snippets, isn’t a universal solution for all WordPress post types. Its behavior and suitability vary depending on the type of content. Understanding these differences helps you effectively manage the display of your content.The “Read More” tag primarily impacts how post excerpts or summaries are displayed on archives, search results, and other content lists.
Its effect on the full post view is less pronounced, as the entire post content is always shown when a user clicks to view it. However, the “Read More” tag does impact the initial preview of a post, which is crucial for enticing users to click through.
Behavior Across Post Types, How to add read more tag in wordpress
The “Read More” tag generally works as expected for standard blog posts. However, its functionality might differ when applied to other post types like pages or custom post types. For pages, the tag typically functions similarly to blog posts, allowing for a summary above the “Read More” link. Custom post types behave similarly if the theme or plugin handles them accordingly.
Figuring out how to add a “Read More” tag in WordPress can be a game-changer for blog posts, especially when you’re aiming for concise snippets. Understanding your competitors’ social media strategies is equally important, and a great way to improve your own. Tools like social media competitor analysis can help you see what’s working for others in your niche.
social media competitor analysis can help you identify effective strategies and tailor your approach. Ultimately, a well-placed “Read More” tag will encourage readers to click through and engage with the full content. This is crucial for driving traffic to your blog.
Suitability for Different Post Types
The suitability of the “Read More” tag is dependent on the purpose of the post type. For static pages, the tag might be unnecessary or even counterproductive. Pages are often designed to be complete in their initial presentation, and a “Read More” tag would disrupt the flow. Custom post types, such as portfolios or product listings, can benefit from the tag, but the implementation needs to consider the specific needs of the post type.
Examples and Limitations
For a portfolio item showcasing a specific project, a “Read More” tag could be useful to present a concise summary of the project’s details followed by a more detailed description. A “Read More” tag can be used in a custom post type of ‘recipes’. A concise description of the recipe and its ingredients, followed by the full recipe, is a common use case.
| Post Type | Suitability of “Read More” Tag | Example |
|---|---|---|
| Blog Post | Generally suitable; enhances readability | A brief introduction to a blog post, followed by the full article. |
| Page | Often unnecessary; might disrupt page flow | A static page explaining a company’s history. |
| Custom Post Type (e.g., Portfolio) | Potentially suitable, but requires careful implementation | A summary of a project’s details, followed by a more detailed description in the full post. |
Custom Post Type Considerations
Implementing the “Read More” tag for custom post types might require modifications to the theme or plugin that handles the post type. You might need to adjust the display logic to accommodate the tag’s presence or absence.
Advanced Read More Tag Configurations
Fine-tuning the “Read More” tag in WordPress goes beyond the basics. This involves adjusting its placement within the post, controlling the excerpt length, and even designing a unique visual style for a more polished user experience. Understanding these advanced configurations can significantly enhance the readability and overall aesthetic appeal of your blog.WordPress, by default, positions the “Read More” link strategically, but this placement can be customized to perfectly align with the content structure.
Adding a “Read More” tag in WordPress is a simple process, but crafting compelling content is key to maximizing its impact. Understanding the core elements of great content, like clarity, engagement, and a strong call to action, is crucial for both your readers and search engines. For a deeper dive into the “ingredients of great content,” check out this helpful resource: ingredients of great content.
Ultimately, a well-structured post with a compelling “Read More” tag encourages readers to delve deeper into your writing.
Adjusting Read More Tag Position
The “Read More” tag’s position within a post can be altered to enhance the flow of the content. By strategically placing the “Read More” link after a specific number of words or sentences, you can control the amount of content displayed before the link, thus guiding the reader’s engagement. This control allows for a more natural transition from the introductory content to the full post.
There are several ways to achieve this customization. WordPress themes often offer options for modifying the “Read More” tag’s position in the theme customizer or via code. For example, many themes use shortcodes that enable specific placements.
Controlling Excerpt Length
The length of the excerpt displayed before the “Read More” link is a crucial element in enticing readers to click through. A concise and compelling excerpt encourages engagement. To control this length, you can use functions in your WordPress theme or plugin to specify the number of words or characters for the excerpt. This approach ensures a consistent reading experience across different posts, avoiding abrupt truncations or overly long excerpts that might discourage clicks.
Using the `the_excerpt()` function with parameters can control this behavior. For example, limiting the excerpt to 50 words is a common approach.
Customizing Read More Tag Design
The visual appearance of the “Read More” tag can be significantly modified to match the overall design aesthetic. Adding a unique class or style allows for custom colors, fonts, and sizes. This customization can be achieved by utilizing CSS rules within your theme’s style sheet. For instance, a prominent button-like “Read More” tag can create a strong visual cue.

Alternatively, a subtle link with a different color or font weight can be used for a more subtle but still effective approach.
Utilizing Plugins for Enhancement
Several WordPress plugins can enhance the “Read More” functionality. These plugins offer additional features and customization options. For instance, plugins can enable the automatic generation of excerpts based on specific criteria or integrate with social media sharing platforms to encourage wider reach. Examples include plugins that allow the selection of specific s for excerpt creation, improving .
Troubleshooting Common Issues
Implementing the “Read More” tag in WordPress can sometimes lead to unexpected display issues. Understanding the common pitfalls and their solutions can save you valuable time and frustration. This section details common problems and how to resolve them with clear, actionable steps.Often, problems stem from incorrect configuration, conflicting plugins, or theme modifications. This guide will help you identify and fix these issues, ensuring your “Read More” tag functions as expected.
Read More Tag Not Displaying
Incorrectly configured “Read More” tags can lead to their absence. Ensuring the necessary code is present and correctly placed within your theme files is crucial.
- Verify that the “read_more” function is correctly called within your theme’s template files, such as single.php. This function is essential for displaying the “Read More” tag.
- Ensure that the theme’s functions.php file contains no conflicting code that might suppress the “Read More” tag. Double-check for any modifications to the `the_content` function or related hooks.
- Check for potential plugin conflicts. Deactivate plugins one by one to isolate the problem. If the issue disappears after deactivating a plugin, you’ve found the culprit.
Read More Tag Displaying Incorrectly
Sometimes, the “Read More” tag might appear in unexpected locations or with incorrect formatting. This often arises from theme customizations or conflicts.
- Review your theme’s style.css file for any rules that might be overriding the default “Read More” tag styling. Look for selectors targeting `.more-link` or similar classes.
- Inspect your theme’s single.php or other relevant template files for custom code related to the “Read More” tag. Make sure any custom code doesn’t interfere with the WordPress default behavior.
- Check for conflicts between your theme and plugins. Deactivating plugins can help you determine if a plugin is causing the problem. If the issue disappears after deactivating a plugin, you’ve found a potential conflict.
Read More Tag Appearing Multiple Times
Duplicated “Read More” tags are a common issue. This is usually due to double calls to the `the_content` function or similar issues in your template files.
- Examine your template files (like single.php) for duplicate calls to functions like `the_content()` or similar functions related to post content display. Identify and remove any redundant calls.
- Review custom code within your theme’s functions.php file. Any modifications to core WordPress functions could introduce duplicate calls or unwanted output.
Read More Tag Position Issue
The “Read More” tag might not appear at the intended position within your post content. Incorrectly placed `the_content` function calls are common causes.
- Check the order of functions in your template files. Functions like `the_content` should be placed correctly within the template hierarchy.
- Verify that custom filters or actions related to post content display aren’t interfering with the default “Read More” tag placement.
Troubleshooting using Debugging Tools
Utilize browser developer tools to inspect the rendered HTML and identify the specific cause of the issue.
Security Considerations
The “Read More” tag, while convenient for managing post content, presents potential security risks if not handled carefully. Malicious actors could exploit vulnerabilities in the way the tag is implemented or used to inject harmful scripts into your WordPress site. Understanding these risks and implementing robust security measures is crucial for protecting your site and user data.Implementing secure practices when using the “Read More” tag is essential for safeguarding your WordPress site against potential threats.
Failing to do so could lead to significant security issues, potentially impacting the user experience and reputation of your website.
Preventing Malicious Code Injection
Protecting against malicious code injection into posts containing the “Read More” tag requires a multi-faceted approach. User input must be thoroughly sanitized and validated to prevent the insertion of harmful scripts.Thorough input sanitization is a critical step in mitigating the risk of malicious code injection. This involves removing or encoding potentially harmful characters and attributes before they are processed by the WordPress system.
Failing to do this can create vulnerabilities that malicious actors can exploit. For example, if a user enters ` ` into a field where the “Read More” tag is used, the script will execute if not sanitized properly.
Sanitizing Input Data
A crucial aspect of securing the “Read More” tag is sanitizing input data to prevent vulnerabilities. The WordPress `esc_html()` function is a powerful tool for encoding HTML characters, making it less likely that injected scripts will be executed. It is important to use this function consistently when dealing with user-submitted content related to the “Read More” tag.A strong security practice involves validating the input data to ensure it adheres to predefined rules.
For instance, if the “Read More” tag is associated with a specific content type, only allow input that matches the expected format. This validation step can prevent unexpected behavior or security risks. Furthermore, consider using a whitelist approach for allowed HTML tags, limiting the potential damage from malicious scripts.
Handling User-Submitted Content
When dealing with user-submitted content that might contain the “Read More” tag, implement strict input validation rules. This helps prevent the injection of malicious code. For example, do not blindly trust user input. Always sanitize and validate data before using it in your application. This is a critical security best practice to avoid vulnerabilities.Implement robust input validation and sanitization processes.
Use functions like `esc_attr()` or `esc_url()` to escape attributes and URLs, respectively, ensuring that potentially harmful characters are properly encoded or escaped. This prevents scripts from being injected into the output.
Best Practices for Security
To protect your site, consistently follow these best practices when dealing with the “Read More” tag:
- Always sanitize user input. Never assume that user input is safe. Sanitize all input data before using it in your application, especially when handling the “Read More” tag.
- Validate user input. Ensure that the input data conforms to predefined rules and expectations.
- Use appropriate sanitization functions. WordPress provides functions like `esc_html()`, `esc_attr()`, and `esc_url()` to help sanitize data.
- Keep your WordPress installation up-to-date. Regular updates often include security patches that address vulnerabilities.
By consistently applying these security measures, you can significantly reduce the risk of malicious code injection and protect your WordPress site and user data from potential threats.
Closing Summary
In conclusion, mastering the “Read More” tag in WordPress is key to creating engaging and user-friendly content. This comprehensive guide has covered everything from basic implementation to advanced customization, alternative methods, and handling different post types. By understanding the nuances of this tag, you can optimize your site’s readability and user experience. Remember to prioritize security best practices when implementing the “Read More” tag, ensuring your content remains secure and accessible to your audience.