How to add taxonomy images category icons in WordPress is a valuable skill for any website owner. Adding visual cues to categories and tags improves site navigation and user experience, making your site more user-friendly and engaging.
This comprehensive guide walks you through the process, from selecting the perfect icons to customizing their display. We’ll cover various methods, plugin options, and advanced techniques to ensure your icons are both visually appealing and functional.
Introduction to Taxonomy Images in WordPress
WordPress uses taxonomy systems to categorize and organize content. These systems are crucial for website structure and user experience. Categories and tags are fundamental taxonomies, allowing authors to classify posts and pages into distinct groups. Adding visual elements like icons to these taxonomies can significantly enhance both user understanding and website navigation.Image icons for taxonomies improve discoverability and visual appeal.
Users can quickly identify different content types simply by looking at the icon representing a category or tag. This visual cue accelerates site navigation and improves the overall user experience. It also makes the website more engaging and aesthetically pleasing.
Taxonomy Types and Image Icon Potential
Understanding the different types of taxonomies in WordPress is essential to determine the optimal use of image icons. Different taxonomies serve different purposes and have varying levels of potential for image icons.
| Taxonomy Type | Description | Image Icon Potential |
|---|---|---|
| Categories | Broad, hierarchical groupings of posts. | High. Icons can clearly differentiate categories like “News,” “Recipes,” or “Products.” |
| Tags | s or descriptive terms used to further classify posts. | Moderate. Icons can help users visually identify similar tags, but may be less visually prominent than categories. |
| Custom Taxonomies | User-defined taxonomies tailored to specific needs. | High. Icons can be uniquely designed to represent custom categories such as “Color,” “Size,” or “Material.” |
Adding image icons to categories and tags, for instance, allows users to immediately grasp the subject matter. A cooking blog could use an image icon of a spoon for the “Recipes” category, or a small image of a specific ingredient for a recipe tag. These visual cues provide an intuitive way to navigate the site and quickly locate the desired content.
Identifying Suitable Image Icons
Choosing the right icons for your WordPress taxonomy categories is crucial for visual appeal and user experience. Well-selected icons can significantly enhance the clarity and organization of your site’s navigation, making it easier for users to browse and find the content they need. The visual language of your icons should be consistent with your theme’s overall design aesthetic.Effective taxonomy icons improve site navigation and readability.
Adding taxonomy image category icons in WordPress can be a visual treat, but what if you want to know which links and buttons are actually getting the most clicks? Knowing how to track those interactions is key, especially when designing a user-friendly site. Fortunately, there are plugins for that, like those that help with how to track link clicks and button clicks in WordPress.
Once you’ve got that figured out, you can focus on improving your site’s navigation with those custom taxonomy icons, knowing exactly which elements users are interacting with most.
They act as visual cues, immediately communicating the content within each category. Selecting icons that are aesthetically pleasing, easy to understand, and appropriately sized for your WordPress theme is key to a positive user experience.
Finding Appropriate Image Icons
Finding suitable icons requires exploring various resources. Free stock photo websites offer a wealth of options, often with licensing terms allowing for commercial use. Look for sites with a good selection of vector icons, as these are easily scalable without losing quality. Icon libraries, often specifically designed for web use, provide curated collections of high-quality icons in various styles.
Some design tools, like those with built-in icon libraries or search capabilities, can also be helpful.
Comparing Icon Styles and Visual Appeal
Different icon styles evoke various emotions and perceptions. A minimalist icon set might convey a sense of simplicity and modern design, while a more illustrative icon set might provide a more engaging and playful feel. Consider the overall aesthetic of your WordPress theme. Choose an icon style that harmonizes with the theme’s colors, fonts, and other design elements.
A good example would be a theme with a clean, modern design, where a flat, geometric icon set would be appropriate, whereas a theme with a more vintage or handcrafted feel might benefit from a more stylized or illustrative icon set.
Icon Formats and WordPress Compatibility
Web-optimized formats like SVG (Scalable Vector Graphics) are highly recommended. They maintain their quality at any size and scale, making them perfect for websites. PNG (Portable Network Graphics) is another suitable format, but it’s important to choose a high-resolution PNG image to prevent pixelation when scaling. Avoid using raster images like JPGs for icons, as they can lose quality when resized.
Ensure that the icons are compatible with your WordPress theme’s design and don’t clash with existing elements.
Adding taxonomy image category icons in WordPress can be a visual boost for your site. Understanding how to do this can significantly improve user experience. Knowing how to interpret your Google Ads Ecommerce pmax report, like the one available at google ads ecommerce pmax report , can help you optimize your ad campaigns and in turn, drive more traffic to the specific categories you’ve visually enhanced with icons.
This can help you see how the categories perform in relation to your overall Google Ads strategy, making the process of adding those icons even more effective.
Criteria for Selecting Suitable Icons
| Criteria | Description | Importance |
|---|---|---|
| Size | Ensure icons are appropriately sized for the space they’ll occupy in the taxonomy. Oversized icons can look cluttered, while icons that are too small can be difficult to discern. | Essential for visual balance and readability. |
| Resolution | Choose icons with high resolution to maintain quality at various sizes. Icons with low resolution can appear pixelated and unprofessional. | Critical for visual clarity and professional presentation. |
| Format | SVG is highly recommended for scalability and quality preservation. PNG is a good alternative, but prioritize high resolution. Avoid raster formats like JPG. | Crucial for ensuring consistent quality across different devices and screen sizes. |
| Color Palettes | Align the icon colors with your WordPress theme’s color scheme to maintain visual harmony. Use colors that are both visually appealing and easy to distinguish. | Essential for a cohesive visual identity across your website. |
Integrating Icons with WordPress Categories and Tags
Adding visual cues to your WordPress categories and tags enhances user experience and improves site navigation. Icons provide a quick and intuitive way for users to distinguish between different content types, making your site more user-friendly. This section details methods for associating image icons with specific taxonomy terms in WordPress.Integrating visual elements like icons alongside your categories and tags is a significant step toward enhancing the overall user experience.
Users can instantly grasp the essence of different content types, which streamlines navigation and improves the comprehension of the site’s structure.
Methods for Uploading and Managing Icons
Associating images with taxonomy terms involves uploading and managing these images within the WordPress platform. WordPress’s built-in media library is a straightforward tool for handling image uploads and organization. Navigate to the Media Library within your WordPress dashboard. From there, upload your desired icon images. Organize them using folders for easier retrieval and maintain a consistent visual style for your icons.
Associating Icons with Taxonomy Terms
Different plugins offer various methods for linking icons to specific taxonomy terms. Some plugins provide a dedicated interface within the WordPress admin panel for associating images with categories and tags. This often involves selecting the desired image from the media library for a specific term.
Plugin Options for Image Support
Several plugins can extend WordPress’s built-in taxonomy functionality to support image icons. These plugins provide user-friendly interfaces for assigning images to categories and tags, streamlining the process and offering additional customization options. For example, the “Custom Post Type UI” plugin allows extensive customization of taxonomy term displays.
Example: Assigning an Icon to a Category
This table demonstrates the process of assigning an icon to a specific category.
| Step | Action | Description |
|---|---|---|
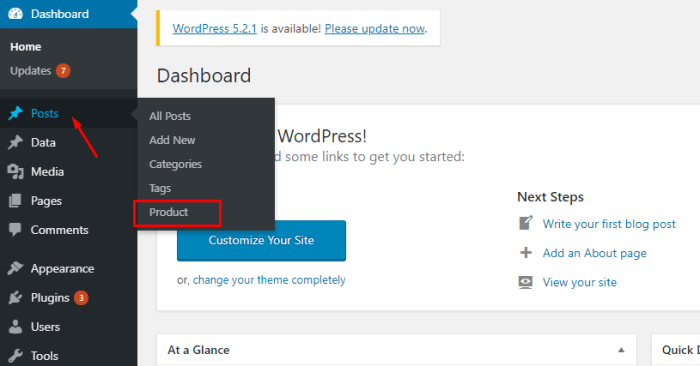
| 1 | Access Category Management | Navigate to the Categories section within your WordPress dashboard. |
| 2 | Select Category | Choose the category to which you want to add an icon. |
| 3 | Locate Icon Options | Identify the field or section designated for uploading or selecting an icon image. |
| 4 | Choose Icon from Media Library | Select the desired icon from your WordPress media library. This is typically a drop-down or selection menu. |
| 5 | Save Changes | Click the “Update” or “Save” button to apply the icon to the selected category. |
These steps highlight the straightforward process for associating icons with categories. The specific interface may vary depending on the plugin used, but the underlying principle of selecting an icon from the media library remains consistent.
Customizing Image Display
Now that we’ve successfully integrated taxonomy image icons into our WordPress site, let’s explore how to fine-tune their appearance. Customizing the display allows for a more tailored and visually appealing experience for users, enhancing the overall aesthetic and usability of the website. This section delves into various methods for altering the size, positioning, and styling of these icons, ensuring they seamlessly integrate with your website’s design.
CSS Customization Options
CSS offers a powerful toolkit for controlling the visual attributes of the taxonomy image icons. You can modify various aspects, including size, positioning, and overall styling. This level of control is essential for achieving a cohesive design and a consistent user experience across different pages and elements on your site.
Controlling Icon Size
Adjusting the size of the icons is crucial for ensuring they complement the overall layout. Using CSS, you can specify the width and height of the icons. For example, to make icons 20 pixels wide and 20 pixels high, you’d use styles like width: 20px; height: 20px;. This ensures a consistent visual representation across various categories and tags.
Positioning Icons
Precise control over icon positioning is vital for a visually balanced and intuitive interface. Using CSS properties like margin-left, margin-right, margin-top, and margin-bottom, you can precisely position icons relative to their surrounding text or other elements. This allows you to achieve a consistent and visually appealing arrangement of icons throughout your site.
Styling Icons
Beyond size and positioning, you can customize the visual appearance of the icons themselves. CSS properties like border, border-radius, box-shadow, and color allow you to add visual flair and make them stand out. For instance, you could apply a subtle border to the icons to distinguish them visually.
Adding taxonomy image category icons in WordPress can be a real game-changer for user experience. It’s a simple process, but a crucial step in website design. Think about how much more appealing a blog post categorized with an easily identifiable icon would be. While that’s a great topic, understanding effective marketing recruitment and onboarding strategies for professional services firms, like those detailed in this insightful article marketing recruitment and onboarding strategies for pro fessional services firms , is equally important.
Ultimately, a visually appealing site with well-organized categories will ultimately improve user engagement, a key element in any successful WordPress website.
Responsive Icon Display
A crucial aspect of website design is ensuring the icons adapt well to different screen sizes. Responsive design principles are vital for providing a positive user experience across various devices. By employing media queries in your CSS, you can define specific styles for different screen resolutions. This ensures icons remain legible and visually appealing on desktops, tablets, and mobile devices.
For example, you could use media queries to adjust the size of icons for smaller screens, preventing them from becoming too large or small, which could lead to readability issues.
CSS Selectors and Properties for Icon Styling, How to add taxonomy images category icons in wordpress
| Selector | Property | Value | Description |
|---|---|---|---|
.category-icon |
width |
25px |
Sets the width of the category icon to 25 pixels. |
.category-icon |
height |
25px |
Sets the height of the category icon to 25 pixels. |
.category-icon |
margin-left |
5px |
Adds 5 pixels of spacing to the left of the icon. |
.category-icon |
border-radius |
5px |
Creates rounded corners on the icon. |
@media (max-width: 768px) .category-icon |
width |
20px |
Reduces the icon size on smaller screens. |
This table provides a concise reference for manipulating icon styles using CSS selectors and properties. Remember to adjust the values to match your specific design requirements and responsive design goals.
Plugin Integration and Customization
Adding taxonomy image icons to your WordPress site often involves using specialized plugins. These plugins streamline the process, handling various aspects like icon size management and different image formats. Choosing the right plugin and understanding its configuration is crucial for a seamless and aesthetically pleasing integration.Plugins offer a significant advantage over manual coding. They often provide pre-built functionality for integrating taxonomy images, saving you development time and effort.
They frequently handle the complexities of image handling and display, which can be intricate for a non-developer. This frees you to focus on other aspects of your site’s design and content.
Plugin Selection Criteria
Plugins vary in their features and capabilities. Selecting the right plugin requires careful consideration of the desired functionalities. A good plugin should allow for customization, providing options for different icon sizes, image formats, and display settings. Thorough research into the plugin’s documentation and user reviews is essential to gauge its usability and suitability for your needs.
Plugin Configuration Options
Plugins typically provide an admin interface for configuring the display of taxonomy image icons. This interface allows you to specify the icon source, size, and other relevant visual parameters.
Plugin Feature Comparison
A table outlining different plugin features and their respective configuration options is presented below. This table helps compare various plugin features, highlighting potential differences in customization and handling diverse image requirements.
| Plugin Feature | Configuration Options |
|---|---|
| Icon Source | Specify the location of image files (e.g., upload directory, external URL). Some plugins might support specific icon libraries. |
| Icon Size | Adjust the dimensions of the displayed icons. Options might include preset sizes or custom dimensions. |
| Image Formats | Support for different image formats (e.g., PNG, JPG, SVG). Check if the plugin supports your preferred format. |
| Category/Tag Assignment | Assign icons to specific categories or tags. This allows for targeted image application to relevant taxonomies. |
| Display Settings | Configure how icons are displayed (e.g., position relative to the category/tag name, size variations for different screens). |
| Performance Optimization | Consider plugins that offer optimized loading to prevent slowing down your site’s performance. |
Example Configuration: Optimizing Icon Display
Using a specific plugin, you might configure icon sizes based on screen resolutions. This ensures icons are appropriately scaled for various devices. Plugins often offer options for specifying sizes for desktop, tablet, and mobile displays. This responsive design approach ensures a consistent visual experience across different devices. Adjusting these parameters optimizes the visual appeal and user experience on all platforms.
Ensuring Accessibility and
Adding taxonomy image icons to your WordPress site can significantly enhance the user experience, but it’s crucial to consider accessibility and search engine optimization () best practices. These practices ensure that your site is usable by everyone, including those with disabilities, and helps search engines understand and rank your content effectively. Failing to address these aspects can hinder your site’s visibility and user engagement.The visual appeal of icons can be easily overshadowed by a lack of consideration for the needs of users with disabilities, or by techniques that don’t work well with search engine algorithms.
By implementing robust accessibility and strategies, you create a more inclusive and discoverable site.
Accessibility Considerations
Image icons, while visually appealing, can pose challenges for users who rely on assistive technologies like screen readers. These tools need alternative text descriptions to convey the meaning of the images to users who cannot see them. This ensures that everyone can understand the purpose and context of the icon, promoting equal access to information.
Alternative Text Attributes
Providing comprehensive alternative text (alt text) for each image icon is paramount. The alt text should accurately describe the icon’s purpose and its relationship to the taxonomy term. Avoid generic descriptions like “image” or “icon.” For example, if the icon represents the “Technology” category, the alt text should be “Technology category icon.” This allows screen readers to effectively communicate the icon’s meaning to users.
Image Descriptions
Beyond alt text, consider providing concise image descriptions within the surrounding content. These descriptions expand on the alt text, offering more context and meaning. For instance, if the icon is part of a category, a description might say “This icon represents the technology category, highlighting innovative products.”
Icons and
Search engines, like Google, rely on various signals to understand the content of a webpage. Image icons, when appropriately tagged, can contribute to a more comprehensive understanding of the site’s content, potentially improving rankings. Relevant alt text, coupled with meaningful image descriptions, helps search engines understand the context of the icon and its relationship to the taxonomy term, ultimately boosting visibility.
Accessibility Best Practices
| Aspect | Description | Example |
|---|---|---|
| Alt Text | Provide concise, descriptive text that accurately reflects the icon’s purpose. | For an icon representing “Books,” use “Books category icon.” |
| Image Descriptions | Offer additional context and meaning, expanding on the alt text. | “This icon represents the Books category, showcasing a wide selection of titles.” |
| Meaningful File Names | Use descriptive file names for your image icons, reflecting their purpose and category. | “books-category-icon.png” |
| Contextual Placement | Place icons within the context of relevant taxonomy terms. | Display the “Books” icon alongside the “Books” category listing. |
| Avoid Redundancy | Avoid repeating information visually and textually. | Use the icon to visually represent a category, while using the category name textually. |
Troubleshooting Common Issues: How To Add Taxonomy Images Category Icons In WordPress
Adding taxonomy image icons to your WordPress site can sometimes encounter snags. Understanding potential problems and their solutions is crucial for a smooth implementation. This section details common issues and provides practical fixes to ensure your icons display correctly and your plugin integrates seamlessly.Troubleshooting these issues can save you significant time and effort, allowing you to focus on other aspects of your website’s design and functionality.
By addressing potential conflicts proactively, you can maintain a consistent and visually appealing user experience.
Icon Display Problems
Issues with icon display often stem from incorrect image paths or formatting. The icons must be accessible to WordPress, ensuring the correct file structure and pathing. Problems may also arise if the icons are not in the correct file format, such as being incompatible with the theme. Ensuring compatibility between the theme and the plugin is vital for correct icon display.
A visual representation of this could be a blank space where the icon should be.
File Upload Issues
Uploading images can encounter problems due to various reasons, including incorrect file types or exceeding file size limits. If the image file is not in the supported format or exceeds the size limit specified by your WordPress settings, the upload will fail. This might be caused by file corruption, improper file compression, or a problem with your server configuration.
Plugin Compatibility Issues
Plugin conflicts are common when integrating new elements into your WordPress site. A conflict between the taxonomy image plugin and other plugins on your site can lead to unexpected behavior or even a complete failure of the image display. This might be due to competing code that modifies the same functions or variables.
Theme Style Conflicts
Themes often have their own styles that can conflict with the plugin’s display rules. The theme’s CSS may overwrite the plugin’s styles, preventing the icons from appearing as intended or causing them to appear in an undesirable manner. This can lead to misalignment, incorrect sizing, or a complete absence of the icons.
Troubleshooting Table
| Problem | Solution |
|---|---|
| Icons not displaying | Verify correct file paths, ensure image format compatibility, and check for theme-plugin conflicts. Double-check the plugin settings for correct image paths. |
| File upload failure | Ensure the image file is in a supported format (e.g., JPG, PNG). Verify that the file size does not exceed the WordPress upload limit. Check for issues with the server configuration. |
| Plugin conflict | Disable other plugins temporarily to isolate the conflict. Check the plugin documentation for known conflicts and compatibility notes. Update both plugins to the latest versions. |
| Theme style conflict | Inspect the theme’s CSS to identify potential conflicts. Use a CSS editor or plugin to override specific styles related to the taxonomy icons. Consider contacting the theme developer for assistance if needed. |
Advanced Techniques (Optional)

Adding taxonomy image icons to WordPress can go beyond simple static assignments. Advanced techniques unlock dynamic displays and more sophisticated management of your icon library. This section explores methods for creating truly customized and flexible icon systems, ideal for complex websites with extensive taxonomies.Dynamic icon generation based on taxonomy terms offers a powerful way to adapt iconography to specific content.
This can involve generating icons based on the specific term itself, perhaps using a color scheme that changes based on the term’s metadata. Imagine a “Project” taxonomy where different project phases (e.g., Planning, Design, Development, Testing) could automatically display unique icons.
Dynamic Icon Generation
Dynamically generating icons provides a more flexible and scalable approach to taxonomy iconography. This allows the icon to reflect the content of the taxonomy term itself. For instance, you could associate a specific color or style with different stages of a project, reflected in the displayed icon. A plugin or theme function could create a lookup table to map taxonomy terms to icon paths, enabling this dynamic behavior.
Custom Fields for Icon Data
Custom fields provide a way to store additional information about each taxonomy term, including icon details. This is useful for storing information beyond the simple image file, such as size specifications, alternative text descriptions, or even custom icon styles. This data can be used in various ways to control the appearance and accessibility of the icons, improving the user experience.
For example, you could add a custom field to specify the icon size for each category, enabling a more consistent design across different screens.
Custom Icon Libraries
Integrating custom icon libraries into your WordPress theme provides a centralized repository for your iconography. This method allows you to maintain all your icons in a single location, making it easier to manage, update, and maintain them. Instead of embedding images directly within your theme files, you would create a dedicated directory for icons and include them via theme functions.
This approach ensures consistency and organization, making it easier to scale your icon library as your website grows.
Creating a Custom Plugin
A custom plugin allows for complete control over the management and display of taxonomy icons. This approach gives you the freedom to create custom logic, implement complex icon mapping, and handle various display scenarios. The plugin can include functions to retrieve icon paths based on taxonomy terms, handle different icon sizes, and implement specific display styles. This gives you total flexibility to meet the specific needs of your website.
A custom plugin offers a more advanced solution for managing a complex icon library, enabling you to control every aspect of the display process.A plugin would contain functions for:
- Retrieving the appropriate icon path based on the taxonomy term.
- Handling various icon sizes and display styles.
- Storing and managing custom icon data using custom fields.
- Integrating with existing WordPress functions to display icons in categories and tags.
By employing these advanced techniques, you can create a dynamic and adaptable taxonomy icon system that aligns seamlessly with your WordPress website’s design and functionality. This flexibility ensures the icons remain relevant and visually appealing as your website evolves.
Final Wrap-Up
In conclusion, adding taxonomy image icons significantly enhances the visual appeal and usability of your WordPress site. By following this guide, you can easily implement these icons, improving user navigation and overall website experience. Remember to prioritize accessibility and best practices for the best results.