How to create a custom WordPress block? This in-depth guide will walk you through the entire process, from initial setup to final deployment. We’ll explore the power of custom blocks, contrasting them with other WordPress elements like widgets and shortcodes. You’ll learn the core principles of building, styling, and integrating your unique block into your WordPress website.
Imagine a WordPress block tailored exactly to your needs – a form for user submissions, a dynamic image gallery, or a sophisticated table editor. This guide will empower you to build precisely that. We’ll start with the fundamental steps and gradually introduce advanced techniques, ensuring you have a strong foundation in custom block development.
Introduction to Custom WordPress Blocks
Custom WordPress blocks are reusable components that extend the functionality of the WordPress editor. They allow developers to create unique and tailored content experiences, enhancing the user interface and adding specific features. Think of them as mini-plugins, designed to embed specific functionalities directly into the WordPress editor.These blocks can encompass anything from simple text formatting to complex interactive elements, making your website more dynamic and user-friendly.
They provide a more organized and modular approach to building content compared to traditional methods like widgets or shortcodes, offering greater flexibility and control.
Benefits of Custom Blocks
Custom blocks offer significant advantages over traditional WordPress components. They provide a more structured and organized approach to content creation, reducing the risk of conflicts and ensuring a consistent user experience.
- Enhanced User Experience: Custom blocks allow for more interactive and engaging content layouts. For example, a custom block for a contact form could feature a visually appealing design, leading to a better user experience.
- Improved Code Maintainability: Custom blocks are modular and reusable, leading to cleaner and more maintainable code. This is crucial for large websites or complex projects, where maintaining codebases is essential.
- Increased Flexibility: Developers can create unique functionalities not available with standard WordPress features. This includes features such as dynamic content displays, interactive maps, or custom widgets.
Difference Between Custom Blocks, Widgets, and Shortcodes
Custom blocks differ from widgets and shortcodes in several key aspects. Widgets are typically used for sidebars and other areas outside the main content area, whereas custom blocks integrate directly into the editor. Shortcodes, on the other hand, are typically used for simple display of content, and do not offer the same level of interactivity or organization.
| Component | Functionality | Placement |
|---|---|---|
| Custom Block | Reusable content components that enhance the editor. | Integrated into the main content area. |
| Widget | Displays content in specific areas like sidebars. | Outside the main content area. |
| Shortcode | Displays content via a code snippet. | Embedded into the text editor. |
High-Level Overview of the Custom Block Creation Process
Creating a custom block involves several key steps. It begins with defining the block’s functionality and design, followed by structuring the code and testing the implementation.
- Defining the Block’s Purpose: What specific functionality or feature will this block provide? Consider the type of content it will manage and how users will interact with it. For example, a block for displaying testimonials should allow users to add testimonials, manage them, and choose display options.
- Structuring the Code: The core of the block’s functionality will be written using JavaScript and other relevant technologies. This involves setting up the block’s internal logic, including how it handles user inputs and displays content. Careful planning in this stage will significantly impact the block’s usability and scalability.
- Testing and Debugging: Thoroughly testing the block is critical to ensure its stability and proper function. Testing in various browsers and with different content inputs is essential to catch any unexpected behavior or bugs.
A Simple Step-by-Step Procedure for Creating a Custom Block
This process will help in creating a simple custom block for displaying formatted text.
- Install and Activate the Necessary Plugins: Use the appropriate plugins to ensure compatibility with the latest WordPress versions. The plugins will help you integrate the block into the editor seamlessly.
- Create a New Block Template File: The template file will contain the JavaScript code to handle the block’s functionality. Create this file within your theme’s directory or in a plugin.
- Define the Block’s Functionality: This stage involves writing JavaScript code to handle the block’s functionality. The code will define how the block interacts with the editor and displays its content.
- Register the Block: Register the block with WordPress so that it appears in the editor’s block library.
- Test and Refine: Thoroughly test the block to ensure its functionality and appearance are as expected.
Setting Up the Development Environment
Getting your WordPress development environment set up correctly is crucial for building custom blocks. A well-organized and configured environment streamlines the development process, making it easier to debug, test, and maintain your code. This section will guide you through installing and configuring essential tools and plugins.A robust development environment is essential for creating and maintaining high-quality custom WordPress blocks.
It provides a controlled and consistent space for development, testing, and debugging, enabling you to confidently integrate your custom blocks into your WordPress site. This is important for isolating your changes and ensuring that they don’t unintentionally affect other parts of your site.
Installing Necessary Tools
A reliable code editor is a cornerstone of any WordPress development workflow. A good editor will provide features like syntax highlighting, autocompletion, and debugging tools, significantly boosting your efficiency. Choosing a suitable editor is important for comfort and productivity during the development process.
- Code Editors: Popular choices for WordPress development include Visual Studio Code (VS Code), Sublime Text, Atom, and Brackets. VS Code is frequently recommended due to its extensive features, including a vast plugin ecosystem, robust debugging tools, and a user-friendly interface.
- Local Development Environment: Setting up a local development environment is crucial. This involves installing XAMPP, WAMP, or MAMP, which are readily available and easy-to-use tools. They create a local server that mirrors the structure and functionality of your WordPress installation.
Configuring the WordPress Environment
A well-structured WordPress project directory is vital for organizing files and ensuring that your custom block’s code is easily accessible and maintainable. It also helps you manage different versions of your code.
- Project Structure: A structured project directory should contain the necessary files and folders to accommodate your custom block. A common structure includes a ‘blocks’ folder to store block files. Within the ‘blocks’ folder, create a new folder for your specific block. This hierarchical structure improves code organization and makes finding files much easier. Example: `wp-content/plugins/my-custom-block/blocks/my-block`.
Essential WordPress Plugins
Certain plugins can significantly enhance your WordPress development experience. Using plugins that support block development can streamline tasks and improve workflow.
- WordPress Plugin Development Tools: A plugin such as the “WP-CLI” plugin is a great example of a useful tool that can help you manage your WordPress installation. This command-line tool offers a wide range of commands for managing your WordPress site, which can be particularly helpful when performing tasks like installing, updating, and managing plugins and themes.
Creating a New WordPress Project
Creating a new WordPress project involves setting up a local server, installing WordPress, and then creating the directory structure for your custom block.
- Install Local Server: Choose a local server setup like XAMPP or MAMP. Follow the installation instructions for your chosen software.
- Install WordPress: Download the latest version of WordPress from the WordPress website and upload it to your local server’s `htdocs` or `www` folder.
- Create Project Directory: In the `wp-content/plugins` directory of your WordPress installation, create a new folder for your plugin. Name this folder after your custom block (e.g., `my-custom-block`).
Sample Project Structure
This structure demonstrates how to organize files within your plugin directory.“`my-custom-block/├── block.php├── block-editor.js├── block-style.scss└── index.php“`
Defining the Block’s Functionality
Crafting a custom WordPress block involves more than just its visual appearance; it necessitates a deep understanding of its internal workings and how it interacts with the broader WordPress ecosystem. This section dives into the core functionality, exploring the block’s structure, the data it handles, and its attributes. We’ll also examine how to manage user input effectively within the block.A well-designed custom block anticipates the types of data it will need to process and present.
This proactive approach ensures the block’s seamless integration into existing workflows. This includes careful consideration of the attributes, which are essentially the knobs and dials that control the block’s behavior.
Learning how to create a custom WordPress block can seem daunting, but it’s actually pretty straightforward. Understanding user needs, like those explored by Ashish Malpani in his work on voice of customer , helps tailor the block to meet specific user requirements. Ultimately, creating a custom block involves careful planning and execution, ensuring it seamlessly integrates into your website’s functionality.
Block Structure and Interface
The structure of a custom block directly impacts its usability and functionality. A well-organized structure ensures the block is easy to use and maintain. This involves planning the input fields and output displays, crucial for a user-friendly experience. The interface should be intuitive, allowing users to easily configure the block’s settings and content.
Data Handling
Custom blocks can handle various data types, from simple strings to complex objects. Understanding these data types is essential for building a robust and versatile block. This includes the ability to store, retrieve, and manipulate the data within the block. Data validation is also critical to ensure that the block functions as expected.
Block Attributes
Block attributes are the defining characteristics of a custom block. They control how the block behaves and how it interacts with the WordPress editor. Each attribute plays a critical role in defining the block’s functionality. Attributes should be well-documented to aid in understanding and troubleshooting.
Different Block Types and Attributes
Understanding the various types of blocks and their associated attributes is critical for designing a comprehensive custom block solution. This is exemplified in the following table:
| Block Type | Attributes |
|---|---|
| Text Block | Content (string), Alignment (left, center, right), Font Size, Font Family |
| Image Block | Image URL, Image Alt Text, Image Caption, Image Size, Link URL |
| Button Block | Button Text, Button URL, Button Style, Button Size |
| Gallery Block | Image URLs, Image Alt Text, Gallery Layout, Link URLs |
Handling User Input and Data
User input is a critical aspect of any custom block. The block should be designed to accept user input in a clear and intuitive manner. Validating user input is paramount to prevent unexpected errors and ensure data integrity. This often involves using JavaScript and PHP to interact with the user and manage the data.
Building the Block’s Logic
")
Crafting the core behavior of your custom WordPress block hinges on a harmonious interplay between JavaScript and PHP. JavaScript handles the front-end user experience, while PHP manages the block’s registration and interaction with WordPress’s internal mechanisms. Understanding this division of labor is crucial for creating responsive and functional blocks.The JavaScript code is responsible for dynamically rendering the block’s user interface and reacting to user actions.
The PHP code registers the block with WordPress, defining its appearance and functionality. By separating concerns, we ensure maintainability and avoid complexities that can arise from mixing these responsibilities.
JavaScript for Rendering and User Interaction
JavaScript is the language that breathes life into the block’s visual elements and responses to user actions. It’s responsible for how the block looks and behaves when a user interacts with it.
A crucial aspect of JavaScript in WordPress block development is handling user input. This often involves updating the block’s internal state in response to user actions, like button clicks or form submissions. The changes are then reflected in the block’s displayed output. Effectively managing these interactions is vital for creating engaging and user-friendly blocks.
Consider a simple text input block. JavaScript would update the block’s displayed text whenever the user types in the input field. This immediate feedback enhances the user experience and allows for dynamic content updates within the block.
// Example JavaScript for a simple text input block
wp.blocks.registerBlockType('my-custom-block/text-input',
  title: 'Text Input',
  icon: 'align-wide',
  category: 'common',
  attributes:
    text:
      type: 'string',
      default: 'My Default Text'

  ,
  edit: (props) =>
    const  attributes, setAttributes  = props;
    const  text  = attributes;

    return (

         setAttributes( text: event.target.value )
        />

    );
  ,
  save: (props) =>
    const  attributes  = props;
    const  text  = attributes;
    return  text
;  ,);
PHP for Block Registration and Functionality
PHP is the backbone of your custom block, enabling its interaction with WordPress. This includes registering the block with the system and defining how it interacts with the backend.
The PHP code is where you specify the block’s attributes, behavior, and how it interacts with the rest of WordPress. Defining the block’s attributes is key for storing data associated with the block. This data is accessible both in the front-end and the back-end.
// Example PHP code for registering the block
add_action('init', 'my_custom_block_init');

function my_custom_block_init()
  register_block_type('my-custom-block/text-input', array(
    'editor_script' => 'my-custom-block-script',
    'editor_style' => 'my-custom-block-style',
  ));
The Interplay of JavaScript and PHP
The block’s functionality arises from the collaboration between JavaScript and PHP. JavaScript handles the dynamic user interface, while PHP manages the block’s registration and interaction with WordPress’s core mechanisms.
Styling the Custom Block
Now that your custom WordPress block is functional, it’s time to give it a visually appealing design. Styling allows you to tailor the block’s appearance to match your website’s aesthetic and enhance the user experience. Effective styling is crucial for creating a consistent and engaging user interface.
CSS Styling Techniques
WordPress blocks leverage CSS to control their visual presentation. Using CSS selectors, you can target specific elements within the block and modify their appearance, such as color, font, size, and layout. Understanding CSS selectors is essential for precise styling.
Best Practices for WordPress Block Styling
Adhering to WordPress’s block styling best practices ensures compatibility and maintainability. These practices minimize potential conflicts and simplify future modifications. Key elements of these best practices include using block-specific selectors and avoiding inline styles.
Learning to craft custom WordPress blocks is a rewarding experience, and knowing how to track your website’s performance is crucial. This involves more than just the coding; understanding user behavior is key. To truly grasp this, delve into a comprehensive guide on mastering digital analytics with Google Analytics 4, guide on mastering digital analytics with google analytics 4 , which will help you decipher the data behind your website’s traffic.
Once you’ve got that under control, you’ll be able to create even more targeted and effective custom WordPress blocks.
Comparison of CSS Styling Approaches
| Approach | Description | Pros | Cons |
|---|---|---|---|
| Using block-specific selectors | Targeting specific elements within the block using selectors that uniquely identify the block’s structure. | High specificity, reduced risk of conflicts with other styles, improved maintainability. | Requires understanding the block’s internal structure. |
| Using contextual selectors | Targeting elements based on their position within the block or surrounding context. | Useful for styling elements dynamically based on their location within the block or the page. | Potentially less maintainable if the block’s structure changes. |
| Using class-based styling | Applying custom classes to elements within the block and targeting those classes in your CSS. | Highly flexible, allows for modularity, enables easy re-styling across multiple blocks. | Can become complex if not managed carefully. |
Modifying Appearance and Layout
CSS provides a wide array of properties to adjust the block’s visual aspects. Properties like `color`, `font-size`, `font-family`, `padding`, `margin`, and `width` can be used to modify text, spacing, and dimensions. This allows for comprehensive control over the block’s look and feel. For example, changing the `background-color` can instantly alter the visual impact.
Incorporating Custom Stylesheets, How to create a custom wordpress block
To create a more organized and maintainable approach to styling, custom stylesheets are recommended. These separate files store your CSS rules, which can be linked to the block during the development process. This promotes code organization and reduces the likelihood of errors. This is achieved by utilizing the `style.css` file within the block’s directory.
Registering and Activating the Block
Now that your custom WordPress block is designed and functional, it’s time to integrate it into your website. This involves registering the block with WordPress, ensuring it’s properly recognized and usable by the platform. The registration process is crucial for the block to appear in the editor and function as expected.
The WordPress Block Registration Process
WordPress block registration uses JavaScript code that defines the block’s attributes, functionality, and appearance. This code, typically placed within a PHP file, informs WordPress about the new block. The code meticulously describes the block’s behavior and interface within the WordPress editor. This step ensures the block seamlessly integrates with existing WordPress functionalities.
Registering the Custom Block with WordPress
The registration process involves creating a JavaScript file (e.g., my-block.js) containing the block’s definition. This file will define the block’s name, icon, attributes, and other important characteristics. The JavaScript file is then linked to a PHP file (e.g., my-block.php) which handles the actual registration within WordPress. This ensures the block is correctly identified and managed by the WordPress system.
This process is crucial for proper block initialization.
Activating the Custom Block After Development
After developing and testing your custom block, you need to activate it in your WordPress environment. This involves uploading the relevant files (the JavaScript and PHP files, along with any associated assets) to the appropriate directory within your theme or plugin. Once the files are uploaded, the block is ready for use. This ensures that the block is accessible and functional within the WordPress editor.
Step-by-Step Guide for Publishing the Custom Block to WordPress
- Create the JavaScript File: Develop the JavaScript code defining the block’s behavior, including its appearance, attributes, and internal logic, as detailed in previous sections.
- Create the PHP File: Develop the PHP file that registers the block with WordPress. This involves linking the JavaScript file and defining the block’s name and other key parameters for proper registration.
- Upload Files: Upload the JavaScript file (e.g.,
my-block.js) and the PHP file (e.g.,my-block.php) to the appropriate location within your theme or plugin directory. This ensures that the block definition is accessible to WordPress. - Activate Plugin/Theme: If your block is part of a plugin, activate the plugin. If it’s a theme block, activate the theme. This step makes the block available for use in the WordPress editor.
- Test the Block: Use the WordPress editor to insert the custom block and verify its functionality. Check that the block renders correctly and that its internal logic operates as intended. Ensure that all expected actions are performed within the block’s interface.
Ensuring the Custom Block Functions Correctly After Activation
To ensure the custom block functions correctly after activation, rigorous testing is paramount. Thoroughly test all aspects of the block, including its rendering, interactions with other elements, and responses to user actions. This ensures a smooth user experience. Thorough testing prevents issues arising from unexpected behaviors after deployment.
Handling User Interactions and Data
Interacting with users and managing the data they provide is crucial for building dynamic and useful WordPress blocks. This section delves into the methods for handling user input, storing data, and ensuring data security within your custom block. We’ll explore how to handle various user interactions, including form submissions and data updates, and the crucial role of JavaScript for communication with the server.User interaction within a custom block often involves receiving data from users.
Ever wanted to build a custom WordPress block? It’s surprisingly straightforward, but understanding your target audience is key. Just like successful businesses rely on thorough research, like the importance of research in business growth , you need to understand user needs to craft a valuable block. This includes analyzing existing solutions and identifying gaps in the market.
Then, you can proceed with the development process, ensuring your custom block meets a real user demand.
This data needs to be processed and managed efficiently, whether it’s simple text input or complex form submissions. Robust data handling practices are essential for ensuring the accuracy and integrity of the block’s functionality.
User Input Handling
User input is typically collected through forms within the block. These forms can range from simple text fields to complex multi-step processes. Effective input handling involves validating user input to prevent unexpected behavior and ensure data integrity.
Data Storage and Retrieval
Data storage and retrieval mechanisms are critical for persisting user input and enabling block functionality across multiple sessions. This section Artikels various approaches for handling the storage and retrieval of data, including using WordPress’s built-in database or external solutions.
Example Scenarios
Consider a custom block for managing a list of tasks. A user could add new tasks, update existing tasks, or delete them. These actions would trigger different interactions with the server and potentially involve updating the displayed list of tasks. Another example involves a block that collects user feedback. The block could present a form for users to submit their feedback, which then gets stored in the database for later retrieval and analysis.
Validating the user input (e.g., ensuring the task description is not empty) and handling potential errors is essential.
JavaScript Communication with the Server (AJAX)
JavaScript plays a vital role in communicating with the server to process user interactions without full page reloads. AJAX (Asynchronous JavaScript and XML) allows for efficient data exchange between the client-side (user interface) and the server-side (WordPress). This approach is crucial for handling tasks like updating data in the block or displaying feedback to the user without requiring a complete page refresh.
Data Validation and Security
Data validation and security are paramount when handling user input. Input validation checks for the expected format, type, and range of data to prevent unexpected behavior. For instance, if a field expects a date, the validation would ensure that the user provides a valid date format. Data sanitization techniques are essential to protect against cross-site scripting (XSS) attacks and other vulnerabilities.
Using WordPress’s built-in sanitization functions helps to minimize risks. Proper encoding and escaping of user input are critical to avoid security loopholes.
Best Practices
- Always validate user input to prevent unexpected behavior or data corruption. This includes checking for required fields, appropriate data types, and valid formats.
- Sanitize user input to prevent cross-site scripting (XSS) vulnerabilities and other security risks. Use WordPress’s built-in sanitization functions whenever possible.
- Use AJAX for asynchronous communication with the server. This avoids full page reloads and provides a more responsive user experience.
- Store user data securely in the WordPress database or a secure external service, implementing proper access controls.
These practices ensure the security and reliability of your custom block and provide a positive user experience.
Testing and Debugging the Block
Thorough testing is crucial for ensuring the reliability and stability of your custom WordPress block. A well-tested block is less prone to unexpected behavior and errors, leading to a smoother user experience. Rigorous testing throughout the development process helps identify and fix issues early on, preventing frustration and saving time later.Comprehensive testing methods and strategic debugging strategies are key to a successful custom block.
Debugging tools are available to aid in identifying and resolving issues, ultimately resulting in a high-quality, robust block.
Testing Block Functionality
Thorough testing ensures your block functions as expected across various scenarios and user interactions. This includes checking how the block interacts with other elements on a page, handles different data inputs, and displays correctly in various browsers and screen sizes.
- Unit Testing: Isolating individual components of the block to verify their functionality independently. This is essential for isolating and identifying errors in specific parts of the block’s code. For instance, a unit test could verify that a button triggers a specific action. Failing unit tests indicate issues in the logic or implementation of that component.
- Integration Testing: Testing how the block interacts with other parts of the WordPress system, including themes, plugins, and other custom blocks. This checks for compatibility and interactions with the broader WordPress ecosystem. For example, ensure the block saves and retrieves data correctly in the context of a post or page.
- User Acceptance Testing (UAT): Involving real users in testing the block to ensure it meets their needs and expectations. UAT is critical for identifying usability issues and gathering feedback on the block’s overall performance.
Troubleshooting Common Issues
Identifying and resolving errors is a vital part of debugging. Understanding common errors and implementing appropriate troubleshooting strategies is essential for smooth block operation.
- Console Errors: Carefully review browser developer tools’ console for JavaScript errors, which often indicate problems in the block’s code. Analyzing these errors helps to pinpoint the source of the issue.
- Debugging Tools: WordPress’s debugging tools can help diagnose issues. Leveraging these tools helps to understand how the block interacts with the WordPress environment. This can involve checking server logs, using WordPress’s debug mode, or examining the block’s output in the browser.
- Step-by-Step Debugging: Inspecting the code line by line to identify where the execution diverges from the expected path can help to pinpoint the root cause of an issue.
Using WordPress Debugging Tools
WordPress offers built-in debugging tools to help developers identify and address issues.
- WordPress Debug Mode: Enabling WordPress debug mode in `wp-config.php` displays detailed error messages and helps pinpoint the source of problems. This mode reveals comprehensive information about the process, allowing for better analysis and resolution of issues. An example is enabling debug mode will reveal details about database queries, plugin conflicts, and theme errors.
- Error Logging: WordPress logs errors in specific files. Analyzing these logs helps identify patterns and pinpoint the cause of recurring errors. This data provides insight into potential conflicts and allows developers to implement effective troubleshooting strategies.
- Browser Developer Tools: Utilizing browser developer tools (e.g., Chrome DevTools, Firefox Developer Tools) is essential for inspecting the block’s behavior and identifying JavaScript errors in real-time.
Addressing Errors in Code and Functionality
Debugging errors requires a systematic approach. By carefully analyzing the error messages and inspecting the block’s code, you can identify and fix issues.
- Review Error Messages: Carefully review error messages for clues. Error messages often provide specific details about the problem, making it easier to locate the problematic code.
- Inspect Code: Inspecting the block’s code for logical errors and syntax issues is essential. Pay attention to the flow of the code, ensuring that it correctly processes inputs and outputs.
- Test and Refactor: Re-test the block thoroughly after making changes to ensure that the corrections resolve the issue and don’t introduce new problems. Refactoring, when necessary, can improve code quality and maintainability.
Advanced Customization Options
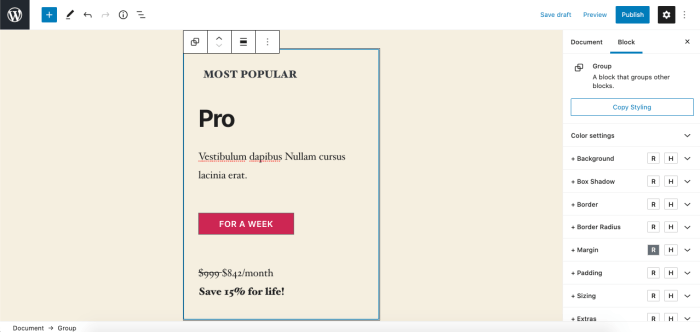
Taking your custom WordPress blocks beyond the basics involves understanding and implementing advanced customization features. This allows for more tailored user experiences and greater control over the block’s appearance and functionality. Advanced features, like block controls, editing options, and block settings, significantly enhance the block’s utility and make it more user-friendly.Adding sophisticated controls and settings empowers users to effectively manage the block’s behavior and appearance, creating a powerful and dynamic tool within the WordPress ecosystem.
Careful consideration of maintainability and scalability is crucial for long-term usability.
Block Controls
Block controls allow users to manipulate the block’s appearance and behavior without needing deep technical knowledge. Adding intuitive controls improves user experience. Implementing these controls requires careful planning and user interface design.
- Adding Controls for Appearance: Controls like color pickers, dropdown menus for font sizes or styles, or image selection fields allow users to adjust visual aspects of the block. This customization can make the block highly adaptable to various design needs.
- Implementing Dynamic Controls: Dynamic controls can adjust based on user input or other factors. For instance, a control that automatically adjusts the spacing between elements in a list depending on the list’s length can provide an enhanced user experience.
Editing Options
These options provide a richer editing experience for users. The goal is to make editing the block more intuitive and efficient. This also reduces the chances of errors.
- Customizable Text Areas: Allowing users to specify the text content of a block, along with features such as formatting options or placeholder text, can significantly enhance the user experience. This enables diverse content and customization possibilities.
- Advanced Formatting Tools: Implementing features like rich text editors, table editors, or even embedded media controls can drastically improve the block’s usability. This enhances the capabilities of the block.
Block Settings
Block settings allow users to adjust the block’s overall behavior and functionality. These settings are crucial for enabling customization that goes beyond the immediate visual aspects.
- Defining Default Values: Pre-setting values for common options ensures consistent functionality across different instances of the block. This standardization helps maintain a predictable and user-friendly interface.
- Storing User Preferences: Enabling users to save their preferred settings within the block allows for personalized experiences and enhances the block’s appeal. Saving settings makes the block more user-centric.
Best Practices for Maintainability and Scalability
These practices are vital for creating custom blocks that can adapt to future needs and updates. Adhering to best practices makes the code cleaner, more organized, and easier to maintain.
- Modular Design: Breaking down the block into smaller, reusable components improves maintainability and reduces the risk of errors when modifying the code.
- Code Documentation: Comprehensive documentation explaining the purpose, functionality, and usage of each part of the block is essential for future maintenance and expansion. Detailed documentation ensures a clear understanding of the code.
- Thorough Testing: Testing the block across various scenarios and user inputs ensures that it functions correctly and reliably in different contexts. Thorough testing helps avoid bugs and ensure a robust block.
Illustrative Examples
Custom WordPress blocks can dramatically enhance your website’s functionality and user experience. Beyond the foundational concepts, practical examples illuminate the potential of these blocks. This section provides a variety of scenarios, demonstrating the diverse applications and showcasing how to implement them.
Image Block with Captions
This example showcases a custom block designed to display images with accompanying captions. This is useful for articles, galleries, and portfolios. It allows for better organization and engagement with visual content.
The block’s functionality is straightforward. Users can upload images and write captions. The block will then render the image and caption in a visually appealing manner, likely with a responsive design for different screen sizes.
Example Implementation: The block could allow users to select an image from their computer, and a text input area would be provided to write a caption. The block would automatically resize the image to fit the available space, while ensuring the caption remains visible and legible.
List Block
This block allows users to create and manage unordered or ordered lists. This is particularly helpful for creating checklists, step-by-step guides, or bullet points in various content types.
Key Features: The block would provide options for users to add list items, adjust the type of list (unordered or ordered), and easily reorder the items. It could also support nested lists for more complex arrangements.
Example: Imagine a recipe blog. The recipe block could enable users to create a list of ingredients and steps, with an option to make the steps an ordered list or bullet points. This approach improves content organization and user understanding.
Table Block
A custom table block offers users a convenient way to create and edit tables within their WordPress posts and pages. This is especially useful for displaying data in a structured format, such as product listings, comparison charts, or data tables.
Features: This block would allow users to add rows and columns, input data, and format the cells (e.g., bolding, italicizing, aligning text). The block could support various table properties, including row and column spans, cell merging, and responsive design. The block could also handle export of the table to various formats like CSV.
Comparison Table
| Block Type | Functionality | Use Case |
|---|---|---|
| Image Block with Captions | Displays images with user-added captions. | Articles, Galleries, Portfolios |
| List Block | Creates and manages unordered/ordered lists. | Checklists, Step-by-Step Guides, Bullet Points |
| Table Block | Creates and edits tables for data display. | Product Listings, Comparison Charts, Data Tables |
Final Wrap-Up: How To Create A Custom WordPress Block
")
Crafting custom WordPress blocks unlocks a world of possibilities for enhancing your website’s functionality and user experience. From designing the block’s structure and behavior to styling it to perfection and seamlessly integrating it into WordPress, this guide equips you with the knowledge to create powerful, customized solutions. Remember, thorough testing and attention to detail are crucial to ensure your block operates flawlessly.