How to install and setup Google Tag Manager in WordPress. This guide provides a comprehensive walkthrough for integrating Google Tag Manager (GTM) with your WordPress website. We’ll cover everything from creating your GTM account to implementing essential tags and triggers, and even advanced configurations for maximum efficiency and security. Whether you’re a beginner or an experienced user, this step-by-step approach will equip you with the knowledge and skills to track crucial website data effectively.
Mastering GTM integration unlocks valuable insights into user behavior and website performance, enabling you to make informed decisions that boost your WordPress site’s success. This tutorial breaks down the process into digestible steps, making it easy for you to understand and apply. We’ll also discuss different implementation methods, comparing plugins versus manual installation. From setting up basic tags to troubleshooting potential issues, this guide has you covered.
Introduction to Google Tag Manager and WordPress Integration
Google Tag Manager (GTM) is a powerful tool for managing website tags and tracking without needing to touch the website’s code directly. Think of it as a central hub for all your website tracking, allowing you to add, update, and remove tags (pieces of code that collect data) efficiently. This is incredibly valuable, especially for complex websites like those built on WordPress, where directly modifying code can be time-consuming and error-prone.GTM streamlines the process of implementing and managing various tracking tools, like Google Analytics, social media pixels, and conversion tracking.
This centralized approach simplifies website maintenance, making updates and adjustments easier, and reducing the chance of errors. By using GTM, WordPress users can significantly improve their website analytics and gain valuable insights into user behavior.
Setting up Google Tag Manager in WordPress is surprisingly straightforward. You’ll need to grab the GTM container ID and add it to your website. This is crucial for tracking conversions, but did you know Google recently updated product markup to support member pricing sales? This update is a game-changer for e-commerce sites, and knowing how to implement it correctly is vital.
Once you have the hang of the new markup, you can further enhance your Google Tag Manager setup to track these member sales. Getting Google Tag Manager right is key for a successful WordPress site.
Google Tag Manager: A Concise Overview
Google Tag Manager is a free tag management system (TMS) that allows you to manage website tags without directly modifying the website’s code. It provides a user-friendly interface for adding, updating, and removing tracking tags, simplifying the process of web analytics implementation. This centralized approach makes managing various tags, like those for Google Analytics, social media pixels, and conversion tracking, significantly easier.
Setting up Google Tag Manager in WordPress is surprisingly straightforward. You’ll need to download the plugin and follow the setup wizard, making sure to connect your Google Tag Manager account. Understanding the key metrics that matter is crucial, and this directly impacts your company’s value, as highlighted in the analysis of the seven factors of company value.
Once you’ve got Tag Manager configured, you can start tracking website traffic and user behavior, gaining insights into how to optimize your site’s performance. This data will prove invaluable for making strategic decisions that drive your business forward.
Benefits of Using GTM with WordPress
Using GTM with WordPress offers numerous advantages. It reduces the risk of errors when adding and updating tags, and it streamlines the process of managing website tracking. By separating tag management from website code, developers can focus on other aspects of website development while maintaining accurate and up-to-date tracking. Furthermore, GTM allows for easy A/B testing and experimentation with different tracking configurations, leading to more informed decisions based on real data.
Fundamental Concepts of Tagging and Tracking in Web Analytics
Tagging in web analytics involves placing small pieces of code (tags) on a website to collect data about user interactions. This data can include page views, clicks, conversions, and other actions. Tracking is the process of collecting and analyzing this data to understand user behavior and website performance. The fundamental purpose of both is to gather valuable information that can improve website design, optimize marketing strategies, and ultimately drive business growth.
Accurate tagging and tracking provide insights into user journeys, helping businesses understand how visitors interact with their websites.
The Overall Process of Installing and Configuring GTM on a WordPress Site
The installation process typically involves installing a GTM container (a snippet of code) on your website. This is generally done via a plugin, but sometimes manually through your theme’s code. Following this, you can create tags for various tracking tools, set triggers to activate these tags under specific conditions, and configure variables to pass data. Understanding these steps is crucial for effectively utilizing GTM on your WordPress site.
Comparison of GTM Implementation Methods
| Method | Advantages | Disadvantages ||—|—|—|| Plugin (e.g., Google Tag Manager for WordPress) | Easy installation and setup; minimal technical expertise required; often includes support and updates; readily available; often simpler configuration; often integrates well with popular plugins. | Potential conflicts with other plugins; may not offer as much customization; limited control over the code implementation; potential for performance issues; sometimes limited features. || Manual Installation (theme/plugin code) | Greater control over the code implementation; potential for enhanced performance; allows for specific and advanced configurations; no reliance on plugins.
| Requires technical expertise; more complex setup; higher risk of errors; less support; potentially more time-consuming. |
Installing the Google Tag Manager Container
Setting up Google Tag Manager (GTM) for your WordPress site involves several crucial steps. This process, while seemingly complex, is actually quite straightforward once you understand the logic behind each action. The core involves creating a GTM account, a container, and then integrating that container with your WordPress website. This guide will walk you through each stage, ensuring you successfully deploy GTM for enhanced tracking and analysis.
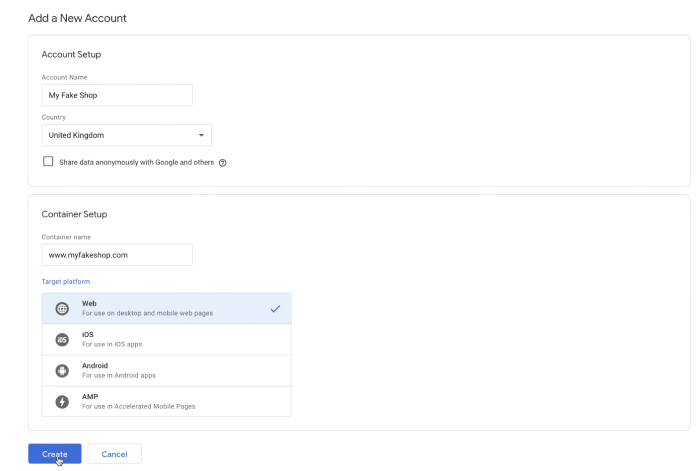
Creating a GTM Account
To begin, you’ll need a Google Tag Manager account. If you don’t already have one, visit the Google Tag Manager website and sign up. The process is straightforward, requiring your Google account credentials. Once you’re logged in, you’ll be directed to your account dashboard.
Creating a New GTM Container
After account creation, you’ll need to create a container specifically for your WordPress site. This container will house the tags you’ll use to track website interactions. On your GTM account dashboard, navigate to the “Containers” section and click “Create container.” Provide a descriptive name for your container (e.g., “My WordPress Site”). Choose the correct web property type (website) from the dropdown menu.
Choosing the Correct Container Settings for a WordPress Site
The container settings are critical for ensuring your GTM implementation works correctly with your WordPress site. The most important setting is the “Container ID.” This ID is unique to your container and is vital for the snippet integration. You should also ensure the container’s time zone is set correctly to avoid discrepancies with your site’s data.
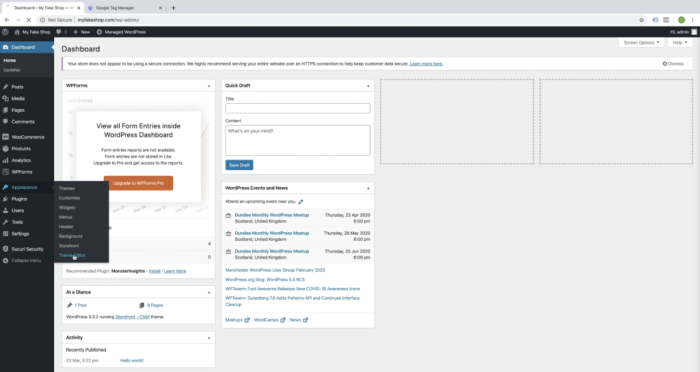
Installing the GTM Container Snippet on Your WordPress Site
Installing the GTM container snippet on your WordPress site involves adding a piece of JavaScript code to your website’s header. This code tells GTM how to interact with your site and track data. There are several ways to achieve this, including using a plugin or manually adding the code via a child theme. Choose the method that best suits your technical comfort level and website structure.
After you’ve added the snippet, you should verify it’s working correctly.
Container Settings Table
This table Artikels the significance of various container settings:
| Setting | Significance |
|---|---|
| Container ID | A unique identifier for your container. |
| Web Property | Defines the type of website (website or app). |
| Time Zone | Ensures data is collected and displayed accurately based on your site’s location. |
| Advanced Settings | Customize further options for specific requirements or tracking methods. |
Setting Up Essential Tags in Google Tag Manager
Now that you’ve successfully integrated Google Tag Manager with your WordPress site, the next crucial step is setting up the essential tags. These tags act as the communication channels between your website and the analytics platforms, allowing you to collect valuable data. This process will enable you to track user interactions, measure campaign effectiveness, and gain insights into website performance.
Creating a New Tag in GTM
Creating a new tag in Google Tag Manager is straightforward. Navigate to the “Tags” section within the GTM interface. Click the “+” button to add a new tag. This will initiate a wizard-style process, guiding you through the necessary configurations. Select the type of tag you want to create (e.g., Google Analytics, Facebook Pixel, or a custom event).
Types of Tags Commonly Used in Web Analytics
A variety of tags are crucial for comprehensive website tracking. Google Analytics is fundamental for measuring website traffic, user behavior, and conversion rates. Conversion tracking tags, like those from advertising platforms (e.g., Google Ads, Facebook Ads), are vital for measuring the effectiveness of marketing campaigns by linking ad clicks to conversions on your website. Custom event tags enable you to track specific user actions not covered by standard tags, such as form submissions, file downloads, or specific button clicks.
Examples of Common Tags
Let’s illustrate with concrete examples. A Google Analytics tag collects data on page views, bounce rates, and user engagement. A Facebook Pixel tag tracks website interactions, allowing Facebook to retarget ads to users who have interacted with your site. An important example is an ad conversion tag from Google Ads, which links clicks from a Google Ads campaign to conversions on your website.
Configuring Tags for Tracking Specific Events
To track specific events, you need to configure the tag to trigger on those events. For instance, if you want to track when a user submits a contact form, you would create a tag that triggers when a specific form submission event occurs. The triggering event will vary depending on the tag type and the action you want to track.
Understanding the event types available within your chosen tag type is crucial.
Essential Tags for WordPress Website Tracking
The table below Artikels essential tags for a robust WordPress website tracking setup. These are not exhaustive, and specific needs will dictate additions.
| Tag Type | Description | Importance |
|---|---|---|
| Google Analytics | Tracks website traffic, user behavior, and conversions. | Essential for understanding website performance. |
| Google Ads Conversion Tag | Tracks conversions from Google Ads campaigns. | Crucial for measuring campaign ROI. |
| Facebook Pixel | Tracks website interactions to enable retargeting and ad optimization. | Important for Facebook ad campaigns. |
| Custom Event Tag (e.g., form submission) | Tracks user actions not covered by standard tags. | Allows for detailed tracking of specific user interactions. |
Configuring Triggers for WordPress Events
Triggers in Google Tag Manager (GTM) act as the gatekeepers, deciding when a tag should fire. They’re crucial for ensuring tags execute only when specific conditions are met, preventing unwanted data collection and optimizing tag performance. Without triggers, tags would fire indiscriminately, leading to inaccurate and potentially overwhelming data. Understanding trigger types and their application in WordPress is key to implementing a robust tagging strategy.Trigger configurations are essential for controlling when tags execute.
This allows for targeted data collection, ensuring that only relevant events are tracked. By defining specific triggers, you can fine-tune the data collected, avoiding unnecessary information and optimizing the performance of your GTM setup.
Understanding Trigger Types
Triggers in GTM come in various types, each designed for a particular purpose. Knowing these different types allows for more granular control over when and how tags fire. This is especially useful in WordPress where numerous events occur.
- Page View Triggers: These are fundamental triggers that fire whenever a user views a new page. They’re vital for tracking page visits, and in WordPress, they often capture page load data for analytics. A page view trigger is used for recording the initial loading of a webpage.
- Click Triggers: These triggers are activated when a user clicks on a specific element, such as a button or a link. They’re essential for tracking user interactions, and in WordPress, they are critical for monitoring button clicks and link engagement. For instance, if you want to monitor when a “Buy Now” button is clicked, a click trigger would be used to collect that data.
- Form Submit Triggers: These triggers are activated when a user submits a form. They’re essential for collecting information about form submissions on your WordPress website. They’re important for tracking contact form submissions, order form submissions, and any other form-based interaction.
- Custom Triggers: These triggers are designed for unique events that aren’t covered by standard trigger types. They allow for extremely granular control over when tags fire. In WordPress, custom triggers might track specific user actions not easily categorized by other types, such as a user enrolling in a webinar or adding a product to their shopping cart.
Examples of Triggers for WordPress Actions
Here are examples of how to use different trigger types for common WordPress actions:
- Page View: A page view trigger is activated every time a user loads a new page on your WordPress site. This is a fundamental trigger for tracking website traffic.
- Button Click: A click trigger can be configured to fire when a user clicks a specific button, like a “Subscribe” button. This enables tracking of user engagement with specific calls to action.
- Form Submission: A form submit trigger is used to track when a user submits a contact form. This helps analyze user interactions with contact forms and identify areas for improvement.
Creating Custom Triggers for Specific Events
Creating custom triggers allows you to track highly specific events not covered by standard trigger types. In WordPress, this can involve monitoring user interactions with custom plugins or elements not part of core functionality.
- Identify the Event: Clearly define the specific event you want to track.
- Choose a Trigger Type: Determine if a standard trigger type is suitable or if a custom trigger is necessary.
- Configure the Trigger: Set up the trigger using the appropriate parameters to identify the event. This may involve selecting a specific element, checking specific values, or defining conditions based on user interactions.
Common WordPress Events and Their Corresponding Trigger Types
This table provides a general guideline for common WordPress events and their associated trigger types:
| WordPress Event | Trigger Type |
|---|---|
| Page View | Page View |
| Button Click | Click |
| Form Submission | Form Submit |
| User Registration | Custom |
| Product Add to Cart | Custom |
Implementing and Testing GTM Tracking
Thorough testing is crucial for ensuring Google Tag Manager (GTM) implementation on your WordPress site is accurate and effective. Without proper testing, you risk missing crucial data points, hindering analysis, and potentially impacting your marketing strategies. This section will detail the importance of comprehensive testing, guide you through the testing process, and help you troubleshoot common issues.Implementing GTM tracking is only half the battle; verifying its functionality is equally important.
Correct implementation ensures accurate data collection, which in turn drives informed decision-making. This section will help you navigate the testing phase, from setting up test environments to utilizing various tools and troubleshooting common problems.
Importance of Thorough Testing
Accurate data collection is paramount in marketing and analytics. GTM’s role in capturing user interactions and site activity is essential. Thorough testing verifies that tags are firing correctly, data is being captured as expected, and triggers are responding to user actions. A robust testing approach ensures the integrity of your data, enabling accurate reporting and effective marketing strategies.
Testing Methods and Tools
Several methods and tools can be used to effectively test GTM implementations. Preview mode within GTM allows for real-time monitoring of tags and triggers. This feature lets you see how tags fire in response to different user interactions on your site.Another critical testing method involves using a dedicated testing environment. This method involves setting up a separate website or a staging area for testing GTM implementations before deploying them to the live site.
This isolates testing, preventing accidental disruptions to live traffic and data.
Testing Steps for WordPress Sites
- Preview Mode Activation: Activate preview mode in GTM to see how tags and triggers behave on your website in real-time. This lets you identify any discrepancies immediately.
- Simulated User Interactions: Use preview mode to simulate user actions like button clicks, form submissions, or page views to verify tag firing. This is vital for understanding how GTM interacts with various website events.
- Data Validation: Examine the collected data in Google Analytics to confirm that the data is being recorded correctly. Look for discrepancies and missing data points to pinpoint areas for improvement.
- Testing in a Staging Environment: Set up a staging environment or a test site to simulate live conditions. Implement GTM on this test environment and thoroughly test all functions before deploying to the live website.
- A/B Testing: Test different configurations or versions of your GTM tags and triggers on a subset of your audience. This allows you to compare performance and optimize for better results.
Troubleshooting Common GTM Issues
Troubleshooting GTM issues requires a systematic approach. Common problems include incorrect tag configurations, mismatched triggers, or issues with data delivery. Identifying the root cause of the problem is key to finding a solution.
Troubleshooting Table
| Error | Possible Cause | Troubleshooting Steps |
|---|---|---|
| Tags not firing | Incorrect tag configuration, missing or invalid trigger, incorrect container setup. | Verify tag configurations, check trigger settings, ensure correct container setup, and review the GTM preview mode for real-time feedback. |
| Data not appearing in Analytics | Tag not firing correctly, data not being passed correctly, incorrect property settings. | Check tag firing, ensure data is being passed correctly to Analytics, and verify Analytics property settings. |
| Triggers not working as expected | Incorrect trigger configuration, missing event data, conflicts with other tags or triggers. | Review trigger configurations, ensure necessary event data is being captured, and look for conflicts with other tags or triggers. |
| Performance issues | Excessive tags or triggers, inefficient data handling. | Optimize tag configurations, reduce the number of tags and triggers if possible, and ensure data is being handled efficiently. |
Advanced Configurations and Best Practices
Diving deeper into Google Tag Manager (GTM) unlocks its true potential for sophisticated tracking and optimization. This section explores advanced features, best practices for WordPress integration, and strategies for performance and security enhancement. We’ll also show how to integrate third-party services seamlessly.Understanding the nuances of GTM variables, custom events, and advanced trigger configurations allows for more precise and dynamic tracking, going beyond basic website interactions.
This is crucial for businesses seeking detailed insights into user behavior and campaign performance.
Advanced GTM Features
GTM offers a robust set of advanced features that go beyond basic tagging. Variables allow dynamic data insertion into tags, providing tailored experiences based on user characteristics or website context. Custom events allow you to track actions not natively supported by GTM or WordPress, further enriching your data collection.
Best Practices for WordPress Integration
Implementing GTM on a WordPress site demands careful consideration. Prioritize a clean and well-organized GTM container structure, avoiding unnecessary complexity. Employ clear naming conventions for tags, triggers, and variables to maintain maintainability. Testing is paramount; thoroughly test each tag and trigger configuration to ensure accurate data collection. Document your implementation process for future reference and maintenance.
Optimizing GTM for Performance and Security
Performance optimization is key for a smooth user experience. Minimize the size of your GTM container and ensure efficient loading by using asynchronous loading techniques. For security, utilize HTTPS to protect data transmission. Employ strong passwords and restrict access to your GTM account to prevent unauthorized modifications.
Integrating Third-Party Services
Integrating third-party services with GTM is common for enhanced tracking. Many analytics platforms, marketing automation tools, and advertising networks can be integrated seamlessly. For example, integrating with a CRM allows you to track customer interactions across your website and other platforms. A detailed understanding of the service’s API is crucial for smooth integration.
Figuring out how to install and setup Google Tag Manager in WordPress can be a bit tricky, but it’s totally doable! Once you’ve got that sorted, you’ll want to make sure your email marketing campaigns are optimized for mobile devices. Checking out mobile optimized subject lines is a great way to boost engagement and clicks. Ultimately, mastering both these areas will lead to a more effective digital strategy for your WordPress site.
Potential Performance Issues and Optimization Strategies
- Excessive Tag Count: Having too many tags in your GTM container can slow down page load times. Consolidate tags where possible or use the ‘tag usage’ report in GTM to identify and reduce redundant tags.
- Complex Trigger Logic: Overly complex trigger configurations can negatively impact performance. Simplify trigger conditions and test thoroughly to avoid unintended behavior or delays.
- Third-Party Library Conflicts: Conflicting third-party libraries can lead to errors and performance issues. Ensure compatibility between your GTM implementation and other scripts on your site.
| Performance Issue | Optimization Strategy |
|---|---|
| Excessive Tag Count | Consolidate redundant tags, utilize tag usage reports, and prioritize asynchronous loading. |
| Complex Trigger Logic | Simplify trigger conditions and thoroughly test for accurate data collection and avoiding delays. |
| Third-Party Library Conflicts | Ensure compatibility between GTM and other scripts, use asynchronous loading for libraries, and carefully review the documentation of third-party libraries. |
Using WordPress Plugins for GTM Integration: How To Install And Setup Google Tag Manager In WordPress
Leveraging WordPress plugins can significantly streamline the integration of Google Tag Manager (GTM) into your website. These plugins automate many of the setup tasks, freeing up your time to focus on other aspects of your website’s performance and functionality. They also help to ensure consistency and accuracy in tag implementation.WordPress plugins offer a user-friendly approach to integrating GTM.

They often handle the technical details of connecting your WordPress site to GTM, allowing you to focus on configuring tags and triggers relevant to your specific needs. This approach is particularly beneficial for those less familiar with the intricacies of code implementation.
Comparison of Popular GTM WordPress Plugins
Various plugins are available for integrating GTM with WordPress. Choosing the right one depends on your specific requirements and the level of customization needed. The ideal plugin will not only streamline the integration process but also enhance tracking capabilities for your site’s data. A key consideration is whether the plugin offers support for custom events or if it is limited to pre-defined actions.
-
Google Tag Manager for WordPress is a popular choice for its ease of use and comprehensive features. It generally handles most basic setups with minimal effort. However, it might lack the flexibility required for complex configurations or advanced tracking scenarios.
-
Ultimate Tag Manager often offers more advanced options and a wider range of tracking capabilities. This might be a better choice for those with sophisticated tracking needs, but the learning curve can be steeper.
-
WP Google Tag Manager by Tagman is a robust plugin that provides both standard and advanced functionalities. It stands out for its support for multiple GTM accounts and detailed configuration options.
Advantages and Disadvantages of Using Plugins
Plugins offer a simplified approach to GTM integration, but it’s crucial to understand their benefits and drawbacks.
-
Advantages: Plugins reduce the need for manual code insertion, streamlining the integration process. They often include user-friendly interfaces, making configuration easier for beginners. Some plugins even offer automatic updates, keeping your GTM implementation up-to-date with the latest versions.
-
Disadvantages: Plugins might limit customization options, especially for highly specific tracking requirements. They may not support all the features and functionalities that manual integration allows. There can also be dependencies on the plugin’s developer for updates and support. A plugin’s limitations should be carefully evaluated before implementation.
Step-by-Step Installation and Configuration
Implementing a GTM plugin is generally straightforward. Each plugin’s instructions will vary slightly, but the core steps remain similar.
- Download and install the chosen plugin from your WordPress admin dashboard.
- Activate the plugin.
- Connect your Google Tag Manager account by providing your GTM container ID.
- Configure any necessary settings within the plugin’s interface.
- Verify that the tags and triggers are functioning as expected through testing.
Plugins for Specific Use Cases, How to install and setup google tag manager in wordpress
Certain plugins are particularly well-suited for specific types of tracking. For instance, e-commerce tracking often requires specialized plugins to accurately capture sales data and customer behavior.
-
E-commerce plugins: Plugins dedicated to e-commerce tracking provide comprehensive tools for capturing transactions, product views, and other key metrics. They are essential for businesses focused on online sales and analyzing purchasing patterns.
Table of Popular WordPress Plugins for GTM
The table below highlights some popular GTM WordPress plugins and their features.
| Plugin Name | Features |
|---|---|
| Google Tag Manager for WordPress | Basic setup, easy to use interface |
| Ultimate Tag Manager | Advanced features, comprehensive tracking |
| WP Google Tag Manager by Tagman | Multiple GTM accounts support, advanced configuration |
Troubleshooting Common GTM Issues on WordPress
Getting Google Tag Manager (GTM) to work flawlessly on your WordPress site can sometimes feel like navigating a maze. This section dives into common pitfalls and provides practical solutions for resolving them. We’ll cover everything from tag firing issues to container conflicts, arming you with the tools and knowledge to confidently troubleshoot any GTM problem on your WordPress site.Effective troubleshooting hinges on understanding the core interactions between GTM, your website, and WordPress.
By identifying the source of the problem, you can pinpoint the necessary adjustments to get your tracking setup humming along.
Identifying Tag Firing Issues
Tag firing issues are a frequent headache for GTM users. These problems often stem from incorrect trigger configurations or conflicts with other plugins. To effectively diagnose these issues, it’s crucial to understand how GTM tags and triggers work together. Checking the GTM preview mode or debugging tools is paramount in this process.
- Review Trigger Configurations: Ensure that the triggers you’ve set up accurately reflect the events you want to track. Double-check the conditions, especially the event type, and the values. A slight misconfiguration can prevent a tag from firing correctly. For example, a trigger set to fire on “pageview” but the correct event type being “customEvent” will not work.
- Inspect Tag Firing Times: Analyze the timing of tag firings using GTM’s preview mode or debugger. This helps pinpoint if a tag is firing too early, too late, or not at all. Look at the timestamp on each firing event to spot any irregularities.
- Check for Tag Sequencing Errors: Ensure that your tags are firing in the intended order. Sometimes, a tag firing before another necessary tag can cause problems. Order is crucial for accurate tracking.
Troubleshooting Container Conflicts
Container conflicts often arise from multiple instances of the GTM container being loaded on a single page. This can lead to unpredictable behavior and errors. Understanding how to manage the container is key to preventing conflicts.
- Verify Unique Container Loading: Make sure only one GTM container is included in your WordPress site’s code. Duplicate containers will lead to errors. Double-check the plugin settings and any custom code for multiple inclusions.
- Review Plugin Compatibility: Some WordPress plugins can interfere with GTM. If you suspect a plugin is the culprit, temporarily disable it to see if the problem resolves. If this resolves the issue, investigate alternative plugins or adjust the plugin’s configuration.
- Examine Custom Code Conflicts: If you have custom code on your site, examine it closely for any conflicts with the GTM container. Carefully review the code for potential issues, and ensure that it’s not overriding or interfering with the GTM container.
Utilizing the GTM Debugger
The GTM debugger is a powerful tool for diagnosing problems. It provides detailed insights into tag and trigger behavior, helping you pinpoint the source of errors.
- Employing the Debugger: Use the debugger to see if tags fire as expected. Set breakpoints to observe the flow of events. This is critical for identifying delays, misconfigurations, and any other issues.
- Analyzing Debugger Logs: Carefully review the logs provided by the debugger. These logs contain detailed information about the events that occurred, helping you pinpoint the exact moment a problem occurred. This can include tag firing times, trigger evaluations, and any errors.
Example Debugging Scenarios and Solutions
- Scenario: A tag isn’t firing on a specific page.
Solution: Use the debugger to inspect trigger firings. Verify that the trigger conditions are met on the problematic page. - Scenario: Multiple GTM containers are loaded.
Solution: Identify and remove the extra containers to ensure a single container is active.
Typical GTM Errors and Potential Causes
| GTM Error | Potential Cause |
|---|---|
| Tag not firing | Incorrect trigger configuration, container conflicts, or missing tags. |
| Container not loading | Incorrect container code placement, script conflicts, or syntax errors in the container code. |
| Data not passing to destination | Incorrect tag configuration or missing data variables. |
Outcome Summary

In conclusion, this comprehensive guide has walked you through the entire process of installing and setting up Google Tag Manager on your WordPress site. From initial setup to advanced configurations, we covered all the essential steps. By implementing the techniques and strategies Artikeld here, you can unlock the full potential of GTM and effectively track crucial website data, ultimately leading to improved site performance and informed decision-making.
Remember to test thoroughly and utilize the provided troubleshooting tips to ensure a smooth implementation.