

How to refresh your browsers cache Google Chrome is a crucial skill for any web user. A cluttered browser cache can lead to slow loading times, missing images, and a frustrating web experience. This guide dives deep into the world of browser caching, explaining how it works, how to clear specific cache entries, and how to manage your cache settings effectively within Google Chrome.
Understanding how your browser stores and retrieves information is key to optimizing your online experience. From images and scripts to entire websites, we’ll explore the different types of cached data and how they impact your browsing speed. This comprehensive guide covers everything from basic clearing techniques to advanced cache management strategies.
Understanding Browser Caching
Browser caching is a fundamental aspect of web browsing that significantly impacts performance and user experience. It’s a mechanism employed by web browsers to store frequently accessed resources, such as images, scripts, and stylesheets, locally on your computer. This local storage allows the browser to retrieve these resources faster on subsequent visits, thus reducing loading times. This process is crucial for optimizing website performance and enhancing user satisfaction.Browser caching works by storing copies of web resources on your computer’s hard drive.
When you visit a website, the browser checks if the cached version of a resource is still valid. If it is, the browser retrieves the resource from the cache, eliminating the need to download it again from the server. This dramatically speeds up subsequent page loads, as the browser can access the data locally instead of fetching it from a remote server.
How Browser Caching Works
Caching works on a principle of comparison and retrieval. The browser first checks if the requested resource exists in the cache. If it does, and if the cached version is still valid (meaning its timestamp hasn’t expired), the browser serves the resource from the cache. Otherwise, it fetches the resource from the server. This process significantly reduces network traffic and improves page load times.
Clearing your browser’s cache in Google Chrome is a simple way to fix some pesky website glitches. Want to take your CRM to the next level? Consider how boost crm efficiency with salesforce einstein ai can streamline your sales processes. A clean cache ensures faster loading times and a more enjoyable browsing experience. Just follow the steps to refresh your cache and you’re good to go!
Types of Cached Files
Various types of files are cached by browsers, significantly impacting the speed and efficiency of web browsing. These include:
- Images: Images are a crucial component of web pages, contributing to visual appeal and content clarity. Caching these images allows the browser to retrieve them quickly on subsequent visits, enhancing the visual performance of the page.
- Scripts: Scripts are pieces of code that perform actions on the web page. Caching scripts reduces the amount of data the browser needs to download, improving page responsiveness and reducing loading times.
- Stylesheets: Stylesheets define the visual presentation of web pages, including colors, fonts, and layout. Caching stylesheets enables faster page rendering, as the browser can retrieve the stylesheet from the cache instead of downloading it repeatedly.
- Other Resources: Other resources like audio, video, and various data files can also be cached. The caching mechanism is universal and applies to any resource that is downloaded.
Benefits of Browser Caching
Browser caching offers several benefits for both users and website owners:
- Faster Page Loads: By retrieving resources from the cache, subsequent page loads are significantly faster, improving user experience.
- Reduced Server Load: Reduced server load as the server does not need to respond to requests for frequently accessed resources.
- Improved Network Efficiency: Reduced network traffic and improved overall network efficiency, particularly beneficial in environments with limited bandwidth.
- Enhanced User Experience: Faster loading times and smoother navigation contribute to a more enjoyable and satisfying user experience.
Drawbacks of Browser Caching
While browser caching is generally beneficial, there are some potential drawbacks:
- Potential for Stale Data: If a resource is modified on the server but not updated in the browser’s cache, users might see an outdated version of the resource.
- Increased Storage Space: Cached files consume storage space on the user’s device.
- Complexity of Management: Implementing and managing cache expiration policies can be complex for website owners.
Cache Expiration Policies
Cache expiration policies are crucial in managing the validity of cached resources. These policies define how long a resource remains valid in the cache. This is essential to ensure that users always see the most up-to-date version of a website.
- Time-Based Expiration: Resources are cached for a specified duration. After that time, the browser fetches the updated resource from the server.
- Conditional Requests: The browser requests resources only if they have been modified since the last download.
Comparison of Browser Caching Mechanisms
The following table provides a comparative overview of various browser caching mechanisms:
| Mechanism | Description | Pros | Cons |
|---|---|---|---|
| HTTP Caching | Based on HTTP headers, controlling how long resources stay in the cache. | Simple to implement, widely supported. | Can lead to stale content if not managed properly. |
| ETag Caching | Uses unique identifiers for resources, enabling conditional requests. | Reduces unnecessary downloads, improves efficiency. | Can be more complex to implement compared to HTTP caching. |
| Last-Modified Caching | Caches resources based on the last modification date. | Efficient for static content. | Can be less efficient for dynamic content. |
Clearing Specific Cache Entries: How To Refresh Your Browsers Cache Google Chrome
While clearing your entire browser cache is often sufficient, sometimes you need to target specific entries. This might be necessary if a particular image or file from a website isn’t displaying correctly, or if you want to remove cached data for a specific domain or file type. This granular control over your cache allows for more precise troubleshooting and maintenance of your browsing experience.
Clearing Cache for Specific Websites
To clear the cache for a particular website, you don’t need to clear the entire cache. Chrome allows for selective removal of cached data. This is useful for resolving issues with a single website without affecting other browsing data.
Removing Cached Images from a Specific Website
To remove cached images from a specific website, the most effective approach is to use Chrome’s developer tools. These tools provide direct access to the browser’s cache. First, navigate to the website in question. Then, open the developer tools (usually by right-clicking and selecting “Inspect”). Within the developer tools, locate the Network tab.
Once you’ve located the specific image you wish to remove, right-click on the entry and select “Disable Cache” or “Clear Cache.” This forces the browser to retrieve the image from the server, effectively removing the cached version.
Clearing Cache for a Specific Domain
Clearing the cache for a specific domain involves removing all cached data associated with that domain. This is often helpful for resolving issues where a website’s content isn’t updating properly. Using the browser’s developer tools, you can target the domain-specific cache. By navigating to the “Network” tab, you can filter the entries to show only requests from the target domain.
Select the specific entries and clear them individually. This ensures only the desired domain’s cache is purged, preserving data from other websites.
Clearing Cached Data for a Particular File Type
To clear cached data for a specific file type, such as .pdf or .jpg, you need to locate the relevant entries in the browser’s cache. While there’s no direct filter for file type, you can utilize the developer tools to identify and remove cached resources of that type. Filter by “type” in the developer tools, and locate the specific files you want to remove.
Deleting these specific entries will purge the cached data of the desired file type.
Table of Steps for Clearing Different Resource Types
| Resource Type | Steps to Clear Cache |
|---|---|
| Images (.jpg, .png) | Use developer tools’ Network tab to identify and remove cached images from the target website. |
| CSS Files (.css) | Use developer tools’ Network tab to identify and remove cached CSS files from the target website. |
| JavaScript Files (.js) | Use developer tools’ Network tab to identify and remove cached JavaScript files from the target website. |
| HTML Files (.html) | Use developer tools’ Network tab to identify and remove cached HTML files from the target website. |
| Specific Domain | Filter the Network tab by domain and remove specific entries. |
Clearing the Entire Browser Cache
Keeping your browser’s cache clean is crucial for optimal performance and security. A cluttered cache can slow down loading times, consume storage space, and even lead to compatibility issues with websites. Regularly clearing your browser’s cache, including the entire cache, ensures a smooth browsing experience and safeguards your data.
Clearing the Cache via the Settings Menu
This is the most straightforward method. You can easily clear the entire cache from within the Chrome settings menu. This method is suitable for users who prefer a visual interface for navigating and executing the task.
Clearing your browser’s cache in Google Chrome can sometimes dramatically impact your site’s performance, especially if you’re tracking keyword ranking updates. For instance, a recent keyword ranking update report might show some unexpected shifts, and refreshing your browser’s cache could help identify if those changes are due to a temporary issue on your end. You can easily refresh your browser’s cache by navigating to Chrome’s settings and following the appropriate steps.
A clean cache can provide a clearer picture, so it’s worth checking if your rankings are fluctuating. See the keyword ranking update report for the latest insights into the current landscape. Following these steps to refresh your browser’s cache can often provide a fresh perspective on your site’s performance.
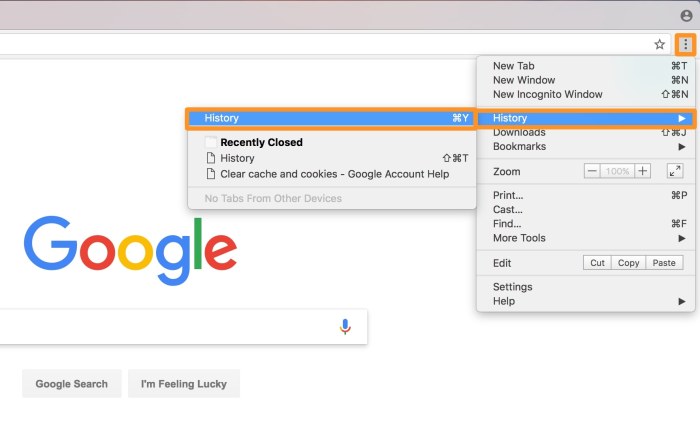
- Open Google Chrome.
- Click on the three vertical dots (the menu button) in the top right corner of the browser window.
- Select “More tools” and then “Clear browsing data.”
- A new window will appear. In the “Time range” dropdown, select “All time.” This ensures you clear all cached data.
- Ensure the “Cached images and files” box is checked. Unchecking this box would only clear the temporary internet files.
- Click “Clear data.”
Clearing the Cache Using Keyboard Shortcuts
For those who prefer speed and efficiency, keyboard shortcuts offer a quicker alternative to clearing the browser cache. This method is especially useful for tasks that require repeated actions.
- Open Google Chrome.
- Press Ctrl+Shift+Del (Windows) or Cmd+Shift+Del (Mac).
- The same “Clear browsing data” window will appear. Follow steps 4-6 from the previous method.
Clearing the Cache Using Developer Tools
While less common for everyday users, the Chrome developer tools provide advanced control over browser functions, including cache management. This method is valuable for technical users who need fine-grained control over cache management.
- Open Google Chrome.
- Press F12 to open the developer tools.
- Navigate to the “Application” tab.
- Locate the “Cache” section.
- Click on the “Clear site data” button for specific websites or “Clear browser cache” to clear the entire cache. (Note: These options are typically located within the Application tab, not within the Cache section directly.)
Comparison of Methods, How to refresh your browsers cache google chrome
Each method has its own strengths and weaknesses. The settings menu is user-friendly and suitable for most users. Keyboard shortcuts provide a faster alternative. The developer tools offer more advanced control but require a higher level of technical familiarity. The table below summarizes the steps for each method.
| Method | Steps |
|---|---|
| Settings Menu | Open settings, select “Clear browsing data”, choose “All time”, check “Cached images and files”, click “Clear data”. |
| Keyboard Shortcuts | Press Ctrl+Shift+Del (Windows) or Cmd+Shift+Del (Mac), select “All time”, check “Cached images and files”, click “Clear data”. |
| Developer Tools | Open developer tools, navigate to the “Application” tab, locate the “Cache” section, click “Clear site data” or “Clear browser cache”. |
Managing Cache Settings
Fine-tuning your browser’s cache settings allows for a customized experience, optimizing performance for specific websites and file types. This control extends beyond simply clearing the cache, enabling users to tailor the caching behavior to their needs. Understanding how to adjust these settings is crucial for managing storage space and improving browsing speed.
Adjusting Cache Settings for Specific Websites
Controlling cache settings on a per-website basis offers granular control. This allows users to selectively disable caching for specific domains while retaining caching for others. For instance, if a user frequently updates a particular news website, they might choose to disable caching for that site to ensure they always see the latest content.
Controlling Cache Expiration Times
The cache expiration time dictates how long a web page or resource remains stored in the browser’s cache before being refreshed. This setting can be crucial for managing storage space and ensuring that users always see the most current content. A shorter expiration time ensures up-to-date content but increases the amount of data the browser needs to retrieve.
Conversely, a longer expiration time conserves storage space but might lead to outdated content if the website’s content changes frequently.
Disabling Caching for Specific Websites
Disabling caching for specific websites can be useful for ensuring the latest version of a webpage is always loaded. This is especially relevant for websites that frequently update their content, such as news sites or e-commerce platforms. This ensures the user always sees the most recent information without any cached content interfering. It’s a powerful tool for maintaining a dynamic browsing experience.
Setting Custom Cache Policies for Different File Types
Different file types (images, scripts, stylesheets) might benefit from different caching policies. For instance, images might be cached for a longer duration than scripts that are frequently updated. This customized approach to caching can significantly improve performance by prioritizing caching for static assets while retaining the ability to load the most current dynamic content.
Chrome’s Cache Settings Table
| Setting | Description | Impact |
|---|---|---|
| Cache Expiration Time | Specifies how long a resource remains in the cache. | Balances storage space and up-to-date content. |
| Cache Control Headers | Settings implemented by the website to control caching. | Enables or disables caching for specific resources. |
| Disable Caching for Specific Domains | Prevents caching for particular websites. | Ensures users always see the most current version of a website. |
| Custom Cache Policies | Allows configuring different caching durations for various file types. | Optimizes performance by prioritizing caching of static content. |
Troubleshooting Cache Issues

Browser caching, while crucial for website performance, can sometimes lead to problems. Slow loading times, missing images, or other inconsistencies can stem from issues with the cached data. This section delves into diagnosing and resolving these common caching problems.Understanding the causes of caching problems is key to effective troubleshooting. Often, these problems arise from conflicts between the cached version of a resource and the updated version on the server.
Clearing your Google Chrome browser cache is a simple way to fix some glitches. It’s a good idea to refresh your cache regularly, especially after installing new plugins like the EWWW Image Optimizer plugin, how to install plugin ewww image optimizer. This helps ensure your browser is running smoothly and efficiently. You can then confidently return to optimizing your website’s speed and performance by clearing your browser cache again.
Incorrect cache settings, corrupted files, or network issues can also contribute.
Identifying Common Issues
Problems with browser caching often manifest as slow loading times, missing images or other resources, or inconsistencies between what’s displayed and the most up-to-date server data. For example, if a website’s design has been updated, but your browser is still displaying the old design, it indicates a cache issue.
Diagnosing Cache Problems
Diagnosing caching issues involves systematically checking various aspects of the browser’s cache. First, check the loading times of specific web pages or resources. If a particular element is loading slowly, or not at all, this suggests a caching problem with that resource. Secondly, examine the browser’s network activity. Slow loading times or error messages might point to a network issue, but also cache problems.
Lastly, look for discrepancies between the displayed content and the expected server data.
Verifying Cache Integrity
To ensure the cache’s integrity, check for corrupted or outdated files. Look for error messages during loading or rendering, which can indicate corrupted cached resources. In addition, monitor server responses. If the server returns an “old” version, it could mean that your browser’s cache is out of sync.
Resolving Conflicts Between Cached and Server Data
Conflicts between cached data and server-side updates frequently arise when websites change their content. The browser might be displaying outdated information, while the server holds the latest version. Clearing the browser cache is a common solution. However, clearing the cache can be problematic if you’re working on a project where you need to view different versions of a resource.
Checking Cache Status
One way to assess the cache status is to examine the network tab of your browser’s developer tools. This tab displays all requests made to the server, including those for cached resources. Look for errors or unusual delays. Additionally, you can often see the cache’s size and the last updated time for cached files.
Resolving Conflicts and Issues
Sometimes, the cached data is corrupted, outdated, or simply missing. Clearing the browser cache is often the first step in resolving these issues. A thorough review of the cache status, coupled with a check of the server responses, is vital in identifying the source of the problem.
Troubleshooting Table
| Potential Problem | Solution |
|---|---|
| Slow loading times for specific resources | Check network tab in developer tools for slow or failed requests. Clear the cache for that specific resource if needed. |
| Missing resources (e.g., images, stylesheets) | Clear the browser cache or try to refresh the page. Check for server-side issues if the problem persists. |
| Inconsistencies between displayed content and server data | Clear the browser cache. Ensure the browser is using the most up-to-date version of the website’s data. |
| Corrupted cached files | Clear the browser cache entirely. If the problem persists, check for corrupted files in the browser’s cache storage. |
Advanced Cache Management Techniques
Beyond the basics of clearing your browser cache, advanced techniques allow for more granular control over how your browser handles cached data. These techniques optimize performance and tailor caching to your specific needs, preventing unnecessary downloads and improving loading times. Mastering these methods can significantly enhance your browsing experience.By understanding and implementing advanced cache management, you can fine-tune your browser’s caching behavior to suit your specific needs.
This can result in a noticeably faster and more responsive browsing experience.
HTTP Headers for Controlling Caching
HTTP headers provide a powerful mechanism for instructing the browser on how to handle cached resources. These directives allow for precise control over caching durations, conditions, and even the invalidation of cached items. Properly utilized, HTTP headers can drastically improve the efficiency of your browsing experience.
- Cache-Control headers are fundamental for managing the caching behavior of web resources. They dictate the maximum time a resource can remain in the browser’s cache and specify whether the resource can be cached at all. This precise control over caching is crucial for dynamic content and resources that need to be updated frequently.
- Expires headers specify a date and time after which a cached resource is considered invalid. This is useful for resources that are updated regularly, preventing stale data from being displayed.
- Vary headers define the conditions under which a cached resource might be different. This is essential for dynamic content where the response depends on user preferences or other factors. For instance, a website might return different versions of a page based on the user’s location, and the Vary header will inform the browser to not cache a response that may not be relevant to the user.
Browser Extensions for Enhanced Cache Management
Several browser extensions offer advanced tools for managing and optimizing the browser’s cache. These extensions provide more granular control, allowing you to fine-tune caching behavior beyond the standard browser settings. Some extensions provide tools to examine cached files, allowing you to see exactly what is being stored and identify any issues.
- Extensions like “Cache-Control” provide tools for inspecting and manipulating HTTP headers, allowing you to analyze how resources are being cached and potentially optimize caching strategies for particular websites.
- Others might allow you to clear specific cache entries, or to prefetch resources to improve loading times. This can be particularly beneficial when navigating complex websites or dealing with large files.
Cache-Control Mechanisms
Cache-control mechanisms are the foundational directives that govern how browsers and servers interact to cache resources effectively. Understanding the different mechanisms allows you to optimize resource delivery and reduce unnecessary bandwidth usage. Effective use of cache-control mechanisms improves page load times and user experience.
- Using directives like “no-cache” prevents the browser from storing resources, forcing a reload every time. This is important for security reasons and for resources that are frequently updated.
- Employing “max-age” directives sets a time limit for the cached resource, ensuring that the browser retrieves the latest version if it is within that time frame.
- The “must-revalidate” directive ensures that the browser checks the server for updated resources even if a cached copy exists, guaranteeing that the user always has the most up-to-date version.
Examples of HTTP Headers for Caching
The table below demonstrates various HTTP headers and their effects on caching behavior.
| Header | Description | Effect |
|---|---|---|
| Cache-Control: max-age=3600 | Specifies a maximum age of 1 hour for the cached resource. | The browser will use the cached resource for up to 1 hour, after which it will request a fresh copy. |
| Cache-Control: no-cache | Disables caching for the resource. | The browser will always request a fresh copy from the server. |
| Expires: Thu, 01 Dec 2023 16:00:00 GMT | Sets an expiration date for the cached resource. | The browser will not use the cached resource after this date. |
| Vary: User-Agent | Specifies that the response might vary based on the user agent. | The browser will not cache responses if the user agent changes. |
Illustrative Examples
Understanding browser caching is crucial for optimizing website performance and user experience. This section provides real-world scenarios to illustrate the importance of clearing cache, managing cache settings, and troubleshooting cache-related issues. From simple scenarios to more complex situations, these examples highlight the practical applications of the principles discussed earlier.
Scenario Requiring Cache Clearing
A user experiences a persistent issue where a website’s login form consistently displays a loading indicator. After inspecting the network traffic, it’s discovered that the login page and its associated stylesheets are not refreshing, despite the user having already cleared their browser history. This suggests that outdated cached resources are preventing the browser from loading the updated version. Clearing the browser cache, including cookies and site data, resolves the issue.
Example of a Web Page with Multiple Cached Resources
Imagine a web page displaying an image gallery. This page relies on several resources: an HTML file to structure the page, CSS files to style the gallery, JavaScript files to handle user interactions, and multiple image files. All these elements are cached by the browser. When a user revisits the page, the browser retrieves the cached versions of the HTML, CSS, JavaScript, and images, significantly speeding up the loading process.
This caching of multiple resources ensures quick page display for returning users.
Incorrect Cache Settings Leading to Problems
A website utilizes a caching mechanism that stores static content for a very long period. However, the site frequently updates its product images. Users experience delays in seeing the latest product images, even after refreshing the page. The long cache duration prevents the browser from loading the most recent images. This demonstrates how incorrect cache settings can lead to problems with website freshness and user experience.
The site’s administrator should adjust the caching settings to a more appropriate timeframe, ensuring that static assets are refreshed regularly.
Caching Affecting Website Performance
A news website displays real-time stock market data. If the browser’s cache is configured to store the stock quotes for an extended period, users might see outdated data. This demonstrates how caching, while beneficial for improving performance, can lead to problems when dealing with rapidly changing data. To ensure the latest stock quotes are displayed, the caching mechanism should be designed to refresh the stock data frequently.
This example shows how caching strategy must be tailored to the specific needs of the website.
Cache Management Scenarios
- Scenario 1: Frequent Updates: A blog frequently publishes new posts. Using short caching durations for the blog’s content ensures users always see the latest articles and avoids displaying old posts. The blog’s caching strategy should prioritize freshness.
- Scenario 2: Static Content: A corporate website with unchanging company information, like a “About Us” page, benefits from longer caching durations. This optimization reduces server load and improves loading times for users visiting the page repeatedly. Caching static content is an effective strategy for reducing server load.
- Scenario 3: Dynamic Content: An e-commerce website with products and pricing frequently updated needs a dynamic caching strategy. This might involve using a caching mechanism that allows for frequent updates to product listings, but still prioritizes the most recent information.
Last Point
In conclusion, refreshing your Google Chrome browser cache is a simple yet powerful way to improve your browsing experience. By understanding how caching works, clearing specific entries, and managing your settings, you can ensure your web pages load quickly and efficiently. This guide provides a complete roadmap for maintaining a clean and optimized browser cache, ensuring a smooth and responsive browsing journey.
Armed with this knowledge, you’ll navigate the web with confidence and speed.