
How to replace images and media files in WordPress is crucial for maintaining a website’s visual appeal and functionality. Outdated, broken, or copyrighted images can quickly degrade a site’s user experience. This guide covers everything from simple replacements to advanced techniques, including troubleshooting common issues and best practices for optimization.
This comprehensive guide explores various methods for replacing images and media files in WordPress, ranging from using the built-in media library to leveraging third-party plugins. We’ll also delve into troubleshooting common problems and best practices to ensure smooth and efficient image replacements.
Introduction to Image Replacement in WordPress
Keeping your WordPress website fresh and functional relies heavily on the images and media files you use. Outdated or broken media can negatively impact user experience, rankings, and even your website’s overall credibility. Replacing outdated or problematic media is crucial for maintaining a professional and engaging online presence.Replacing images and media isn’t just about aesthetics; it’s a critical maintenance task.
Outdated images can create a jarring visual experience, making your site look unprofessional and potentially losing potential customers. Broken links, caused by changes in file storage or server locations, lead to frustrating user experiences and impact your site’s search engine ranking. Copyright issues necessitate replacing images to avoid legal complications.
Importance of Image Replacement
Regular image replacement is essential for a healthy WordPress site. Broken images, outdated designs, or copyright infringements can harm your site’s performance and credibility. Users are less likely to engage with a website that displays broken images or outdated content. algorithms prioritize websites that are regularly updated, and broken links and outdated images can negatively affect your site’s ranking.
Common Scenarios Requiring Image Replacement
There are various scenarios where image replacement becomes necessary. One common reason is broken links. This often occurs when the original image file is moved or deleted. Out-of-date images can also necessitate replacement. For instance, if a product has undergone a redesign, the original images may no longer accurately represent the current product.
Copyright issues also necessitate image replacement. Using images without proper licensing can lead to legal repercussions.
Replacing images and media files in WordPress is pretty straightforward. You can easily swap out old pictures for new ones directly in the media library. However, a key consideration when optimizing your site for better performance is understanding how those image replacements impact your overall website design and conversion rates, such as in the case of B2B website conversion rate optimization.
b2b website conversion rate optimization strategies often involve visually appealing imagery that encourages conversions. Ultimately, careful image selection and replacement in WordPress can significantly contribute to your overall website’s success.
Types of Media Files Requiring Replacement
A variety of media files can require replacement on a WordPress site. Here’s a table outlining the common types:
Methods for Replacing Images and Media Files: How To Replace Images And Media Files In WordPress
Replacing images and media files in WordPress is a common task for website maintenance and updates. This process can be accomplished using various methods, each with its own set of advantages and disadvantages. Understanding these methods will help you choose the best approach for your specific needs and workflow.Effective image replacement ensures consistent visual appeal and optimized website performance.
The chosen method should also account for potential conflicts with existing website elements or plugins.
Replacing images and media files in WordPress is pretty straightforward. Just locate the file in your media library, then click ‘replace’ or ‘edit’. Knowing how to handle these updates is crucial, especially when major website updates like the recent Florida two broad core update Florida two broad core update happen. This update might affect your image optimization strategies, so double-checking your file replacements is always a good idea.
Built-in Media Library Method
The WordPress media library provides a straightforward way to replace images. This built-in feature is readily accessible and often sufficient for basic image replacements.
- Accessing the Media Library: Locate the media library within your WordPress dashboard. This typically involves navigating to the “Media” section, or similar, from the admin panel.
- Selecting the Existing Image: Within the media library, locate the image you want to replace. Select the image by clicking on it.
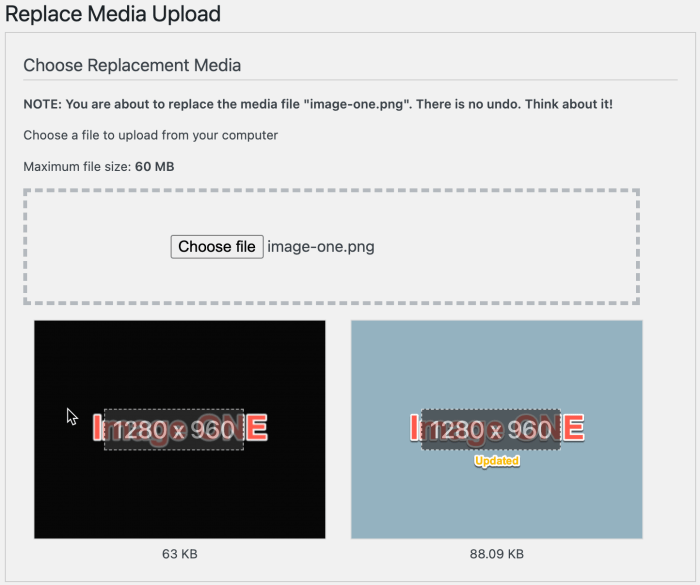
- Uploading the New Image: Click on the “Add New” button. This action will typically lead to a file selection interface. Choose the new image file you want to use. Ensure the new image has the necessary file format and dimensions to function seamlessly on your website.
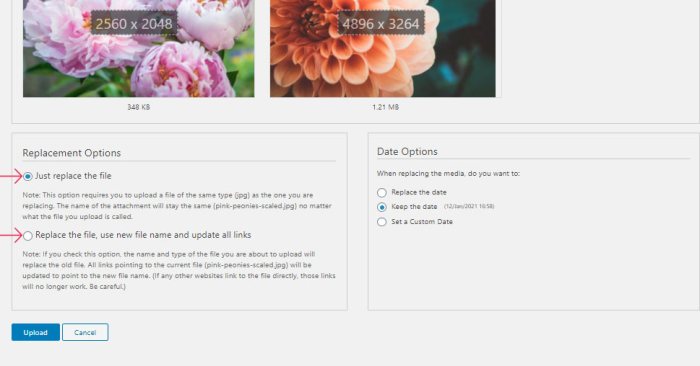
- Replacing the Image: Once the new image is uploaded, you can replace the existing image’s URL with the new one’s. This is usually done within the content editor where the image is embedded.
- Saving Changes: Save the post or page to apply the changes. The image will now be replaced on the live website.
Third-Party Plugin Method
Third-party plugins offer more extensive customization and often additional features compared to the built-in media library. These plugins can automate tasks, provide more control over image attributes, or enhance the overall image management process.
- Plugin Installation: Select and install a suitable plugin from the WordPress repository. Follow the instructions to install and activate the chosen plugin.
- Plugin Configuration: Configure the plugin according to your needs. Many plugins provide options to customize image dimensions, compression settings, or other attributes.
- Replacing Images: Utilize the plugin’s features to replace images. The specific process will vary depending on the plugin. Many plugins offer bulk image replacement tools.
- Verification: Verify the image replacement on the website. Ensure the new image displays correctly and functions as intended.
Comparison of Methods
The following table compares the built-in media library method and the third-party plugin method for image replacement.
| Method | Advantages | Disadvantages |
|---|---|---|
| Media Library | Easy to use, readily available, built-in feature, typically requires less setup. | Limited customization options, may not support advanced image manipulation tasks. |
| Plugin | Extensive customization options, additional features like bulk replacement or advanced image optimization, often more efficient for complex workflows. | Learning curve, potential for plugin conflicts with other components, and increased overhead. |
Troubleshooting Image Replacement Issues
Replacing images in WordPress can sometimes lead to unexpected problems. Understanding these common issues and their solutions is crucial for maintaining a smooth and functional website. This section will delve into diagnosing and resolving problems like broken images, upload errors, and media library synchronization issues.Troubleshooting image replacement problems is a necessary step in maintaining a functioning WordPress site.
By identifying and addressing these issues proactively, website owners can ensure that their images display correctly and that their media library remains consistent with the site’s content.
Identifying Broken Images
Broken images are a frequent occurrence when replacing media files. Often, the problem lies in incorrect file paths or missing image files. A broken image link can be a result of a typo in the image URL or if the file itself has been moved or deleted. Inspecting the image URL, ensuring the file exists in the expected location, and verifying file permissions are vital steps to pinpoint and resolve this issue.
Resolving File Upload Errors
Errors during file uploads are frustrating and can hinder image replacement. These errors frequently stem from exceeding file size limits, using unsupported file formats, or encountering issues with server permissions. A comprehensive approach involves verifying file size compatibility with WordPress settings, confirming the image format is supported, and ensuring that the server has appropriate write permissions to the media directory.
For instance, a large JPEG image might exceed the upload limit set by the WordPress configuration. Alternatively, an unsupported file format (like a .psd) could prevent successful upload.
Troubleshooting Media Library Synchronization Issues
Media library synchronization problems can lead to images not appearing where expected or not updating after replacement. The issue might stem from outdated browser caches or problems with the WordPress media library itself. Clearing the browser cache and attempting to re-upload the image are crucial steps. Furthermore, checking for any server-side issues, such as temporary database glitches, is also important.
Debugging the File Upload Process
The file upload process in WordPress is a critical aspect of image replacement. To debug upload problems, carefully review error messages, which often contain valuable clues about the specific cause of the issue. If there are permission errors, adjust the file system permissions to allow WordPress to write to the media directory. Additionally, checking file sizes against allowed limits and ensuring the correct file format is used is essential.
Example of Common Errors and Solutions
A common error is a 404 error. This error typically indicates a missing file or an incorrect URL. The solution involves double-checking the image file path, making sure it exists, and ensuring the URL points to the correct location. Another common issue is the ‘Upload failed’ message. This message could be triggered by an oversized image file, a problem with the image format, or an insufficient upload quota.
The solution is to resize the image to meet the size constraints, confirm the file type is supported, or check and update the upload limits.
Table of Common Image Replacement Issues and Solutions
| Issue | Description | Solution |
|---|---|---|
| Broken Image | Image does not display | Check image file path, server permissions, and verify the image file exists in the expected location. |
| File Upload Error | Error during upload | Verify file size, format compatibility with WordPress, and ensure the server has appropriate write permissions. |
| Synchronization Issues | Media library not updating | Clear browser cache, re-upload the file, and check for server-side issues. |
Best Practices for Replacing Images
Replacing images in WordPress is straightforward, but following best practices ensures smooth transitions, optimal performance, and prevents future headaches. A well-optimized and organized image library is crucial for a healthy website. By understanding the intricacies of image replacement, you can confidently update your website’s visuals without compromising user experience or .Effective image replacement is more than just swapping files; it’s about maintaining a robust and efficient image workflow.
By prioritizing optimization, organization, and backups, you’ll be able to streamline your image management and keep your website running smoothly.
Optimizing Images for Web Use
Image optimization is paramount for website speed and user experience. Large, unoptimized images can significantly slow down your site, impacting load times and potentially driving away visitors. Before replacing an image, consider these optimization strategies:
- Choose the right file format: WebP is a highly efficient format that often offers superior compression compared to JPEG or PNG, especially for photographs and illustrations. PNGs are best for graphics with transparency or sharp lines, like logos or icons. JPEGs are good for photographs, but their compression can lead to quality loss.
- Compress images: Utilize online tools or image editing software to compress images without significantly compromising visual quality. Tools like TinyPNG and ImageOptim offer powerful compression capabilities for various formats.
- Resize images appropriately: Ensure images are the correct dimensions for their intended use. Unnecessary large images consume server resources and add to page load time. Consider the size of the display areas where they will be used.
- Use a quality image editor: Professional image editing software, like Photoshop, provides advanced control over compression and resizing, ensuring a balance between image quality and file size.
Maintaining File Organization and Naming Conventions, How to replace images and media files in wordpress
A well-structured file system is critical for efficient image management. This applies to all your image files, not just those being replaced.
- Create folders by category: Organize images into logical folders based on their content (e.g., “blog posts,” “products,” “about us”). This makes locating specific images a breeze.
- Use descriptive filenames: Avoid generic names like “image1.jpg.” Instead, use names like “product-featured-image.jpg.” This makes it easy to identify images and understand their context.
- Maintain a consistent naming convention: Consistency in naming and organization will save you considerable time and frustration when managing large numbers of images. For example, consistently use hyphens in filenames, and ensure capitalization is consistent.
Backing Up Images Before Replacement
Backing up images is a crucial safety measure. Before replacing any image, always create a copy.
Replacing images and media files in WordPress is surprisingly straightforward. You just need to navigate to the Media library, select the file you want to replace, and click “Replace.” However, understanding the intricacies of image optimization and file management can sometimes be crucial for good website performance, especially when considering aspects like technical SEO. For example, optimizing images for search engines can significantly impact your site’s visibility, and whether or not that process is challenging depends on your particular situation, which is why is technical SEO hard is a question worth considering.

Once you’ve got the hang of these simple steps, you’ll be a WordPress pro in no time.
- Use a dedicated backup plugin: WordPress offers various backup plugins that automate the process and safeguard your image files from accidental deletion.
- Manual backups: If you prefer a manual approach, copy the image file to a separate folder or external storage. This way, you can restore the original if needed.
- Cloud storage: Utilize cloud storage services like Google Drive, Dropbox, or OneDrive to create backups of your image files. This offers an off-site backup solution.
Preventing Future Image Replacement Issues
Proactive measures minimize the chance of future issues.
- Use the correct WordPress media library: Ensure you’re using the appropriate WordPress media library tools for uploading, editing, and managing images.
- Regularly review and update your image files: Check for outdated or unnecessary images to keep your media library streamlined.
- Employ a version control system for images (optional): While not mandatory, version control systems can track changes to your images over time, offering a detailed history of updates.
Image Alt Text and Descriptions
Alt text and image descriptions are essential for accessibility and .
- Provide descriptive alt text: Alt text provides alternative text for images that are not displayed or for users with visual impairments. Use concise, accurate descriptions of the image content. This is crucial for accessibility and .
- Optimize for : Incorporate relevant s into your alt text and descriptions to improve search engine visibility. s should be natural and seamlessly integrate with the image’s context.
Image Replacement Best Practices
- Optimize images for web use before uploading.
- Maintain a consistent file naming and folder structure.
- Always back up images before replacement.
- Utilize WordPress media library tools effectively.
- Include descriptive alt text and image descriptions.
Advanced Image Replacement Techniques
Image replacement in WordPress goes beyond simple file swaps. Advanced techniques allow for more control over image presentation, optimization, and integration with your website’s design. This section dives into these methods, focusing on resizing, device-specific optimization, theme customization, image quality maintenance, and plugin integration.Effective image replacement involves more than just swapping files. Understanding the nuances of image manipulation and integration with your theme and plugins is crucial for maintaining website performance and visual appeal.
These advanced techniques ensure your images look their best and enhance user experience.
Image Resizing and Optimization
Proper image sizing is essential for website performance. Large images slow down loading times, negatively impacting user experience. Using image resizing tools allows you to adjust dimensions without compromising quality. Tools like ImageOptim and TinyPNG can compress images significantly, reducing file sizes without noticeable loss of quality. Choosing the right format, such as WebP, can further enhance performance.
WebP offers superior compression compared to JPEG, resulting in smaller file sizes and better quality.
Device-Specific Optimization
Different devices (desktops, tablets, smartphones) have varying screen sizes and resolutions. Optimizing images for specific devices ensures a seamless viewing experience across platforms. Using responsive image techniques allows images to automatically adjust to different screen sizes, preventing blurry or pixelated displays. This is particularly important for mobile users.
WordPress Theme Customization
Many WordPress themes offer customization options for replacing images in specific areas. These options often allow you to upload new images or specify image paths directly within the theme’s settings. Carefully reviewing the theme’s documentation is crucial to find the correct area for image replacement and the associated instructions. Customizing the theme to incorporate the desired images ensures visual consistency with the overall website design.
Maintaining Image Quality and Format
Maintaining image quality is crucial for visual appeal. Lossy compression formats, like JPEG, can lead to quality degradation if excessively compressed. Lossless formats, such as PNG, preserve image quality but often result in larger file sizes. Understanding the trade-offs between quality and file size is essential for optimizing your images. Choosing the appropriate format for each image is key to achieving the best balance.
Example: Image Resizing with a WordPress Plugin
The following code snippet demonstrates how a WordPress plugin might implement image resizing. This is a simplified example and may vary depending on the specific plugin.“`PHP// Example using the GD libraryfunction resize_image($image_path, $new_width, $new_height) $image = imagecreatefromjpeg($image_path); $resized_image = imagecreatetruecolor($new_width, $new_height); imagecopyresampled($resized_image, $image, 0, 0, 0, 0, $new_width, $new_height, imagesx($image), imagesy($image)); imagejpeg($resized_image, $image_path, 80); // Adjust quality as needed imagedestroy($image); imagedestroy($resized_image);“`
Integrating Image Replacement with Other Website Elements
Images are often integrated with other website elements like galleries, sliders, or post content. When replacing images, consider how these elements will be affected. For instance, if replacing an image in a slider, ensure the new image matches the slider’s dimensions and style. Proper integration ensures a seamless transition when replacing images within different parts of your website.
Conclusive Thoughts
Replacing images and media files in WordPress is a fundamental website maintenance task. By understanding the methods, troubleshooting steps, and best practices Artikeld in this guide, you can confidently manage your website’s visual assets. Whether you’re dealing with broken links, copyright concerns, or simply updating visuals, this guide empowers you to handle image replacement with ease and efficiency.