Google tag manager how to implement custom html tags on click listeners – Google Tag Manager: how to implement custom HTML tags on click listeners. This guide provides a comprehensive walkthrough for setting up and implementing custom HTML tags triggered by click events within Google Tag Manager. We’ll explore everything from fundamental GTM concepts to advanced techniques, covering various click scenarios and troubleshooting common errors. Learning this will empower you to create more dynamic and data-driven experiences on your website.
Understanding event listeners in JavaScript is crucial for controlling when and how your tags fire. We’ll cover different ways to implement click listeners on various HTML elements and show you how to precisely target specific elements using selectors. This knowledge will allow you to fine-tune your tag implementation for maximum efficiency and accurate tracking.
Introduction to Google Tag Manager
Google Tag Manager (GTM) is a free tag management system that simplifies the process of adding and managing tracking tags on your website or application. Instead of directly editing the codebase each time you want to add a new tracking tag, GTM allows you to manage these tags in a centralized, user-friendly interface. This significantly reduces the risk of errors and speeds up the implementation process, especially when dealing with multiple tags and frequent updates.GTM works by providing a dedicated container for your website, which acts as a hub for all your tracking tags.
You can add, update, and remove tags without needing to touch the underlying code. This decoupling between your website’s code and the tags you use for analytics and marketing is a core benefit. This approach improves website maintainability and ensures seamless integration with various tracking platforms.
Fundamental Concepts
GTM relies on three fundamental concepts: containers, tags, and triggers. A container is a unique code snippet that’s embedded on your website, serving as a central repository for all your tags. Tags are the individual tracking tools that collect data. They can include tracking pixels from advertising platforms, analytics tools like Google Analytics, or custom tracking scripts. Triggers define the conditions under which a tag should fire.
Figuring out how to implement custom HTML tags on click listeners in Google Tag Manager can be tricky, but understanding the basics is key. A great way to use this knowledge is to track user engagement on your website. For instance, micro influencers and marketing strategies often rely on engaging click-throughs, which can be precisely measured using custom tags.
This allows for more targeted analysis, crucial for optimizing future campaigns and improving overall performance in your Google Tag Manager setup.
This is crucial for collecting data only when specific events occur, like a user clicking a button or visiting a specific page.
Containers
A GTM container is a JavaScript code snippet placed on your website. This snippet acts as a bridge, allowing GTM to interact with and manage your website’s tags. Each website typically needs its own unique container. The container is essential for the management of tags and triggers in a centralized location.
Tags
Tags are the individual tracking tools that gather data. They can encompass pixels for advertising platforms, analytics tools like Google Analytics, or custom scripts for specific tracking needs. Each tag is configured to collect data based on the trigger conditions that are associated with it.
Triggers
Triggers are the conditions that determine when a tag should fire. They are responsible for ensuring that tags are executed only when specific events happen on your website. These events could include user actions like clicks, page views, or form submissions. Triggers are the mechanism that makes GTM dynamic and responsive to user interactions.
Figuring out how to implement custom HTML tags on click listeners in Google Tag Manager is super useful for tracking user interactions. Strong online branding, like what’s discussed in this insightful article on 3 huge reasons why you should care about online branding , is crucial for a successful website. This is because a well-defined brand image directly correlates with how users interact with your website.
Knowing how to track those interactions, via custom tags in GTM, helps you analyze user behavior and tailor your site’s design to improve engagement and conversion rates. It’s a great way to measure the success of your brand building efforts.
Event Listeners in JavaScript
Understanding event listeners in JavaScript is crucial when using GTM. Event listeners are functions that are executed when specific events occur on a website. For example, a click event listener will run a specific function when a user clicks on a button. GTM relies on these events, and the correct implementation of event listeners, to execute the desired actions and fire the tags when the events occur.
Role of GTM in Implementing Custom HTML Tags
GTM’s power extends beyond third-party tags. You can create custom HTML tags using JavaScript to track specific events or actions that aren’t directly covered by pre-built tags. This customization is a critical aspect of using GTM to collect and analyze unique data points, which may not be covered by standard solutions. This approach allows for a more nuanced understanding of user behavior.
Setting up a GTM Container

Getting your Google Tag Manager (GTM) container set up correctly is crucial for tagging and tracking your website’s performance. A well-configured container ensures accurate data collection, enabling informed decisions about your website’s effectiveness. This involves several key steps and considerations. The correct container selection and proper implementation are vital for reliable data collection and analysis.A GTM container acts as a central hub for managing website tags.
It’s a crucial element of your website’s infrastructure, enabling you to implement tracking codes, monitor user interactions, and gather insights. Proper configuration of the container is essential for efficient tag management and accurate data collection.
Creating a New GTM Container
Creating a new GTM container is a straightforward process. You’ll need to log in to your Google Tag Manager account. Navigate to the “Containers” section and click “Create container.” Choose the website or app you want to tag. Give your container a descriptive name. This will help you easily identify it later.
Adding the GTM Container Code to Your Website
Adding the container code to your website is the next step. This involves copying and pasting a snippet of code into the HTML of your website. Locate the correct placement, usually in the ` ` section, of your website’s HTML. This is usually done through a CMS plugin or directly editing the HTML. Ensure you paste the code correctly to avoid conflicts and errors. It’s important to ensure the code is added in the correct place to avoid hindering your website’s functionality.
Best Practices for Container Setup and Configuration
Several best practices will enhance your GTM container setup. These include using descriptive names for containers and tags, creating a clear structure for tags and triggers, and regularly reviewing and updating your container to keep up with changes. This involves creating clear naming conventions, maintaining a logical structure, and performing periodic reviews to ensure accuracy. Thorough documentation of the container’s setup is essential for troubleshooting and maintenance.
Selecting the Correct Container for Your Needs
Choosing the right container is vital for your website’s success. Consider the scope of tracking and tagging you need. If you need to track events for multiple websites or apps, create a separate container for each. This ensures that your data is organized and avoids conflicts between tracking parameters. For example, if you run an e-commerce store and a blog on the same domain, creating separate containers will help you track metrics for each separately.
Creating Custom HTML Tags
Custom HTML tags in Google Tag Manager (GTM) are powerful tools for implementing custom tracking logic. They allow you to create tags that execute specific JavaScript code on your website, extending the functionality of GTM beyond its pre-built tags. Understanding their structure and parameters is key to leveraging their full potential for personalized tracking and reporting.Custom HTML tags offer a degree of flexibility that pre-built tags often lack.
They are particularly useful for implementing complex tracking requirements that go beyond the scope of standard tag types. They are also useful for integration with third-party services that may not have pre-built GTM tags.
Custom HTML Tag Structure
A custom HTML tag in GTM consists of a block of HTML code that will be executed when the tag fires. This code can include JavaScript, CSS, or any other valid HTML elements. The crucial part is the JavaScript, which allows you to interact with the website’s environment. This JavaScript can trigger events, send data, or perform other actions.
Parameters and Attributes
The parameters and attributes of a custom HTML tag in GTM determine how the tag functions and what data it sends. The primary parameter is the tag’s code, the actual HTML and JavaScript code. Additional parameters may be needed for configuring the tag’s behavior, like whether it should fire on a specific event or only on certain conditions.
Key Components of a Custom HTML Tag
| Component | Description | Example |
|---|---|---|
| Tag Configuration | Defines the conditions under which the tag should fire. This includes the triggering event, any required variables, and potentially, filters. | Event: Page View Variable: Page URL Filter: Contains /product/ |
| HTML Code | This section contains the HTML elements and, critically, the JavaScript code that performs the desired action. | // JavaScript code to send data to a custom endpoint.fetch(‘/api/event’, method: ‘POST’, body: JSON.stringify(data)).then(response => console.log(response)).catch(error => console.error(error)); |
| Variables | Variables in GTM allow dynamic data insertion into your tags. This is particularly useful for customizing the behavior of your custom HTML tag. | Use the `Page URL` variable to send the current page URL in the request. |
Using Variables Within Custom HTML Tags
Variables play a critical role in custom HTML tags, enabling dynamic behavior. By referencing variables within your tag’s JavaScript code, you can adapt the tag’s actions based on the current context of the website. This means you can make your tracking more specific and more useful. For example, if you want to send a specific product ID to your analytics platform, you can use a variable that retrieves that ID.Imagine tracking user interactions on a specific product page.
By including the product ID as a variable in the custom HTML tag, you can send this data with every interaction, providing richer insights into user behavior. This variable is usually accessed within the JavaScript code using curly braces, like `VariableName`.
Implementing Click Listeners
Click listeners are fundamental in web development, enabling dynamic interactions with web pages. They allow JavaScript to respond to user actions, such as clicks on buttons, links, or other elements. This responsiveness enhances user experience and facilitates complex functionalities. This section dives deep into click listeners, providing practical examples and demonstrating how to integrate them with Google Tag Manager (GTM) for data tracking.
Understanding Click Listeners in JavaScript
Click listeners in JavaScript are functions that execute when a specific HTML element is clicked. They are crucial for creating interactive web pages. This responsiveness transforms static web pages into dynamic applications, allowing for user input and feedback.
Different Methods for Implementing Click Listeners
Several ways exist to attach click listeners to HTML elements in JavaScript. Each method offers unique advantages and considerations.
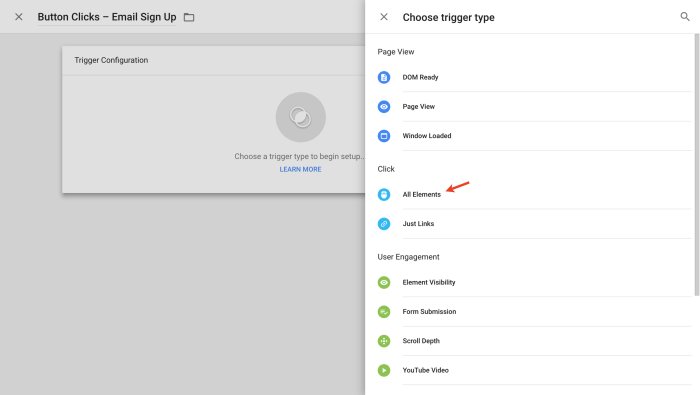
- Using the
addEventListener()method: This method is generally preferred for its flexibility and ability to handle multiple events on a single element. It also supports event delegation, which can be particularly beneficial for large web pages. - Using the inline
onclickattribute: While simple, this method is less flexible and less maintainable for complex applications. Inline event handling can lead to code bloat and reduced maintainability as the page grows.
JavaScript Code Examples for Various Elements
Below are examples of implementing click listeners using the addEventListener() method for different HTML elements. These examples demonstrate the fundamental structure and logic involved in responding to user clicks.
- Clicking a Button:
<button id="myButton">Click Me</button> <script> const button = document.getElementById('myButton'); button.addEventListener('click', function() console.log('Button clicked!'); // Your GTM tag trigger logic here ); </script> - Clicking a Link:
<a href="https://www.example.com" id="myLink">Visit Example</a> <script> const link = document.getElementById('myLink'); link.addEventListener('click', function(event) console.log('Link clicked!'); // Prevent default link behavior (optional) event.preventDefault(); // Your GTM tag trigger logic here ); </script> - Clicking a Div:
<div id="myDiv">Click Here</div>
<script>
const div = document.getElementById('myDiv');
div.addEventListener('click', function()
  console.log('Div clicked!');
  // Your GTM tag trigger logic here
);
</script>
Triggering a GTM Tag on a Click Event
Once a click event is handled in JavaScript, you can use GTM’s trigger system to fire a specific tag. This process involves defining a GTM trigger that listens for the click event and a corresponding tag that executes based on that trigger.
In the above examples, you would replace the // Your GTM tag trigger logic here comments with the appropriate GTM code. This involves referencing the GTM tag you’ve created and configuring the trigger to match the click event.
Handling Different Click Scenarios

Managing clicks effectively in Google Tag Manager (GTM) is crucial for accurate data collection. Different click scenarios, such as multiple clicks on the same element, require tailored strategies to prevent redundant tag firings and ensure reliable tracking. This section details how to handle these scenarios using GTM’s custom HTML tags and click listeners.
Multiple Clicks on the Same Element
A common challenge is dealing with users clicking an element multiple times rapidly. Without proper handling, each click will trigger a new tag firing, potentially leading to inflated event counts. This section provides a robust approach to address this issue.
Preventing Multiple Tag Firings
To prevent multiple tag firings from a single click, utilize a simple counter. This approach allows you to track the click event and prevent subsequent tag firings within a specific timeframe. This method is crucial for avoiding inaccurate data collection. Implement a variable to store a timestamp of the last click. If a new click occurs within a predefined time interval, ignore it.
Different Click Listener Behaviors
GTM’s click listeners offer flexibility in handling various click scenarios. You can configure the listener to trigger actions only on the first click, or on subsequent clicks after a specific delay. This flexibility is essential for capturing different user interactions.
- First Click: This scenario involves triggering a tag only once when the element is clicked for the first time.
- Subsequent Clicks: For capturing repeated actions on the same element, you can use a timeout. This method ensures tags fire only after a certain time has passed from the previous click, preventing redundant firings. This approach helps analyze user behavior patterns more effectively.
- Click Intervals: Tracking clicks within a certain timeframe can be useful for capturing rapid user actions. You can configure the click listener to fire tags only when clicks occur at intervals longer than a defined threshold. This method is suitable for scenarios requiring precision in capturing user interaction frequencies.
Targeting Specific Elements
Precise targeting is vital for accurate data collection. Using unique IDs or classes as selectors in your click listeners ensures that tags fire only for the intended elements. This specificity is crucial to avoid unintended tag firings.
| Selector Type | Example | Description |
|---|---|---|
| ID | #product-details |
Targets the element with the ID “product-details”. |
| Class | .add-to-cart |
Targets all elements with the class “add-to-cart”. |
| Combined | #product-details .add-to-cart |
Targets the “add-to-cart” element within the “product-details” element. |
These methods provide a strong foundation for handling diverse click scenarios within GTM, ensuring accurate and reliable data collection.
Implementing Custom HTML Tags with Conditional Logic
Adding conditional logic to your custom HTML tags in Google Tag Manager (GTM) allows you to fine-tune tag firing based on specific user interactions and page conditions. This dynamic approach significantly enhances the precision and relevance of your tags, enabling you to collect more accurate data and tailor your marketing strategies effectively. Instead of firing tags indiscriminately, conditional logic enables selective data collection, making your implementation more efficient and your insights more meaningful.Conditional logic empowers you to trigger tags only when specific circumstances are met.
This capability is crucial for implementing sophisticated tracking strategies, ensuring that your tags respond appropriately to different user behaviors and page states. This refined control streamlines data collection and eliminates unnecessary data points, which improves the overall performance and reliability of your tag implementation.
Conditional Statements Based on User Actions
Conditional statements in custom HTML tags are employed to control the firing of the tag based on user actions, such as clicks on specific elements. For example, you can configure a tag to fire only when a user clicks a “Buy Now” button. This method ensures that the tag is triggered only when the intended action occurs, reducing the noise in your data and improving the accuracy of your analytics.
Implementing Conditional Logic within a Custom HTML Tag
To implement conditional logic, you’ll use JavaScript within your custom HTML tag. You can incorporate `if`/`else` statements or more complex conditional expressions. The logic is applied within the JavaScript code that you place within the custom HTML tag. The specific JavaScript you use depends on the conditions you need to meet. A good example would be checking if a specific class exists on an element before triggering a particular tag.
Dynamic Attributes for HTML Tags
Dynamic attributes enhance the versatility of your custom HTML tags. You can use JavaScript to generate attributes based on user interactions or page information. This enables you to create unique attributes for each event or state. For instance, you might create a custom attribute that reflects the specific product a user clicked on. This allows for more nuanced analysis and reporting.
Modifying Tag Firing Based on Specific Conditions
You can modify tag firing based on various conditions, including page views, specific user segments, or specific events. For example, you might want a tag to fire only on certain pages, like product pages. You could also create different tags that fire based on different user actions. This granularity lets you adapt your tagging strategy to meet the needs of diverse user flows and page types.
These conditional logic statements significantly enhance the ability of GTM to collect accurate and relevant data, allowing for targeted adjustments in marketing strategies and more effective analyses. Using JavaScript and conditional logic within custom HTML tags allows for advanced and flexible tag management, ensuring accurate data collection and meaningful insights.
Debugging and Troubleshooting
Implementing custom HTML tags in Google Tag Manager (GTM) can sometimes lead to unexpected behavior. Proper debugging is crucial for identifying and resolving issues efficiently. This section will cover common errors, troubleshooting steps, and debugging techniques using browser developer tools. We’ll also touch upon optimizing custom tag performance for a smooth user experience.Troubleshooting custom HTML tags involves a methodical approach to pinpoint the root cause of any issues.

Understanding common pitfalls and employing effective debugging techniques will empower you to resolve problems quickly and confidently.
Common Errors in Custom HTML Tags
Common errors in custom HTML tags include incorrect syntax, missing or mismatched attributes, and improper event handling. For example, an incorrect tag structure will lead to tag firing issues, and missing attributes will result in incomplete tag data. Careful review of the tag configuration is paramount.
Troubleshooting Click Listeners and Tag Firing
Click listeners are critical for triggering tags on user interactions. Issues may arise from incorrect event targeting, misconfigured tag triggers, or conflicts with other scripts. Ensure that the click listener is correctly targeting the desired element, and that the tag trigger is configured to fire based on the specified event.
- Verify that the correct element is selected for the click listener. Inspect the HTML structure and ensure the correct selector is used in the tag configuration. Using incorrect selectors will prevent the listener from firing.
- Confirm that the tag trigger is properly configured to fire based on the click event. Review the trigger configuration to ensure it’s set up to respond to the expected click event type.
- Check for potential conflicts with other scripts. Conflicting scripts can interfere with the execution of the click listener or tag firing. Review and update any conflicting code snippets or scripts.
Debugging with Browser Developer Tools
Browser developer tools are indispensable for diagnosing GTM implementation issues. Using tools like the Network tab, Console, and Elements panel can reveal invaluable insights.
- Network Tab: The Network tab in your browser’s developer tools allows you to monitor requests and responses related to your GTM tags. This helps identify any issues with tag loading or data transmission.
- Console: The Console tab logs errors and warnings. Inspect the console output to pinpoint issues related to tag configuration or script execution. Error messages often provide clues to the underlying problem.
- Elements Panel: The Elements panel helps you inspect the HTML structure and identify the specific elements targeted by your click listener. This allows you to confirm that the correct element is selected.
Optimizing Custom HTML Tag Performance
Optimizing custom HTML tags is crucial for maintaining a smooth user experience. Minimizing unnecessary requests and streamlining tag firing logic can significantly improve performance.
- Use optimized selectors to target the desired element. Efficient selectors reduce the time taken to find the target element.
- Minimize the number of custom tags. Overuse can lead to performance bottlenecks.
- Use asynchronous loading for custom tags. Loading tags asynchronously can improve the overall performance and prevent delays in page rendering.
Advanced Techniques
Google Tag Manager (GTM) offers powerful features beyond basic click tracking. Mastering advanced techniques allows for intricate control over tag behavior, crucial for complex website functionalities and robust data collection. This section delves into advanced GTM features, focusing on using dataLayer variables, custom JavaScript, and refined trigger configurations to handle intricate scenarios.Understanding how to leverage these features can streamline your GTM implementation and improve the accuracy and completeness of your website data.
Leveraging DataLayer Variables
DataLayer variables act as dynamic containers for data that can be passed to your tags. By incorporating dataLayer variables within your custom HTML tags, you can personalize tag behavior based on user interactions or website context. This dynamic approach allows for greater flexibility and tailored actions. For example, you can use a dataLayer variable to pass product IDs or user IDs to tags, enabling more granular analysis and targeted marketing.
Figuring out how to implement custom HTML tags in Google Tag Manager for click listeners can be tricky, but it’s a crucial skill for tracking user behavior. Understanding how to manage this effectively is important for any site, especially when considering a redesign or migration. For instance, if you’re planning a significant website update, check out these three key strategies for seamlessly transitioning without harming your search engine rankings: 3 keys to redesigning or migrating your site without killing your seo.
Once you’ve got your SEO strategy in place, you can then focus on using Google Tag Manager to accurately capture and analyze those user actions with your custom HTML tags.
- Dynamically updating tags based on user actions is achievable through dataLayer variables.
- Personalizing tag behavior based on user information (e.g., user roles, location) is possible.
- DataLayer variables enable the creation of tags that react to various website events, allowing for enhanced functionality and comprehensive data collection.
Employing Custom JavaScript
Custom JavaScript within GTM tags allows for advanced logic and calculations beyond what’s possible with built-in functions. This enables you to manipulate tag behavior programmatically, enabling complex interactions. For instance, you can use JavaScript to perform calculations, modify tag parameters based on dataLayer variables, or trigger specific tag actions conditionally.
- Conditional logic within custom HTML tags can be significantly enhanced with custom JavaScript.
- JavaScript allows complex data transformations and calculations within the tag, providing a more flexible approach.
- Implementing custom logic for dynamic tag behavior based on user actions is possible with custom JavaScript.
Customizing Tag Behavior with Advanced Triggers, Google tag manager how to implement custom html tags on click listeners
Advanced trigger configurations enable you to refine when a tag fires. This is crucial for ensuring tags fire only under the specific circumstances you require. Using combinations of triggers (e.g., a ‘click’ trigger AND a ‘page view’ trigger), you can define sophisticated rules for tag activation. For example, you can set up a tag to fire only when a user clicks on a specific product button on a product detail page.
- Trigger configurations can be customized to meet specific needs, allowing for fine-grained control over tag firing conditions.
- Combining different triggers allows for the creation of complex and tailored tag behaviors based on multiple criteria.
- Advanced trigger configurations ensure tags fire only under the precise conditions you want, enhancing data accuracy and preventing unwanted activations.
Responsive Design Considerations: Google Tag Manager How To Implement Custom Html Tags On Click Listeners
Custom HTML tags, when integrated into Google Tag Manager, need to be designed with responsiveness in mind. This ensures consistent functionality and a seamless user experience across different devices and screen sizes, from desktop monitors to mobile phones. Adapting click listeners for touch-based interfaces is crucial for optimal mobile performance. A responsive approach prioritizes the user experience, regardless of the device being used.Ensuring your custom HTML tags function flawlessly on various screen sizes is paramount.
This involves careful consideration of how the tags are structured and how they interact with the user’s actions. Responsive design is not just about adjusting visual elements; it also involves modifying the underlying logic and behavior of click listeners to adapt to different input methods, like touch gestures on mobile devices. A responsive approach will guarantee a smooth user experience regardless of screen size.
Adapting Custom Tags for Different Screen Sizes
Custom HTML tags can be adapted to various screen sizes using CSS media queries. These queries allow you to target specific screen widths and apply different styles and behaviors accordingly. For instance, you can use different image sizes for mobile and desktop views, adjusting the size of the elements to maintain readability and avoid visual clutter on smaller screens.
Ensuring Click Listener Functionality on Mobile
Mobile devices often rely on touch interactions instead of mouse clicks. Click listeners need to be adjusted to accommodate these differences. Using touch events (like `touchstart`, `touchmove`, and `touchend`) in your JavaScript code is crucial for mobile-first design. This approach ensures smooth functionality and seamless user interaction across different devices.
Best Practices for Mobile-First Design
A mobile-first approach prioritizes designing for smaller screens first, then progressively enhancing the experience for larger screens. This strategy is beneficial for several reasons. For example, it leads to simpler, more focused layouts, and it ensures that the core functionality of your tags works flawlessly on mobile. This strategy often leads to a more intuitive and user-friendly experience across all devices.
Responsive Table Structure for Custom Tags
| Screen Size | Image/Element Width | Click Listener Behavior | CSS Media Query |
|---|---|---|---|
| Mobile (320-768px) | 50% | Touch events (e.g., `touchstart`) | `@media (max-width: 768px)` |
| Tablet (769-1024px) | 75% | Mouse clicks and touch events | `@media (max-width: 1024px)` |
| Desktop (1025px+) | 100% | Mouse clicks | `@media (min-width: 1025px)` |
This table illustrates how to adjust the width of an image or element based on screen size. The CSS media queries target specific screen ranges, and the click listener behaviors are tailored to the input methods most commonly used on each device. Adjusting the values in the table to your specific needs is important to create a truly responsive design.
Ending Remarks
In conclusion, implementing custom HTML tags with click listeners in Google Tag Manager allows for highly targeted and dynamic tracking. This detailed guide has covered the essential steps, from setting up your GTM container to handling diverse click scenarios and troubleshooting potential issues. By mastering these techniques, you can enhance your website analytics and create more engaging user experiences.