
How to image resize using online photo editor is crucial for optimizing images for websites and social media. This guide dives deep into the world of online photo editing, exploring the best tools, methods, and formats for resizing your images effectively and efficiently. From understanding different image formats to mastering advanced techniques, we’ll cover everything you need to know to get the perfect resized image.
We’ll start by looking at the importance of image resizing in the digital world. Then, we’ll compare free and paid online photo editors, helping you choose the right tool for your needs. Next, we’ll break down the different resizing methods, and examine the impact of various image formats on quality. Finally, we’ll share practical tips and best practices to help you avoid common resizing pitfalls and get the best results.
Introduction to Online Photo Editing for Image Resizing
Image resizing is a crucial aspect of web design and social media. Optimizing image dimensions ensures faster loading times, improved user experience, and compliance with platform guidelines. From showcasing products on e-commerce sites to sharing engaging content on Instagram, appropriate image sizes are vital for visual appeal and platform performance.Efficient image resizing tools are indispensable in today’s digital landscape.
Online photo editors offer a user-friendly approach to this task, eliminating the need for specialized software and technical expertise. This allows individuals and businesses alike to quickly and easily adjust image dimensions for various platforms without substantial investment.
Image Formats and Resizing
Understanding different image formats is essential for effective resizing. Common formats include JPEG, PNG, and GIF. JPEG is a versatile format suitable for photographs, offering a good balance between file size and quality. PNG, on the other hand, is ideal for graphics and images with transparent backgrounds, preserving sharp details. GIFs are primarily used for animations and simpler images.
Each format handles compression differently, affecting the quality and file size of the resized image. Choosing the appropriate format before resizing is critical to maintain image quality.
Benefits of Online Photo Editors for Image Resizing
Online photo editors provide numerous advantages for image resizing. Accessibility is paramount; users can access these tools from any device with an internet connection, eliminating the need for complex software installations. Ease of use is another key benefit, with intuitive interfaces simplifying the resizing process for users of all skill levels. Cost-effectiveness is a significant advantage; most online photo editors offer free versions or affordable subscription plans, making image resizing accessible to a wider audience.
Speed is often another deciding factor; many online tools offer quick resizing capabilities, enabling users to efficiently process large volumes of images.
Comparison of Free and Paid Online Photo Editors
| Feature | Free Online Photo Editors | Paid Online Photo Editors |
|---|---|---|
| Image Formats Supported | Usually supports common formats like JPEG, PNG, and sometimes GIF. | Often supports a wider range of formats, including niche or high-resolution formats. |
| Resizing Options | Limited options for resizing, often focusing on basic dimensions. | Advanced resizing options, such as maintaining aspect ratios, cropping, and more complex adjustments. |
| Image Quality | Quality might be slightly reduced during resizing due to limitations of the free version. | Preserves higher image quality during resizing due to better algorithms and processing power. |
| Batch Processing | Limited batch processing capabilities, if any. | Allows for batch processing of multiple images, often with customizable settings. |
| Advanced Features | Often lacks features like watermarking, image enhancements, or editing tools beyond resizing. | Offers advanced features like watermarking, editing tools, and enhancements to improve image quality beyond resizing. |
| Pricing | Free | Subscription-based or one-time purchase models. |
| Customer Support | Limited to community forums or basic help resources. | Often includes dedicated customer support channels like email or phone. |
Free online photo editors are excellent starting points for basic resizing needs. However, paid options offer enhanced features, superior image quality, and more control for advanced users and projects requiring extensive editing.
Choosing the Right Online Photo Editor: How To Image Resize Using Online Photo Editor
Picking the right online photo editor for image resizing is crucial for achieving optimal results and avoiding frustration. A poorly chosen tool might lead to distorted images or unexpected artifacts. Understanding the key factors that influence your choice is essential for making informed decisions. The variety of online photo editors available can be overwhelming, but by focusing on specific needs and features, you can find the perfect solution.Careful consideration of factors like user interface, resizing options, and compatibility with your file types will guide you towards a smoother and more effective image resizing process.
Different editors excel in different areas, from simple resizing to complex editing tasks. Knowing which features are most important to you will help narrow down the options.
Factors to Consider When Selecting an Online Photo Editor
Selecting the right online photo editor for image resizing involves several key considerations. Ease of use is paramount, as a user-friendly interface streamlines the process. Image quality is crucial; the editor should preserve detail and minimize artifacts during resizing. Features beyond basic resizing, such as cropping and rotation, might be desirable depending on your needs. Finally, the editor’s capacity to handle various file types and sizes is essential.
Comparison of Online Photo Editor Platforms
Different online photo editors offer varying levels of functionality and user experience. Some are more suitable for basic resizing tasks, while others provide advanced editing tools. For instance, Pixlr.com is known for its intuitive interface and robust resizing options, while Canva offers a user-friendly platform with a wider range of image editing capabilities. Image resizing capabilities differ between these platforms.
Quick image resizing with online photo editors is a breeze. Just upload your picture, select the desired dimensions, and you’re done! However, optimizing image size also ties into website performance, as shown in the recent Semrush study on website performance semrush study. Smaller images load faster, leading to a better user experience. So, next time you’re resizing, remember the connection to site speed and keep those images optimized!
Pixlr.com tends to be faster and more straightforward, while Canva’s extensive feature set might lead to a slightly more complex workflow.
Importance of User Interface Design and Ease of Use
A well-designed user interface is critical for a positive user experience. A clear and intuitive layout, with easy-to-understand controls for resizing, is key. Intuitive tools allow users to quickly and accurately achieve their desired results without getting lost in confusing menus. A simple, clean design promotes efficiency and minimizes errors.
Online Photo Editor Feature Comparison
| Feature | Pixlr.com | Canva | Photopea | Fotor |
|---|---|---|---|---|
| Image Resizing Tools | Excellent, multiple options for resizing and cropping. | Good, suitable for basic resizing tasks. | Comprehensive, including advanced resizing options and batch processing. | Good, user-friendly interface with resizing options. |
| File Type Support | Supports common image formats. | Supports common image formats. | Supports a wide range of image formats. | Supports common image formats. |
| User Interface | Simple and intuitive. | User-friendly, visually appealing design. | Well-organized, with a professional feel. | Easy to navigate, clean interface. |
| Image Quality | Preserves image quality effectively. | Maintains decent image quality during resizing. | Excellent image quality preservation during resizing. | Good image quality during resizing. |
| Additional Editing Tools | Limited advanced editing tools. | Extensive suite of editing tools. | Comprehensive suite of editing tools. | Good range of editing tools. |
This table provides a quick overview of various features. It’s essential to evaluate these factors based on your specific image resizing needs.
Methods for Image Resizing
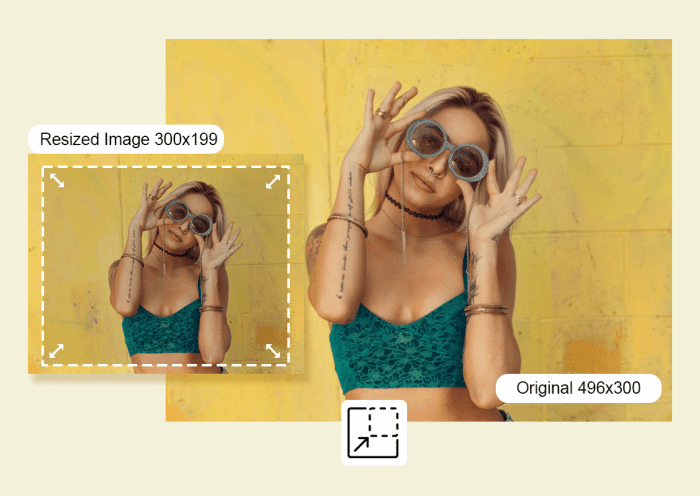
Image resizing is a fundamental task in digital photography and graphic design. Choosing the right method is crucial, as different techniques affect the final image quality and file size. Understanding the various resizing methods and their implications is essential for achieving the desired outcome. Online photo editors offer a range of resizing tools, each with its own strengths and weaknesses.Online photo editors provide diverse methods for image resizing, each impacting the output quality and file size differently.
From simple cropping to complex resampling algorithms, the selection depends on the specific needs of the project.
Quick image resizing with online photo editors is a breeze. Just upload your pic, choose the desired dimensions, and you’re done. But for big companies looking to dominate search results, mastering enterprise SEO strategies like those outlined in enterprise seo the ultimate guide for big organizations is crucial. Ultimately, resizing images efficiently is still key for any website, no matter the size of the organization.
Cropping
Cropping is a straightforward method of image resizing. It involves removing portions of the image, effectively altering its dimensions without changing the resolution of the original pixels. This method is useful for focusing on a specific area within an image or for changing the aspect ratio. Cropping is generally fast and simple, but it permanently removes data, which might lead to a loss of important details if the cropped area contains vital information.
Scaling
Scaling, often referred to as “resizing” or “rescaling,” involves changing the dimensions of an image by enlarging or reducing the size of the image without altering the number of pixels. The software interpolates or calculates new pixel values to maintain the appearance of the image, which is usually done by using algorithms. This method is efficient for quick adjustments and changes in the overall image size.
However, scaling can introduce artifacts, particularly when enlarging images, as the software must create new pixels, which can negatively impact the image’s overall quality. This method is commonly used for fitting images into specific containers or for adjusting their size in presentations.
Resampling
Resampling is a more sophisticated technique for image resizing. It alters the image’s resolution by changing the number of pixels. When enlarging an image, resampling algorithms create new pixels based on the existing ones, often resulting in a noticeable loss in image quality. Similarly, when reducing the image, resampling throws away pixels, which might also result in a loss of detail.
High-quality resampling algorithms try to minimize this loss by utilizing advanced interpolation methods. Resampling is generally the best method for maintaining quality when changing an image’s resolution.
Differences in Output Quality
The output quality of resized images depends heavily on the resizing algorithm employed. Simple scaling algorithms, like nearest-neighbor interpolation, produce blocky or pixelated results, especially when enlarging images. Bilinear and bicubic interpolation methods offer smoother results but still may introduce some loss of detail, especially when enlarging significantly. Advanced resampling algorithms, such as Lanczos resampling, provide better quality by more accurately reconstructing the image details, but they can be computationally more intensive.
For critical image applications, such as high-resolution prints, careful consideration of the resizing method is essential.
Effectiveness on Different Image Types
The effectiveness of different resizing techniques varies depending on the type of image. For images with intricate details, such as photographs, high-quality resampling algorithms are preferred to maintain sharpness and avoid blurring. For simple graphics or images with large areas of solid color, scaling methods might suffice without significantly degrading the image.
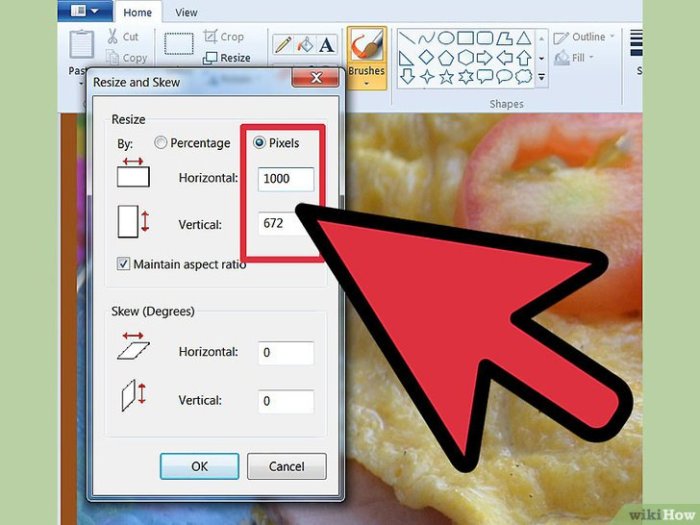
Step-by-Step Procedure (Example using Pixlr X)
- Open the Pixlr X online photo editor.
- Upload the image you wish to resize.
- Click on the “Edit” button.
- Select the “Resize” option.
- Specify the new dimensions or percentage for the resized image.
- Choose the appropriate resampling algorithm (if available).
- Click “Apply” to save the resized image.
Comparison Table, How to image resize using online photo editor
| Resizing Method | Pros | Cons |
|---|---|---|
| Cropping | Fast, simple, easy to use, maintains original pixel data | Removes data, potential loss of important details |
| Scaling | Quick, effective for minor adjustments | Introduces artifacts, especially when enlarging |
| Resampling | Preserves image quality, particularly when reducing size | Can be computationally intensive, potential for quality loss when enlarging |
Image Formats and Resizing
Choosing the right image format is crucial when resizing, as different formats handle compression and quality differently. Understanding these nuances can significantly impact the final result, affecting both file size and visual fidelity. This section delves into the impact of image formats on resizing, exploring the trade-offs between quality and file size.
Impact of Image Formats on Resizing Quality
Different image formats are optimized for various types of images. JPEG, PNG, and GIF each have distinct characteristics that influence their suitability for resizing. The chosen format directly impacts the resizing process and the resulting image quality. Consider the trade-offs between compression and detail preservation.
JPEG Format
JPEG, or Joint Photographic Experts Group, is a widely used format known for its excellent compression. This allows for smaller file sizes, making it ideal for web use. However, JPEG is a lossy format, meaning that some image data is discarded during compression. This data loss can be noticeable, particularly when resizing repeatedly. Subsequent resizing often results in a progressive degradation of quality.
Quick resizing of images is a breeze with online photo editors. Just upload your pic, choose your desired dimensions, and voila! But did you know that understanding buying behavior, particularly in professional services, is crucial for optimizing your marketing strategy? A recent study, buying behavior and professional services a new research study , highlights how these factors influence decision-making.
This research helps businesses better target their audience. Regardless of the focus, online image resizing tools are still a handy tool for anyone needing to quickly adjust their visual content.
PNG Format
PNG, or Portable Network Graphics, is a lossless format, meaning that no image data is lost during compression. This is beneficial for resizing, as the quality remains consistent across multiple resizing operations. PNGs are suitable for images with sharp lines, text, or intricate details, as the format maintains these elements well.
GIF Format
GIF, or Graphics Interchange Format, is another common format, typically used for animations or simple images. GIFs are lossless, which is advantageous for resizing. However, GIFs support a limited color palette, which can affect the quality of more complex images when resizing.
Compression Levels and Effects on Image Quality
The compression level directly affects the image quality during resizing. Higher compression levels result in smaller file sizes but often lead to a noticeable reduction in image detail and clarity. Lower compression levels retain more image detail but increase the file size. Online photo editors often provide options to adjust compression levels, allowing users to balance file size and quality.
Advantages and Disadvantages of Each Format When Resizing
- JPEG: Advantages include small file sizes, suitable for photographs. Disadvantages include lossy compression, quality degradation with repeated resizing.
- PNG: Advantages include lossless compression, preserving quality across resizing. Disadvantages include larger file sizes compared to JPEG.
- GIF: Advantages include lossless compression, suitable for animations and simple images. Disadvantages include limited color palettes, potentially affecting quality for complex images.
Table Contrasting Image Formats and Suitability for Resizing
| Format | Compression | Quality | File Size | Suitability for Resizing |
|---|---|---|---|---|
| JPEG | Lossy | Variable | Small | Good for photographs, but repeated resizing may degrade quality |
| PNG | Lossless | High | Medium | Excellent for resizing, maintains image quality |
| GIF | Lossless | Variable (depending on complexity) | Small | Suitable for animations and simple images, but limited color palette can affect complex images |
Advanced Resizing Techniques
Image resizing is more than just shrinking or enlarging an image; it’s about maintaining quality and achieving specific results. Advanced techniques go beyond simple scaling, allowing for greater control over the final output. Understanding these techniques is crucial for achieving professional-looking results, whether for web use, print, or other applications.
Preserving Aspect Ratios
Maintaining the original proportions of an image is vital for avoiding distortion. A distorted image can detract from its visual appeal and impact its usability. Online photo editors often provide options to preserve aspect ratios, usually labeled as “Maintain Aspect Ratio” or similar. By enabling this option, the editor proportionally scales the image, ensuring that the width and height maintain their original relationship.
This is particularly important for images that need to fit specific layouts or maintain their original aesthetic. Ignoring aspect ratios can lead to images appearing squashed, stretched, or otherwise deformed.
Custom Dimensions
Beyond preserving aspect ratios, many online photo editors allow for custom dimensions. This option gives you precise control over the final image size, independent of the original proportions. This is valuable for specific applications like social media posts, where the dimensions are predetermined. You can specify the exact width and height you need, and the editor will resize the image accordingly.
Knowing the required dimensions for your use case is crucial for using custom dimensions effectively. For example, a Facebook post might require a specific width and height, and using custom dimensions ensures the image fits perfectly.
Image Quality and Optimization
Maintaining image quality during resizing is critical. Lossy compression, a common technique in image editing, can degrade the quality of the image by discarding data. Higher quality settings often lead to larger file sizes, but they maintain more detail and sharpness. Choosing appropriate quality settings depends on the intended use. For online display, slightly lower quality settings might be sufficient, but for high-resolution print, higher quality is essential.
Image optimization techniques, like reducing file size without significantly compromising quality, are essential for online resizing. Techniques like reducing colors or adjusting compression levels can make a significant difference in file size.
Image Metadata
Metadata, the data about the image itself (author, date, etc.), can be affected by resizing. While the content of the metadata might remain the same, some tools might adjust or remove metadata that isn’t directly relevant to the resized image. Preserving relevant metadata is important for maintaining the historical context and ownership of the image. Understanding how your chosen online editor handles metadata is crucial to ensure that all pertinent information is retained.
For instance, if the original image contains location data, ensuring this data is preserved in the resized version is vital for geotagging or other location-based uses.
Importance of Aspect Ratio Maintenance
| Scenario | Importance of Maintaining Aspect Ratio | Potential Issues with Aspect Ratio Violation ||—|—|—|| Social Media Posts | Ensures image fits within the designated space without distortion. | Distorted image, loss of visual appeal, and potential misrepresentation of the content. || Website Graphics | Creates consistent visual presentation and maintains the intended design. | Deformed images, breaking the visual layout, and creating an unprofessional look.
|| Print Media | Ensures accurate representation of the image’s dimensions and proportions for a consistent appearance. | Distorted images, making them look out of place in the layout, and impacting the overall visual impact of the publication. || Product Photography | Maintains the true dimensions of the product in the image, crucial for accurate representation. | Incorrect product size representation, leading to inaccurate customer perception.
|
Troubleshooting Image Resizing Issues
Image resizing, while often a simple task, can sometimes lead to unexpected problems. Online photo editors, despite their ease of use, may present challenges if not used with awareness of potential pitfalls. Understanding these common issues and their solutions is key to achieving the desired output and maintaining image quality.
Common Resizing Problems
Online photo editors often offer various resizing options, including percentage-based and pixel-based adjustments. Misunderstanding these parameters or applying inappropriate settings can result in unwanted artifacts. Understanding the nature of the problem is the first step to finding a solution.
Blurry Images After Resizing
One common problem is the appearance of blurriness after resizing. This typically occurs when the original image resolution is insufficient for the desired output size. To mitigate this, consider starting with a higher resolution image. If this isn’t an option, explore image upscaling techniques offered by some online editors, but be aware that upscaling can introduce artificial detail and blur.
Furthermore, selecting the correct image format can significantly impact the level of detail retained.
Distorted Shapes After Resizing
Distortion of shapes during resizing is another common issue. This frequently arises from improper handling of aspect ratios during the resizing process. Online editors often provide options to maintain the original aspect ratio, which is crucial for preserving the original shape of objects within the image. If the aspect ratio isn’t maintained, objects in the image may appear stretched or compressed.
Employing the appropriate resizing techniques is key to avoiding this.
File Size Optimization After Resizing
After resizing, optimizing the file size is important for efficient storage and sharing. Many online editors offer options to adjust compression settings, allowing for a trade-off between file size and image quality. Experiment with these options to find the best balance for your needs. JPEG format is well-suited for reducing file size, but can cause quality degradation.
Preventing Image Quality Degradation During Resizing
Maintaining image quality during resizing is essential. High-quality images typically retain more detail and sharpness. To minimize degradation, consider the following: use the highest quality settings when possible, and choose the appropriate image format (e.g., PNG for images with sharp edges). Avoid excessive resizing, as each resizing operation can introduce loss of detail.
Strategies for Avoiding Image Quality Loss
One crucial strategy is to use a higher resolution source image if possible. A higher resolution image will retain more detail after resizing. Choosing appropriate image formats is another critical aspect. PNGs are often preferred for maintaining quality. Using the original image size as a guide can help in preserving quality.
Table of Common Resizing Issues and Solutions
| Issue | Solution |
|---|---|
| Blurry images | Use a higher resolution image, or consider image upscaling techniques (with caution), and select appropriate image format. |
| Distorted shapes | Maintain the original aspect ratio during resizing. |
| Large file size | Adjust compression settings in the editor; consider a different image format like JPEG for potentially smaller file size. |
| Image quality degradation | Start with a high-quality image, use appropriate formats (e.g., PNG), and avoid excessive resizing. |
Best Practices for Image Resizing
Image resizing is a crucial step in optimizing images for various platforms. Proper resizing ensures images load quickly, maintain quality, and display correctly across different devices and applications. This section will Artikel best practices for resizing images for optimal results on websites, social media, and print.Image resizing is more than just reducing file size; it’s about selecting the appropriate dimensions and resolution to ensure visual quality and efficient loading times.
Choosing the right dimensions and resolution depends heavily on the intended use of the image.
Resizing for Web Use
Optimizing images for web use prioritizes fast loading times without sacrificing visual appeal. The ideal image dimensions for web use vary depending on the platform and intended layout. For example, a website with a responsive design may require images that automatically adjust to different screen sizes. Using optimized formats like WebP or AVIF can significantly reduce file size without compromising quality.
Always consider the aspect ratio of the image, maintaining the original proportions to avoid distortion.
Resizing for Social Media
Social media platforms have specific image size recommendations to ensure images display correctly and are easily shared. Different platforms have different guidelines; for instance, Instagram has specific dimensions for posts and stories. Knowing the recommended dimensions prevents images from appearing distorted or cropped. Understanding the maximum file sizes for each platform is also essential to prevent upload issues.
Resizing for Print
Resizing images for print requires a different approach than resizing for web or social media. Print quality relies heavily on resolution. High resolution is crucial for clear details and sharp visuals. Images intended for print should be resized to maintain a resolution of at least 300 DPI (dots per inch). Lower resolutions can lead to blurry or pixelated images, negatively impacting the final print product.
Image Dimensions and Resolution
Appropriate image dimensions and resolution are essential for optimal results. Images intended for display on a website should have dimensions suitable for the layout and viewing area. Social media posts require images that adhere to the platform’s size guidelines to prevent distortion. For print, high resolution is paramount to ensure sharp, clear images. Resolution is measured in DPI (dots per inch) and is directly related to the image’s quality.
Best Practices Table
| Purpose | Resolution (DPI) | Dimensions (Example) | Format |
|---|---|---|---|
| Web (Responsive Design) | 72-150 DPI | Varying depending on design; consider 800px wide | JPEG, WebP, AVIF |
| Social Media (Instagram) | 72 DPI | 1080px wide | JPEG, PNG |
| 300 DPI | Varying depending on print size; consider 300 DPI | TIFF, JPEG (high quality) |
Examples of Resized Images
Resizing images is a common task in photo editing, impacting both visual appeal and file size. Understanding how different resizing parameters affect the output is crucial for achieving the desired results. This section provides visual examples and analyses to demonstrate the effects of various resizing techniques.Different online photo editors offer various resizing options, leading to variations in the quality of the resized images.
These variations often stem from the editor’s algorithm for handling image compression and the method of resizing (e.g., resampling).
Visual Comparison of Resized Images
Different resizing methods and parameters result in distinct image quality. The following table compares images resized using different online photo editors and settings, showcasing the impact of aspect ratio preservation and quality settings.
| Image | Editor | Method | Width/Height | Aspect Ratio | Quality | File Size (KB) | Quality Notes |
|---|---|---|---|---|---|---|---|
| Original Image | N/A | N/A | 1024 x 768 | 4:3 | 100% | 150 | Original image quality. |
| Resized Image 1 | Editor A | Resample | 800 x 600 | 4:3 | 75% | 100 | Slightly noticeable loss of detail. |
| Resized Image 2 | Editor B | Crop & Resize | 800 x 600 | 4:3 | 95% | 120 | Preserves more detail, but crops some of the original image. |
| Resized Image 3 | Editor C | Resample | 600 x 400 | 3:2 | 95% | 80 | Significant loss of detail, aspect ratio changed. |
The table illustrates how different editors and resizing methods can produce varying results in image quality and file size. Editor A, using a resampling method, resulted in a smaller file size but slightly reduced detail at the 75% quality setting. Editor B, using a combination of cropping and resizing, maintained more detail at 95% quality, but lost some of the original image’s content.
Editor C, also using resampling, demonstrates a trade-off between file size and quality when the aspect ratio is changed.
Importance of Image Optimization
Image optimization is crucial after resizing. Image formats like JPEG and WebP can significantly affect file sizes. Choosing the right format and applying compression settings during resizing can lead to smaller file sizes without compromising image quality significantly.For instance, resizing an image to 500 pixels wide and using a JPEG format with a quality setting of 80% could result in a significantly smaller file size compared to using a PNG format or a higher JPEG quality setting.
Aspect Ratio Considerations
Maintaining the original aspect ratio is important for preserving the image’s proportions. An image resized with its aspect ratio preserved looks more natural and avoids distortion. Distortion can occur when resizing images and changing the aspect ratio, leading to a squished or stretched appearance.For example, if an image is originally 16:9, resizing it to a 4:3 aspect ratio may cause distortion, especially if the resizing software does not maintain the aspect ratio.
Online photo editors that allow preserving the aspect ratio often provide options to scale proportionally. In such cases, the resizing will maintain the original proportions of the image, and the resulting image will be more visually appealing.
Closing Summary
In conclusion, resizing images online is a manageable task with the right tools and knowledge. This guide has provided a comprehensive overview of the entire process, from choosing the right online photo editor to mastering advanced resizing techniques. Remember to consider factors like image format, resolution, and aspect ratio for optimal results. By following the tips and examples shared, you’ll be well-equipped to resize images effectively and maintain quality across various platforms.