How to install plugin cleanup images is a crucial skill for any WordPress user seeking to optimize website performance and storage space. This guide dives deep into the process, providing a step-by-step walkthrough, detailed explanations, and troubleshooting tips for various platforms. From WordPress to custom websites, we’ll cover installation methods, configuration options, and image cleanup strategies. Get ready to transform your website’s efficiency!
Imagine a website cluttered with unnecessary images, slowing down loading times and hogging valuable storage space. Plugin cleanup images can be the solution, helping you maintain a fast and responsive website. This guide offers a structured approach, from installation to advanced optimization techniques. We’ll explore different strategies and provide actionable steps to ensure your website remains lean and lightning-fast.
Introduction to Plugin Cleanup Images: How To Install Plugin Cleanup Images
Plugin cleanup images, often bundled with website management tools or image editors, are specialized software designed to optimize and streamline the management of image files within a digital environment. These tools assist in removing unnecessary or redundant image data, reducing file sizes without significant loss of image quality. This optimization is crucial for improving website performance, reducing storage costs, and enhancing user experience.The core purpose of these plugins is to improve efficiency and effectiveness in managing image assets.
They accomplish this by identifying and eliminating redundant or unnecessary information within image files, often leading to smaller file sizes. This, in turn, leads to faster loading times for websites, thereby boosting user engagement and satisfaction. This is especially relevant for websites with high traffic or large image libraries.
Common Scenarios for Plugin Use
Plugin cleanup tools are highly beneficial in several scenarios. They’re essential for managing large collections of images on websites, where reducing file sizes is vital for maintaining optimal performance. E-commerce sites, for example, often rely heavily on high-resolution product images, leading to larger file sizes. Plugin cleanup tools are vital in such cases to ensure efficient loading times without compromising image quality.
Additionally, sites dealing with high traffic volumes can experience significant performance bottlenecks if image files are not optimized.
Types of Cleanup Plugins and Their Comparison
The image cleanup plugin market offers various types of tools, each with its own strengths and weaknesses. Understanding these differences helps users select the most suitable plugin for their needs.
| Plugin Type | Features | Benefits | Limitations |
|---|---|---|---|
| Lossless Compression Plugins | Optimize image files without losing image quality. Often use algorithms to reduce file size while maintaining visual fidelity. | Preserves image detail and quality, suitable for professional-grade images. | May not achieve the same level of compression as lossy compression plugins. Can take more processing time for large images. |
| Lossy Compression Plugins | Reduce image file sizes by discarding some image data. Algorithms focus on reducing file size, potentially sacrificing minor details. | Achieve significantly smaller file sizes compared to lossless compression. Faster processing times. | Image quality can degrade depending on the level of compression applied. Not suitable for images requiring high visual fidelity. |
| Metadata Removal Plugins | Remove unnecessary metadata associated with image files. This data often adds to the file size without impacting image quality. | Reduce file size significantly by eliminating extraneous information. | May not be suitable for all use cases where metadata is critical (e.g., image provenance tracking). |
| Image Format Conversion Plugins | Convert images to different formats, such as JPEG, PNG, or WebP. Different formats have varying compression levels. | Allows for format-specific optimization, selecting the most efficient format for the image. | Conversion can sometimes lead to a loss of quality, depending on the initial format and target format. |
This table provides a concise overview of common cleanup plugin types. Each plugin type has its own characteristics that influence its application. Careful consideration of these factors will help users make informed choices when selecting the appropriate plugin for their specific needs.
Installation Methods for Different Platforms
Installing a plugin cleanup image tool can vary significantly depending on the website platform. This section delves into the installation procedures for WordPress, Joomla, Drupal, and custom website platforms, offering clear steps for each. Understanding these differences will help ensure a smooth and successful installation process.The varied architectures of these platforms require tailored approaches to plugin installation. Different platforms often use different plugin directories and mechanisms for handling extensions.
This section details the process for each, ensuring a clear and concise method for all.
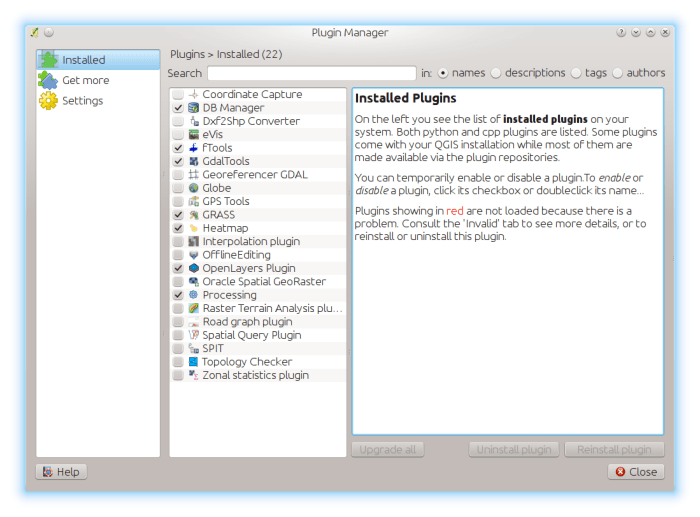
WordPress Installation, How to install plugin cleanup images
WordPress utilizes a user-friendly plugin installation interface. This straightforward method makes the process accessible to both beginners and experienced users.
- Navigate to the Plugins section in your WordPress dashboard.
- Click the “Add New” button.
- Search for the plugin cleanup image tool using the search bar.
- Select the desired plugin and click “Install Now.”
- Activate the plugin after the installation completes.
Joomla Installation
Joomla’s plugin installation procedure is slightly different, but still straightforward.
- Log in to your Joomla administrator panel.
- Navigate to the Extensions menu.
- Select the “Manage” option under the “Plugins” section.
- Click the “Upload” button to browse and select the plugin cleanup image tool’s zip file.
- Follow the on-screen instructions to complete the installation and activation.
Drupal Installation
Drupal’s approach to plugin installation involves the use of a module directory.
- Access the Drupal administration interface.
- Navigate to the “Extend” section or similar menu option.
- Upload the plugin cleanup image tool’s module file to the correct directory using a file manager or similar tool.
- Enable the module through the Drupal interface.
- Configure the module settings as needed.
Custom Website Platform Installation
Custom website platforms require a more hands-on approach. The specific steps depend on the platform’s architecture and how plugins are integrated.
- Identify the plugin’s installation instructions.
- Locate the appropriate directory for installing plugins on your custom platform.
- Upload the plugin’s files to the designated directory.
- Configure the plugin settings according to the platform’s requirements.
- Verify the plugin’s functionality.
Comparison of Installation Processes
Different platforms offer varying levels of ease and complexity in plugin installation. WordPress is known for its intuitive interface, while Joomla and Drupal have more structured processes. Custom platforms may require a more technical understanding of the platform’s architecture.
Installing a plugin to cleanup images can really boost your site’s performance, but did you know that image optimization is just one piece of the accessibility puzzle? Think about how your customers with visual impairments might experience your site. Consider using best practices, like providing alternative text descriptions for images, as detailed in tips to make your ecommerce site more accessible.
By focusing on accessibility, you’re not just helping those with specific needs, you’re creating a better experience for everyone. Once you’ve got those accessibility basics covered, you can dive back into image optimization for that lightning-fast site you’ve always wanted!
| Platform | Step 1 | Step 2 | Step 3 |
|---|---|---|---|
| WordPress | Navigate to Plugins | Click “Add New” | Search and Install |
| Joomla | Log in to Admin | Navigate to Extensions | Upload and Install |
| Drupal | Access Admin Interface | Navigate to “Extend” | Upload and Enable |
| Custom Platform | Review Installation Instructions | Locate Plugin Directory | Upload and Configure |
Plugin Configuration Options
Plugin cleanup tools offer a variety of configuration options to tailor their behavior to specific needs. Proper configuration ensures optimal performance and prevents unwanted side effects. Understanding these options empowers users to fine-tune the plugin’s actions for their unique environments.The configuration options allow users to specify which files and directories should be targeted for cleanup, the severity level of the cleanup process, and other parameters to avoid data loss or accidental deletions.
This careful control is essential for a safe and effective cleanup process.
Key Configuration Options
A typical plugin cleanup image tool features various settings to control its actions. These settings determine which files and directories are scanned, how aggressive the cleanup process should be, and what types of files are prioritized for deletion.
Targeting Specific Files and Directories
Careful selection of files and directories is crucial for a safe cleanup. Users can specify which file types, extensions, or sizes should be targeted for deletion. For example, old log files or temporary files are common targets. Incorrect targeting can lead to accidental deletion of important files.
Cleanup Severity Levels
Options often exist to control the severity of the cleanup. A low severity might only remove outdated files, while a high severity may also delete potentially problematic files. Understanding these levels is vital to prevent data loss. For example, a low severity setting might target old cache files, while a high severity could also delete files marked as “trash.”
File Age and Modification Time
The plugin often allows specifying the age or modification time of files to be targeted. This lets users selectively remove files older than a certain date or last modified beyond a specified period. This helps manage older data efficiently. For instance, a setting might delete images older than six months or log files modified more than a week ago.
File Size and Type Filters
The tool often provides filters to target files based on size. For example, files smaller than 1KB or larger than 100MB might be excluded or included for cleanup. Furthermore, specific file types can be targeted. A configuration option might allow filtering by file extension (.tmp, .log, .bak) for specific cleanup.
Advanced Configuration Options
These options often include parameters for handling specific file types or directories. For instance, there may be options to exclude certain directories from the cleanup process, to skip files modified within a recent period, or to handle problematic file types.
Example Configuration Options Table
| Option Name | Description | Default Value | Allowed Values |
|---|---|---|---|
| File Type | Specifies the file type(s) to target. | All files | .log, .tmp, .txt, .bak |
| File Age | Specifies the age of files to delete. | 30 days | 1 day, 7 days, 30 days, 90 days, Custom |
| File Size | Specifies the size of files to target. | No size limit | < 1KB, 1KB-10KB, 10KB-100KB, >100MB, Custom |
| Cleanup Severity | Specifies the level of aggressiveness. | Low | Low, Medium, High |
Common Configuration Errors and Solutions
Incorrect configuration settings can lead to data loss or unexpected behavior. Understanding potential errors is crucial.* Accidental Deletion of Important Files: Carefully review the target files and directories. Always test the plugin’s actions in a non-production environment first. Provide a backup before any major cleanup.
Incorrect File Type Filtering
Double-check the file types specified for deletion. Ensure you’ve accurately entered the extensions or patterns. Review and adjust as needed.
Overly Aggressive Cleanup Settings
Start with low severity settings and gradually increase them if needed. This provides a safety net to avoid unwanted data loss.
Missing Permissions
Verify that the plugin has the necessary permissions to access and modify the targeted files. Adjust permissions as needed.
Image Cleanup Strategies
Image cleanup plugins offer a powerful arsenal for optimizing image storage and performance. These tools go beyond basic file management, diving into the nitty-gritty of image data to achieve significant savings in disk space and loading times. Understanding the various strategies available and their potential impact is crucial for selecting the right plugin for your needs.Image cleanup strategies often involve a combination of techniques, each contributing to overall optimization.
From simple resizing to complex lossless compression, these strategies can dramatically reduce file sizes without sacrificing visual quality. The most effective strategy will depend heavily on the specific needs of your website or application.
Image Resizing
Image resizing is a fundamental aspect of image cleanup. By adjusting dimensions, plugins can significantly reduce file sizes. This is particularly useful for images displayed on different screen sizes or in various contexts. Appropriate resizing strategies ensure images load quickly without compromising visual clarity. For instance, a high-resolution image displayed on a mobile device can be resized to a smaller, optimized format, improving loading speed without noticeable quality loss.
Image Optimization
Image optimization strategies delve deeper than resizing, focusing on the image’s underlying data structure. Techniques like lossless compression and format conversion can significantly reduce file sizes without impacting visual quality. For example, converting images from a large, high-resolution format (like TIFF) to a more optimized format (like JPEG) can yield substantial savings in storage space. JPEGs, while not always the best choice for every image, are highly efficient for photos, and can be optimized further by plugins.
Lossless Compression
Lossless compression techniques are crucial for reducing image file sizes without losing any data. This method is essential for maintaining the integrity of the image, particularly for illustrations, diagrams, and other graphics where every detail is important. Plugins utilizing lossless compression algorithms effectively reduce the file size while retaining the original quality of the image. Examples include techniques that identify and remove redundant data within the image’s file structure.
Format Conversion
Converting images from one format to another can lead to substantial size reductions. Plugins can convert images from formats like PNG to JPEG, or from a less efficient format to a more optimized one. This is a powerful technique for reducing storage requirements and improving website performance. The optimal format will vary depending on the image content; high-quality photographs might be best suited for JPEG, while illustrations and graphics might benefit from PNG.
Comparison of Cleanup Strategies
| Strategy Name | Description | Pros | Cons |
|---|---|---|---|
| Resizing | Adjusting image dimensions | Reduces file size, improves load times | Potential quality loss if not done carefully |
| Optimization | Improving image data structure | Significant file size reduction, maintains quality | May not be suitable for all image types |
| Lossless Compression | Reducing file size without data loss | Maintains image quality, reduces file size | Effectiveness varies depending on image type |
| Format Conversion | Converting image to a different format | Potential for significant file size reduction | Quality may vary depending on format conversion |
Image Optimization Techniques
Image optimization is crucial for website performance and user experience. High-resolution images, while visually appealing, can significantly slow down page load times. Optimized images reduce file sizes without compromising quality, improving page speed and enhancing the overall user experience. This section delves into advanced image optimization techniques that plugins can employ, covering lossless compression, various image formats, and the benefits of using WebP.Image optimization techniques are not just about reducing file size; they are about improving the user experience by making websites load faster.
This translates to lower bounce rates, higher engagement, and improved search engine rankings. A well-optimized image strategy is essential for any website aiming to succeed in today’s fast-paced digital environment.
Installing plugin cleanup images is a straightforward process, but sometimes a custom 404 page WordPress, like the one detailed here , can lead to unexpected image issues. Understanding how to properly manage these images within your custom theme is crucial for a smooth user experience. So, while you’re focusing on your 404 page, remember to double-check your image cleanup plugin setup for optimal performance.
Advanced Image Optimization Techniques
Modern image optimization goes beyond simple resizing. Plugins can employ sophisticated techniques to significantly reduce file sizes while maintaining visual quality. These techniques include lossless compression, format selection, and automated optimization during the cleanup process.
Lossless Compression Methods
Lossless compression algorithms reduce file size without discarding any image data. This means the original image quality is preserved. Common lossless compression methods include JPEG XR and PNG optimization. These methods are highly effective in reducing file sizes, especially for images with significant detail or sharp edges.

Lossless compression techniques, unlike lossy compression, retain all the original image data, preserving image quality. This is a critical factor for maintaining the fidelity of images during the optimization process.
Image Formats and File Size Impact
The choice of image format significantly impacts file size. Different formats are suited for different types of images. For example, PNG is often best for images with sharp lines and transparency, while JPEG is more suitable for photographs. WebP, a modern format, is increasingly favored for its excellent compression capabilities. Plugins can analyze image types and automatically select the most appropriate format for optimal file size reduction.
- PNG (Portable Network Graphics): Preserves all image data, including transparency. Ideal for graphics and logos. However, it can result in larger file sizes compared to JPEG.
- JPEG (Joint Photographic Experts Group): A widely used format for photographs. It achieves good compression, but some image quality might be lost during compression.
- WebP: A modern format developed by Google. It offers superior compression compared to both JPEG and PNG, resulting in smaller file sizes while maintaining high image quality.
Benefits of Using WebP Format
WebP is a superior format due to its ability to compress images with minimal quality loss. This translates to smaller file sizes, which, in turn, leads to faster page load times. Plugins can identify images suitable for WebP conversion and automatically convert them, resulting in noticeable performance gains. Many modern browsers fully support WebP, making it a highly recommended format for image optimization.
First, installing plugin cleanup images is pretty straightforward. You just need to download the right plugin for your specific platform. Knowing how to track your image visibility across various AI platforms, like how to track visibility across ai platforms , is also crucial. Then, you can easily optimize the images you upload to improve your website’s performance and SEO.
Once you’ve tracked your image visibility, you can effectively install the right plugin to clean up any unnecessary or outdated images.
Automatic Image Optimization During Cleanup
Plugins can automate the optimization process during image cleanup. This involves identifying images that can be optimized and applying appropriate techniques, such as lossless compression or format conversion. Plugins can integrate with image optimization tools to perform these tasks automatically, saving significant time and effort.
Common Image Optimization Tools and Plugin Integration
Various image optimization tools exist, including TinyPNG, ShortPixel, and ImageOptim. These tools can be integrated with plugin cleanup image tools, allowing for automated image optimization during the cleanup process. This integration provides a comprehensive approach to image optimization, enhancing website performance and user experience.
- TinyPNG: A popular online tool for compressing PNG and JPEG images. It offers free and paid options.
- ShortPixel: A cloud-based image optimization service that offers bulk image optimization and resizing.
- ImageOptim: A command-line tool for optimizing image files. It is often used by developers to perform image optimization on large sets of images.
Troubleshooting Common Issues

Image optimization plugins, while powerful, can sometimes encounter hiccups during installation, configuration, or cleanup processes. Understanding potential problems and their solutions is crucial for a smooth user experience. This section details common issues and provides practical steps to resolve them.
Installation Problems
Plugin installation failures can stem from various factors, including incompatible WordPress versions, insufficient server resources, or incorrect file uploads. Thorough checks before installation are essential. Verify your WordPress version compatibility with the plugin’s requirements. Ensure your server has adequate memory and processing power to handle the plugin’s operations. Double-check the file upload permissions and ensure the plugin files are saved correctly.
Configuration Issues
Incorrect plugin configurations can lead to unexpected behavior or failure of the image cleanup process. Carefully review the plugin settings. Misconfigured directories or file paths can cause the plugin to miss images or produce errors. Verify that the plugin’s settings match your website’s file structure and image storage conventions.
Image Cleanup Process Errors
Image cleanup issues can result from various factors, including incorrect image selection criteria, insufficient disk space, or problems with the image file itself. Carefully review the plugin’s image selection criteria to ensure it aligns with your needs. Ensure there’s sufficient disk space to handle the cleanup process. Check for corrupt or damaged image files that might prevent the plugin from processing them correctly.
Plugin-Website Conflicts
Conflicts with other plugins or themes are another potential source of problems. Ensure compatibility between the image optimization plugin and other installed plugins or themes. Incompatible plugins or themes might disrupt the plugin’s operations. Check for any conflicting plugin settings that might be causing errors. Review the plugin’s documentation for known conflicts with other plugins.
Solutions to Common Problems
- Incompatible WordPress Version: Update your WordPress installation to the latest version supported by the plugin or choose a compatible plugin version.
- Insufficient Server Resources: Contact your hosting provider to upgrade your server resources or explore optimizing your website’s code to reduce server load.
- Incorrect File Permissions: Verify and adjust file permissions to allow the plugin to access and modify necessary files. Ensure the correct directory and file permissions are set for the plugin to function properly.
- Corrupted Image Files: Remove or replace the corrupted images. Use alternative image optimization tools if the problem persists. The plugin might not be able to process corrupt images and may lead to errors during the cleanup process.
- Plugin Conflicts: Deactivate other plugins one by one to isolate the conflict. Check plugin compatibility documentation for potential conflicts.
- Configuration Errors: Double-check all plugin settings, especially those related to file paths and image selection criteria. Refer to the plugin’s documentation for correct configuration settings. If the issue persists, contact the plugin developer for assistance.
- Insufficient Disk Space: Free up disk space on your server to allow the plugin to perform its tasks without limitations. Consider moving large images or files to a different storage location or archiving them.
Plugin Security Considerations
Image cleanup plugins, while beneficial for website performance, can introduce security vulnerabilities if not carefully chosen and implemented. A poorly designed plugin could potentially expose your site to malicious attacks or data breaches. Thorough security evaluation before installation is crucial to safeguarding your website’s integrity and user data.Understanding potential risks and employing best practices for securing plugin cleanup tools is essential for maintaining a secure online presence.
A robust security posture protects against various threats, from simple data leaks to sophisticated exploits. Prioritizing security is paramount in today’s digital landscape, where websites are increasingly targeted by malicious actors.
Importance of Security Evaluation
Properly vetting plugins before installation is critical to prevent unforeseen security issues. Thorough investigation can reveal vulnerabilities, potential misuse scenarios, and compatibility problems with your existing website setup. A plugin that seems innocuous on the surface could have hidden functionalities that pose risks.
Potential Security Risks
Poorly designed or maintained plugins can expose your website to several security risks. These include, but are not limited to, unauthorized access to sensitive data, data breaches, and website defacement. Malicious actors could exploit vulnerabilities to gain control over your website or steal user information. For example, a plugin with insufficient input validation could allow attackers to inject malicious code, leading to data compromise.
Evaluating Plugin Security Before Installation
Thorough investigation of a plugin’s security posture is essential before installation. Check the plugin’s documentation for details on security measures, code review reports, and community feedback. Look for a history of updates and bug fixes, which often indicate a developer’s commitment to security. Consider the developer’s reputation and experience in creating secure software. A plugin with limited documentation and a lack of community involvement raises red flags.
Choosing Reputable Plugin Developers
A strong developer reputation often translates to secure plugin development practices. Look for plugins from developers with a proven track record of producing reliable and secure software. Positive reviews, active community support, and a consistent update schedule are good indicators of a responsible developer. Check for any previous security vulnerabilities reported by the community or other users.
Best Practices for Securing Plugin Cleanup Tools
Maintaining the security of image cleanup tools involves multiple layers of protection. Regularly updating plugins to the latest versions is crucial as security patches often address vulnerabilities. Implement strong access controls to limit access to sensitive website resources. Use secure coding practices to develop and maintain your plugins. Using a strong firewall and intrusion detection system is vital.
Security Considerations Table
| Potential Threat | Description | Mitigation Strategy |
|---|---|---|
| Unvalidated Input | Attackers can inject malicious code into user input fields, leading to command execution or data breaches. | Thoroughly validate all user inputs and sanitize them before processing. |
| Insufficient Access Control | Unrestricted access to plugin functions can allow attackers to perform unauthorized actions. | Implement role-based access control to restrict access to plugin functionalities. |
| Outdated Dependencies | Plugins relying on outdated libraries or frameworks might contain known vulnerabilities. | Regularly update plugins and their dependencies to the latest versions. |
| Cross-Site Scripting (XSS) | Attackers can inject malicious scripts into the website, potentially stealing user data or hijacking sessions. | Use input sanitization techniques to prevent XSS vulnerabilities. |
Final Conclusion
In conclusion, mastering how to install plugin cleanup images is a valuable skill for any website owner. This comprehensive guide has equipped you with the knowledge and tools to optimize your website’s image management. Remember to choose the right plugin, configure it carefully, and implement appropriate cleanup strategies to maximize efficiency and user experience. We’ve covered everything from installation to advanced optimization techniques, ensuring your website remains lean and responsive.