
How to use icon fonts in WordPress post editor unlocks a world of design possibilities, adding visual flair and enhancing user experience. These lightweight, scalable icons replace traditional images, boosting website performance. Learn how to seamlessly integrate icon fonts into your WordPress posts, transforming your site from basic to breathtaking.
This guide will walk you through the process of choosing, installing, and integrating icon fonts, from basic setup to advanced customization. We’ll explore various libraries, comparing their features and ease of use. Expect detailed instructions and actionable steps, ensuring you master the art of using icon fonts in your WordPress posts.
Introduction to Icon Fonts in WordPress
Icon fonts are a modern approach to incorporating symbols and graphics into web design. Instead of using individual image files for icons, icon fonts use a special font file that contains various glyphs (symbols). This method significantly improves website performance and scalability compared to image-based icons.Icon fonts are essentially a collection of vector-based icons embedded within a font file.
This allows for seamless scaling of icons across different screen sizes and resolutions without loss of quality. This contrasts sharply with image-based icons, which can become pixelated or blurry when resized, leading to a poor user experience. Furthermore, icon fonts are loaded with the rest of the text on a page, improving page load speed.
Icon Fonts vs. Image-Based Icons
Icon fonts excel in performance and scalability. Image-based icons, while easily recognizable, are significantly less efficient. They require separate downloads for each icon, increasing page load time and resource consumption. Icon fonts, on the other hand, are loaded as part of the page’s font resources, minimizing load time. The vector nature of icon fonts enables effortless scaling without sacrificing quality.
This adaptability is crucial for responsive web design.
Advantages of Using Icon Fonts in WordPress Posts
Using icon fonts in WordPress posts offers several advantages:
- Improved Page Load Times: Icon fonts are loaded with the page’s fonts, which significantly improves page load times compared to loading individual image files. This is crucial for providing a smooth user experience, especially on slower internet connections.
- Enhanced Scalability: Icon fonts adapt seamlessly to different screen sizes and resolutions without loss of quality. This responsiveness is essential for a modern website design that adapts to various devices.
- Consistent Visual Style: Using a single icon font across a website ensures a unified and consistent visual style, enhancing brand identity and user experience.
- Reduced File Size: Compared to image-based icons, icon font files are generally smaller, which contributes to faster loading times and better website performance.
Structure of an Icon Font
Icon fonts are structured similarly to regular fonts, but instead of letters and numbers, they contain glyphs (symbols). This allows for the consistent display of icons.
| Element | Description |
|---|---|
| Glyph | Individual icon within the font file. |
| Font File | The file containing all the glyphs. |
| Font Name | The name of the font, often a unique identifier. |
| CSS Class | A unique identifier used in CSS to style and position the icon within a document. |
Popular Icon Font Libraries
Choosing the right icon font library for your WordPress website is crucial for enhancing visual appeal and consistency. A well-selected library streamlines your design process, saves time, and ensures a professional look. Selecting a library requires careful consideration of features, licensing, and potential integration challenges.A plethora of icon font libraries are available, each offering a unique range of icons and functionalities.
Understanding the strengths and weaknesses of different libraries helps you make an informed decision that aligns with your specific needs and project requirements. A comprehensive comparison will guide you through the selection process, enabling you to choose a library that seamlessly integrates into your WordPress site.
Popular Icon Font Libraries
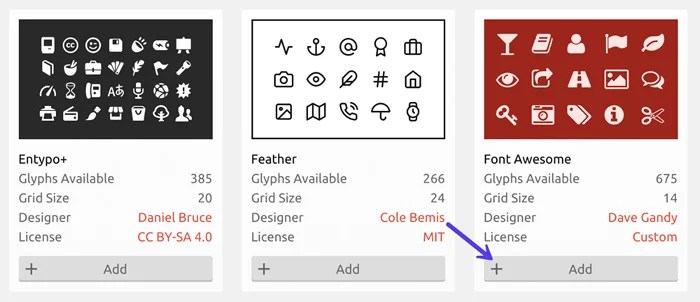
Several well-regarded icon font libraries are readily available for use in WordPress. Their varying features, functionalities, and licensing terms offer diverse options for website designers.
- Font Awesome:
- Ionicons:
- Material Design Icons:
- Line Icons:
- Mizo Icons:
Comparison of Icon Font Libraries
A comparison table outlining the features, functionalities, and pricing of these libraries will help website owners make an informed decision.
| Library | Features | Pricing | Licensing |
|---|---|---|---|
| Font Awesome | Vast collection of icons, responsive design, wide range of styles (solid, regular, brands), extensive documentation and community support | Free (with some premium features) | MIT License |
| Ionicons | Extensive icon set, diverse styles, focus on mobile-first design, vector-based icons, good for responsive websites | Free (with some premium features) | MIT License |
| Material Design Icons | Consistent design language with Google’s Material Design, versatile for various apps and interfaces, clear style guidelines | Free | Apache 2.0 License |
| Line Icons | Clean and simple line icons, perfect for minimal design, lightweight, versatile for various applications | Free | MIT License |
| Mizo Icons | Modern and stylish icons, adaptable to different design styles, diverse range of options for different uses | Free | MIT License |
Font Awesome Installation and Setup
Font Awesome is a widely popular and reliable choice for icon fonts in WordPress. Its installation and setup are straightforward.
- Download the Font Awesome zip file from the official website.
- Extract the contents of the downloaded file to your WordPress theme folder or a dedicated plugin folder.
- Locate the `style.css` file within your theme’s directory.
- Add the following line to include the Font Awesome CSS file in your `style.css` file:
<link rel="stylesheet" href="path/to/fontawesome.min.css"> - Use the Font Awesome class names in your WordPress theme’s HTML to display the desired icons.
Licensing Considerations
Understanding the licensing terms is essential before incorporating any icon font library into your project. The license dictates how you can use the icons and what restrictions, if any, are in place.
“Different icon font libraries have various licensing terms. Some are free for personal use, while others might have limitations or require attribution.”
The usage restrictions of each library vary. It’s crucial to review the license agreements before making a decision to ensure compliance.
Want to spice up your WordPress posts with some stylish icons? Learning how to use icon fonts in the post editor is surprisingly straightforward. You’ll find a wealth of options available, and it’s a great way to add visual appeal. Plus, knowing how to integrate these visual elements seamlessly can really improve user experience, especially when combined with strategies like those explored in articles about Salesforce deals boosting the sales process, salesforce deals boost sales process.
So, get those icons ready to elevate your next WordPress post!
Embedding Icon Fonts in WordPress Posts
Integrating icon fonts into your WordPress posts enhances visual appeal and streamlines content presentation. This process allows for a consistent and visually engaging experience across your website, making it easier for users to quickly identify and understand the content. By embedding these icons, you can add emphasis, improve readability, and provide a more professional look to your blog posts.
Adding those cool icon fonts to your WordPress posts is surprisingly straightforward. Just download the font, upload it to your theme, and then use shortcodes or custom CSS to insert them. However, it’s worth considering the bigger picture of how the algorithms used to build these fonts are trained, which often involves massive datasets. Thinking about the potential for algorithmic bias, as discussed in the article algorithmic bias whos training the machines , can make you a more conscious user of these tools.
Ultimately, mastering icon fonts in WordPress is about both technical proficiency and thoughtful consideration of the underlying processes.
Now, let’s delve into the practical steps involved in embedding icon fonts within your WordPress posts. We’ll focus on a popular library, Font Awesome, and demonstrate how to select, utilize, and integrate these icons seamlessly into your WordPress theme.
Selecting and Using Specific Icons
Font Awesome provides a vast library of icons, meticulously categorized for ease of use. You can browse the icons by category, searching for the specific icon you need. Once found, use the appropriate class name for that icon. This class name, usually in the format of `fa-icon-name`, will be used within the HTML structure to display the icon.
Integrating Icon Font CSS into Your WordPress Theme
A crucial step is integrating the icon font CSS file into your WordPress theme. This ensures the icons are available for use throughout your posts. There are several approaches to achieve this. One approach is to directly include the CSS file in your theme’s style.css file. Alternatively, you can use a child theme, allowing for easy updates and preventing conflicts with future theme updates.
A third option involves using a plugin that manages icon font integration.
Linking the Icon Font CSS File to Your Theme
Once you’ve selected the necessary icon font library (e.g., Font Awesome), you need to link the corresponding CSS file to your theme. This is typically done within the theme’s style.css file. If using a plugin, the plugin will usually handle the linking process. Ensure the link is properly placed in the style.css file or the plugin’s designated location.
Incorrect placement can lead to the icons not displaying correctly.
Example: Using Font Awesome Icons in a WordPress Post
To illustrate, consider using a Font Awesome icon in a WordPress post. Let’s say you want to display a “calendar” icon. The HTML for this would look like this:
This is a post about upcoming events.
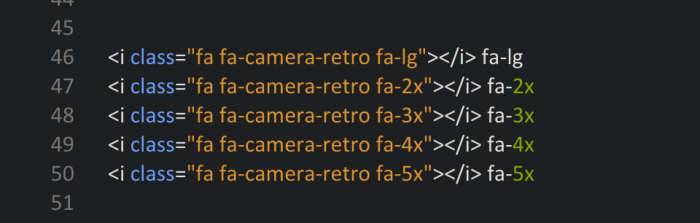
This HTML utilizes the Font Awesome class `fas fa-calendar`. The ` ` tag is used to embed the icon. The specific class names, such as `fas` for Solid, `far` for Regular, or `fab` for brands, determine the appearance of the icon. By adjusting the class name, you can use various styles and variations from the Font Awesome library.
Example of Font Awesome integration
| Icon | HTML Code |
|---|---|
| Solid Calendar | <i class="fas fa-calendar"></i> |
| Regular User | <i class="far fa-user"></i> |
| Brand Twitter | <i class="fab fa-twitter"></i> |
Using the proper Font Awesome classes ensures that the desired icon displays correctly in your WordPress post.
Styling and Customizing Icons
Once you’ve successfully embedded your chosen icon font into your WordPress posts, the real fun begins – customizing those icons to match your website’s aesthetic. This section dives into the world of icon styling, enabling you to tweak colors, sizes, and other visual attributes to create a cohesive and visually appealing design. You’ll learn how to add custom classes and IDs for even greater control over your iconography.Understanding how to style icon fonts allows for a high degree of visual flexibility.
This flexibility lets you tailor the icons to match your brand identity and enhance the overall user experience of your website. It’s a powerful technique for making your content more engaging and visually appealing.
Modifying Icon Color
Modifying the color of your icons is a fundamental aspect of styling. This involves changing the visual representation of the icon, aligning it with the overall color scheme of your website. Changing the color can significantly impact the overall look and feel of your content.To change the color of an icon, you use CSS. The `color` property, applied to the ` ` element that contains the icon, is the most straightforward method. For instance, to make a specific icon blue, you’d use a CSS rule like this:“`CSS.my-blue-icon i color: blue;“`This rule targets all `` elements within the `.my-blue-icon` class, ensuring the desired color change.
Adjusting Icon Size
Controlling the size of icons is essential for maintaining visual consistency. The size of an icon can affect the readability and overall aesthetic of the page. Different sizes create various visual impacts. Smaller icons might be more subtle, while larger icons draw more attention.You can adjust the size of icons using the `font-size` property in CSS. This allows you to precisely control the dimensions of the icon, ensuring they fit within the layout and match your design guidelines.
For example, to make a specific icon larger, use a rule like:“`CSS.my-large-icon i font-size: 2em;“`This code snippet increases the font size of all ` ` elements within the `.my-large-icon` class, effectively scaling the icon to twice its original size.
Other Visual Attributes
Beyond color and size, you can manipulate various other visual attributes of your icons. These attributes include font weight, opacity, and potentially even applying drop shadows or gradients. Adjusting these aspects creates a more comprehensive range of visual effects.You can modify the font weight using the `font-weight` property. For example, to make an icon bold, use:“`CSS.my-bold-icon i font-weight: bold;“`Adjusting the opacity using the `opacity` property allows you to create subtle effects.
Example:“`CSS.my-transparent-icon i opacity: 0.5;“`This creates a semi-transparent icon, reducing its visibility. These methods, coupled with CSS transforms, offer a comprehensive toolkit for manipulating icon appearance.
Custom Classes and IDs
Custom classes and IDs are powerful tools for targeting specific icons and applying tailored styling. Using specific identifiers for your icons allows you to target them individually for specific adjustments. This precision allows for a greater degree of control over your iconography.For instance, if you have a set of icons representing different actions, you can assign a unique class to each.
This allows you to style each action icon differently, such as `icon-edit`, `icon-delete`, or `icon-save`.
Icon Styling Options
| Styling Option | CSS Property | Example | Description |
|---|---|---|---|
| Color | color |
.my-icon i color: red; |
Changes the color of the icon. |
| Size | font-size |
.my-icon i font-size: 1.5em; |
Adjusts the size of the icon. |
| Font Weight | font-weight |
.my-icon i font-weight: bold; |
Sets the boldness of the icon. |
| Opacity | opacity |
.my-icon i opacity: 0.7; |
Controls the transparency of the icon. |
Troubleshooting Common Issues
Using icon fonts in WordPress can sometimes lead to unexpected results. This section will delve into common problems users encounter and provide actionable solutions to get your icons displaying perfectly. Knowing how to troubleshoot these issues saves valuable time and ensures a smooth user experience.Troubleshooting icon font problems involves understanding the potential points of failure, from the font itself to the way your theme or plugins interact with it.
By systematically examining these areas, you can isolate the source of the problem and implement a targeted solution.
Identifying Icon Font Display Problems
A critical first step in troubleshooting is accurately identifying the issue. Is the icon missing entirely? Is it displaying incorrectly, with the wrong size, or in the wrong place? Detailed observation is key to pinpointing the source of the problem. This involves carefully examining the affected posts or pages, looking for visual discrepancies and checking for any associated error messages.
Learning how to use icon fonts in WordPress post editors is a great way to enhance your website’s visual appeal and improve user experience. By strategically incorporating icons, you’re essentially creating effective visual cues for web navigation, like using a clear call to action or highlighting important sections. This directly relates to the principles of creating effective visual cues for web navigation , and choosing the right icons can significantly boost your website’s usability.
Ultimately, mastering icon fonts in your WordPress editor will lead to a more engaging and user-friendly site design.
By systematically analyzing the issue, you can narrow down the potential causes and proceed with the appropriate troubleshooting steps.
Resolving Conflicts with Existing Styles, How to use icon fonts in wordpress post editor
Icon font issues can arise from conflicts with existing stylesheets. WordPress themes and plugins often have their own CSS rules that might interfere with the icon font’s styling. Inspecting the theme’s CSS and identifying any conflicting rules is vital. Using a CSS inspector tool within your browser, you can analyze how the theme and your icon font styles interact and pinpoint any conflicts.

This often involves carefully examining the CSS rules related to the icon class or selector you are using, and potentially adjusting your icon font’s CSS rules to override or complement these conflicts.
Troubleshooting Missing or Incorrect Icons
If icons aren’t showing up at all or are appearing incorrectly, several factors might be at play. Double-check that the icon font file is correctly linked in your WordPress theme’s CSS. Verify that the icon classes are being used correctly within the HTML structure. For instance, ensure the icon class is correctly applied to the element where you intend to display the icon.
If you are using a plugin, ensure that the plugin is compatible with the icon font you’re using and that the plugin’s CSS isn’t interfering with the icon’s display. Checking the browser’s cache and clearing it can also resolve issues.
Table of Common Problems and Solutions
| Problem | Possible Solution |
|---|---|
| Icons not displaying at all | Verify correct linking of the icon font file in your theme’s CSS. Check for typos and ensure the file path is accurate. Ensure the icon class is correctly applied to the HTML element. |
| Icons displaying incorrectly (wrong size, color, position) | Inspect your theme’s CSS for conflicting styles. Check if the icon font’s CSS overrides are correctly applied. Ensure the icon class is used correctly. Test in different browsers to rule out browser-specific issues. |
| Icons not aligning properly | Review your HTML structure to confirm the icon is embedded in the correct element. Check your theme’s CSS for any alignment-related conflicts. Adjust your icon font’s CSS rules for specific alignment needs. |
| Icons are not responsive | Ensure that the icon font is responsive by using media queries in your CSS. If using a plugin, check for plugin settings related to responsiveness. |
Best Practices and Tips
Using icon fonts in WordPress can significantly enhance the visual appeal and usability of your website. However, a thoughtful approach is crucial for achieving optimal results. This section Artikels best practices, performance strategies, accessibility considerations, and tips for selecting and integrating icons seamlessly into your design.
Performance Optimization
Optimizing your website’s performance is paramount, especially when dealing with additional assets like icon fonts. Large, unoptimized files can slow down page load times, impacting user experience. By following these strategies, you can ensure your website runs smoothly.
- Choose the Right Font Library: Select a library that offers the icons you need without unnecessary extras. Downloading only the required characters reduces file size.
- Combine Icon Fonts with Other Assets: Leverage techniques like CSS sprites to combine multiple icon font files into a single image. This reduces HTTP requests and improves loading speed.
- Minify and Compress: Use CSS and JavaScript minification tools to reduce the size of your stylesheets and scripts. Compression algorithms further reduce file size and improve loading speeds.
- Use a Content Delivery Network (CDN): Hosting your icon fonts on a CDN can significantly reduce latency for users worldwide, as files are served from servers closer to them.
Accessibility Considerations
Accessible design is critical for inclusivity. Icon fonts, when used properly, can enhance usability for all users, including those with visual impairments. These considerations ensure everyone can navigate and understand your website.
- Provide Alternative Text (Alt Text): For screen reader users, add descriptive alt text to icon elements. This text should accurately reflect the icon’s purpose.
- Use Icons in Conjunction with Text: Avoid relying solely on icons to convey critical information. Always include clear text labels to ensure accessibility for all users.
- Ensure Sufficient Contrast: Icons should have sufficient contrast against the background to be easily discernible. This is particularly important for users with visual impairments.
- Avoid Overuse of Icons: Using too many icons can overwhelm the user interface and create confusion. Balance the use of icons with clear text labels.
Choosing Appropriate Icons
The right icons can significantly improve your website’s visual hierarchy and user experience. Carefully consider the context and overall design when selecting icons.
- Consider Your Target Audience: The icons you choose should resonate with your target audience and reflect their expectations.
- Maintain Consistency: Maintain a consistent style throughout your website. Use the same icons for similar actions or functions.
- Prioritize Clarity: Select icons that are easily understood without needing lengthy explanations. Ambiguous icons can confuse users.
- Consider the Design Aesthetic: Choose icons that complement the overall design aesthetic of your website. Icons that match your brand identity and style guidelines will strengthen the user experience.
Incorporating Icons Seamlessly
Seamless integration is crucial for a polished user experience. Consider these tips for a visually appealing and user-friendly website.
- Use a Consistent Icon Style Guide: Develop a style guide that Artikels the use of icons, including their size, color, and spacing.
- Test on Various Devices: Ensure your icons display correctly on different devices and screen sizes.
- Maintain Visual Hierarchy: Use icons strategically to guide users through the site and highlight important elements.
- Use Icon Sets Carefully: Carefully choose icon sets that meet your website’s needs and aesthetic requirements.
Advanced Icon Font Integration Techniques: How To Use Icon Fonts In WordPress Post Editor
Mastering icon fonts in WordPress goes beyond simply embedding them. Advanced techniques unlock greater flexibility and customization, allowing you to seamlessly integrate icons into intricate designs, dynamic plugins, and unique page layouts. This section dives into sophisticated methods for integrating icon fonts, focusing on practical examples and actionable steps.Leveraging icon fonts in WordPress plugins or custom themes provides a significant advantage.
These techniques extend beyond the standard usage, offering refined control over visual elements and enhancing the user experience. Integrating icons into interactive elements, custom post types, and widgets empowers you to create more engaging and personalized WordPress sites.
Integrating Icon Fonts with WordPress Plugins
Many popular WordPress plugins offer customization options that support icon fonts. Often, these plugins have dedicated fields or settings where you can insert icon font classes. This allows you to visually represent functionality, actions, or categories with specific icons. For example, a plugin for managing blog posts might use icons to represent different post types (e.g., a photo icon for photo posts, a video icon for video posts).
Carefully review the plugin’s documentation for instructions on how to incorporate icon fonts effectively.
Integrating Icon Fonts with Custom Themes
Within custom themes, you can integrate icon fonts using CSS rules tailored to your specific design. You can target particular elements like buttons, navigation links, or other elements, applying the relevant icon classes to modify their appearance. This method gives you complete control over the design. For instance, you can style the theme’s header navigation with icon fonts, replacing traditional text-based links with visually engaging icons.
This customization extends to the styling of specific post types, categories, or widgets, enabling unique visual representations.
Using Icon Fonts for Interactive Elements
Icon fonts can elevate interactive elements beyond simple visuals. Icons can be employed within clickable elements like buttons, or to represent actions such as “like,” “comment,” or “share.” By associating icon font classes with JavaScript events, you can trigger dynamic actions when the icons are interacted with. Consider adding hover effects, animations, or color changes to further enhance user engagement.
This approach allows for a more intuitive and visually appealing user experience, making the site interactive and more user-friendly.
Integrating Icon Fonts with WordPress Widgets
Certain WordPress widgets can be enhanced by incorporating icon fonts. For example, a custom widget for displaying recent posts might use icon fonts to visually represent the post type or category. This method improves the widget’s visual appeal and provides clear visual cues to the user. Using icons alongside widget text enhances readability and comprehension.
Using Icon Fonts in Custom Post Types or Page Templates
Icon fonts can dramatically improve the visual appeal of custom post types or page templates. For instance, you can display different types of files (images, videos, documents) using relevant icon fonts. This improves the overall layout and clarity of the content. Icons can be used in combination with the content for enhanced visual appeal, making it more intuitive for users to understand the content layout.
Example: A Custom Post Type with Icon Fonts
Imagine a custom post type for “Projects.” This post type could include fields for project name, description, and category. To visually distinguish project types (e.g., design, development, marketing), you could use icon fonts. For instance, a design project could have a graphic design icon displayed next to the project name. This visual cue immediately communicates the project type to the user.
The CSS would link the specific icon font class to the corresponding project category. This visual approach adds a layer of clarity and enhances the user experience.
Final Summary
Incorporating icon fonts into your WordPress posts can significantly elevate your website’s design. By understanding how to select, embed, and customize these versatile elements, you’ll be able to create visually appealing and highly functional content. This comprehensive guide equips you with the knowledge to effectively leverage icon fonts, transforming your WordPress posts into engaging and visually rich experiences.